
I remember the first time I tried designing my outdoor kitchen. Excited, I spread out my plan, only to realize I had no clear idea of how much space I needed around my appliances and prep area. Suddenly, a chair or a table leg would obstruct my workflow, or worse, I or a guest would accidentally bump into something. That lightbulb moment made me rethink everything—especially about how close is too close and how far is too far. It’s this precise dilemma that led me to discover the magic of the 3-foot rule in outdoor kitchen planning.
Why Proper Spacing in Your Outdoor Kitchen Matters More Than You Think
Imagine cooking dinner, only to find your movement restricted or accidentally knocking over a glass because the layout was just a few inches off. When I ignored the fundamental rule of spacing—keeping a clear 3 feet around key areas—I faced cramped countertops, foot traffic jams, and a constant feeling of chaos. Over time, I realized that this simple guideline isn’t just about comfort; it’s about safety, efficiency, and enjoyment. According to industry experts, proper spacing reduces accidents and enhances the overall experience of outdoor cooking. Studies have even shown that well-planned outdoor spaces increase property value and usability, making them a worthwhile investment for any homeowner.
Are you tired of feeling cramped in your own backyard? Or perhaps wondering if your current layout is hampering your outdoor adventures? Let’s dive into how applying the 3-foot rule can transform your space from frustrating to fabulous.
Is the 3-Foot Rule Actually Worth the Hype?
Early on, I made the mistake of thinking that more space was always better. In reality, I overlooked the importance of balanced layout—too much room can feel empty and inefficient. The key is finding that sweet spot where your outdoor kitchen is functional, cozy, and stylish. Understanding and implementing this rule has made a huge difference in how I use my space every day.
Now, I’ll guide you through the practical steps to make your outdoor kitchen work seamlessly with the 3-foot rule, ensuring your outdoor living area becomes the envy of the neighborhood.
Establish Clear Zones and Spacing
Begin by defining your main areas: cooking, prep, serving, and lounging. Use a measuring tape to mark a 3-foot radius around each zone, ensuring ample space for movement without feeling cramped. I once used painter’s tape to visualize these zones in my backyard, which helped me reposition appliances for optimal flow, preventing the kitchen from feeling cluttered.
Position Appliances for Efficiency
Place your grill, sink, and refrigerator along a logical workflow—think of it like a kitchen assembly line. Keep these within reach but separated enough to avoid congestion. When I installed my built-in grill, I created a dedicated prep counter nearby, which saved me trips across the space and streamlined dinner prep.
Consider Traffic Flow and Access Points
Ensure pathways between zones are wide enough—at least 3 feet—to accommodate guests and furniture movement. Avoid placing seating directly in high-traffic areas, which can disrupt cooking. I experimented by sketching the layout on graph paper, moving pieces around until I found a natural flow that allowed easy access for everyone during gatherings.
Design with Safety and Comfort in Mind
Maintain safe distances from combustible elements and sturdy walking paths. Use materials like composite decking for durability and low maintenance. A friend of mine transitioned to composite decking and noticed how much easier it was to keep clean, especially around food prep zones. For aesthetic appeal and shade, I added a pergola, which integrated nicely into the layout—learn more about pergola ideas.
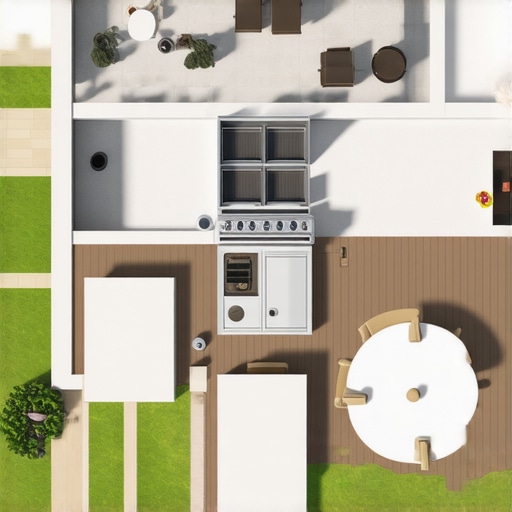
Visualize your layout with an overhead plan, marking zones and pathways clearly, to prevent mistakes and ensure practical spacing.
Incorporate Materials That Grow With Your Needs
Choose durable, weather-resistant materials like composite decking and metal railings to withstand outdoor conditions. When I upgraded my deck, I opted for composite decking, which reduced maintenance and added a sleek look. Proper railing systems also enhance safety and style, especially when designed with your entire layout in mind.
Plan for Future Expansion or Modifications
Leave open spots for adding features like a fire pit or additional seating as your needs evolve. I kept a corner space accessible, which later became my cozy outdoor fireplace area—demonstrating the importance of flexible planning. Reviewing your layout periodically helps you refine the space for maximum enjoyment and functionality.
While many homeowners adopt popular trends and generic advice when designing their decks, railing systems, composite decking, or pergolas, there’s often a gap between surface-level choices and the nuanced understanding that ensures long-term beauty, safety, and functionality. Let’s dig deeper into what most people get wrong and uncover some advanced insights that can elevate your outdoor space from good to exceptional.
One widespread misconception is the belief that all composite decking brands are created equal. In reality, many overlook subtle differences in formulations, which significantly impact durability and resistance to fading or staining. For instance, the composite decking secrets reveal that choosing a brand with proven fade and stain resistance can save you headaches down the line.
When it comes to railing systems, a common mistake is focusing solely on aesthetic appeal without considering the technical aspects like spacing, material strength, and local building codes. Too often, homeowners opt for glass railings because they look sleek, but neglect proper installation, which can lead to wobbly posts or safety violations. Advanced users should pay attention to the premium railing selection tips to ensure a secure and stylish fit.
Regarding pergolas, many enthusiasts believe that the primary concern is the material choice, but the real nuance lies in their integration with overall landscape architecture and shading effectiveness. A common trap is installing a pergola without factoring in sun angles and future growth of surrounding plants, which can render the structure either useless or a maintenance nightmare. For a truly elevated design, explore pergola design inspiration that balances form and function beautifully.
Now, let’s answer a question that even experienced landscapers might overlook:
How can I ensure that my deck and pergola work harmoniously over time, considering temperature changes and material expansion?
The answer lies in understanding material behavior: composites tend to expand and contract with temperature fluctuations, which can cause warping or gaps if not installed with proper allowances. Incorporating precise spacing and flexible fittings, along with choosing materials specified for your climate, is essential. This advanced approach shields you from costly repairs and ensures a seamless aesthetic. As highlighted in experts’ insights, attention to these nuances guarantees longevity.
Ultimately, navigating these hidden nuances and avoiding common traps requires a conscious, informed approach—moving beyond trendy visuals to prioritize structural integrity, materials, and future adaptability. Have you ever fallen into this trap? Let me know in the comments and share your experiences or questions about advanced deck and outdoor feature design.Keeping your outdoor deck, railing systems, composite decking, and pergolas in peak condition requires the right tools and a proactive maintenance plan. One of the most reliable investments I made was acquiring a high-quality cordless power drill equipped with various screwdriver bits, which simplifies fastening or tightening railings and trim components. Its cordless design gives me flexibility on site, enabling quick adjustments without the hassle of cords. Additionally, a digital angle finder helps me ensure perfect alignment of pergola beams, especially when dealing with slope or uneven surfaces, preventing long-term structural issues. For cleaning, I recommend a pressure washer with adjustable nozzles, allowing gentle yet thorough removal of dirt, mold, or debris from composite and wood surfaces—this extends their lifespan significantly. When it comes to software, I’ve found that landscape design tools like SketchUp or Realtime Landscaping are invaluable for visualizing complex layout changes before committing to physical modifications, saving time and avoiding costly errors. Predicting future trends, I believe smart technology integration—such as sensors for humidity or light—will become standard, automating maintenance alerts and optimizing watering or cleaning schedules. To maintain your deck and features over time, consider establishing a regular inspection routine: check for loose fasteners, signs of warping, or deterioration, and address issues promptly. Applying protective coatings annually, especially on wood elements, preserves appearance and prevents decay. For composite decking, cleaning with a specialized composite cleaner and avoiding harsh chemicals maintains its sleek look. I also recommend reviewing your railing systems; upgrading to corrosion-resistant materials like stainless steel hardware can prevent rust and wobbly posts. As for pergolas, ensuring the posts are anchored properly—preferably with concrete footings—prevents sinking or sway, especially in areas with shifting soils. For an advanced tip, use a laser level to verify the alignment of all structural components during installation—this tiny investment in precision will pay dividends in durability and appearance. Considering the growing importance of long-term resilience, I predict that integrating sensors and automated maintenance alerts will soon transform how we care for our outdoor spaces, turning routine upkeep into effortless tasks. I encourage you to try using a laser level for your next pergola or railing project; it dramatically improves accuracy and saves time.
The Hardest Lesson I Learned About deck design, railing systems, composite decking, and pergolas
One of my biggest realizations was that even small details—like the spacing between deck boards or the placement of a pergola post—can make or break the entire project. I once rushed into installing a pergola without considering the sun’s path, which left it shaded during the wrong times of the day. This taught me to think holistically about how every element interacts over time, emphasizing the importance of precise measurements and planning.
My Essential Toolkit for Outdoor Project Success
Beyond the usual power tools, I rely heavily on a laser level for perfect alignment and a digital angle finder to ensure structural integrity, especially when installing complex pergola designs. I trust these tools not just for accuracy but because they save significant time and prevent costly mistakes, as highlighted in railing system tips. Keeping a well-stocked toolkit can elevate your outdoor projects from good to exceptional.
Your Turn to Elevate Your Garden Oasis
Remember, designing a beautiful, functional outdoor space isn’t just about following trends—it’s about applying insights like the 3-foot rule and understanding your unique landscape. Every backyard has potential; the key is embracing detailed planning, choosing quality materials, and investing in expert-guided resources like pergola design inspiration. Start small, think big, and enjoy every step of creating your dream outdoor retreat.