
I was standing on my ladder, sweat stinging my eyes, looking down the line of my brand-new cedar pergola. From the ground, it looked okay, but from up here? It was a total disaster. Every single slat was just a fraction of an inch off, creating a wavy pattern that screamed amateur hour. I had spent three weekends and way too much money researching pergola designs that turn your garden into a sanctuary, only to trip at the finish line because I thought my eyes were more reliable than a simple block of wood. My biggest mistake was trusting a metal tape measure that kept sagging in the middle. I thought I could eyeball the gaps, but by the time I reached the fifth board, the error had compounded into a glaring three-quarter-inch drift. It looked like a drunken carpenter had been in charge. Today, I’m going to show you exactly how to avoid that frustration with a simple trick that ensures every board sits perfectly.
Get Rid of the Wavy Slat Syndrome
Building a beautiful overhead structure is about more than just height and wood quality. While I’ve talked before about the string line move for perfectly plumb pergola posts, the real visual magic happens in the repetitive lines of the roof slats. If those lines aren’t crisp, the whole project feels sloppy. I used to think I needed expensive specialized tools, but then I discovered that the $20 tool that makes deck board spacing perfect can actually be replicated for free using your own scrap pile. We are going to solve the problem of visual drift once and for all. Have you ever stepped back from a long day of building only to realize your spacing was just slightly ‘off’ across the entire span?
Will a Scrap Piece of Wood Really Save Your Sanity?
You might be skeptical that a literal chunk of wood is better than a laser-etched tape measure, but the physical consistency of a fixed spacer is unbeatable. According to the USDA Forest Products Laboratory, wood moisture content can fluctuate significantly with the seasons, causing boards to swell or shrink. If you start with inconsistent spacing, those natural movements will only make the visual gaps look worse over time. By using a dedicated spacer block, you eliminate the human error of reading a tiny line on a metal tape while balancing on a ladder. Whether you are looking for pergola design inspiration from modern to classic looks, the core principle remains the same: consistency is king. In the next few minutes, I’ll walk you through how to create your own custom spacer and the specific way to ‘seat’ it so your slats look like they were installed by a high-end pro.
Stop Guesstimating and Build a Custom Spacer
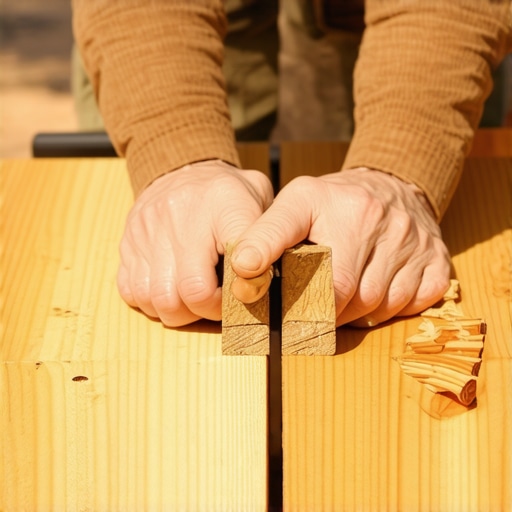
The secret to that high-end, architectural look isn’t a better tape measure; it is the elimination of the tape measure altogether. To start, grab a piece of scrap material—ideally a leftover from your actual rafters or your composite decking secrets pile. Cut this block to the exact width of the gap you want between your slats. If your design calls for a 2-inch gap, cut your block to exactly 2 inches. This block acts as a physical template, a ‘dumb’ tool that cannot misread a line or sag in the heat. It turns a complex layout task into a simple game of ‘fit the block.’ This is the same logic behind the $20 tool that makes deck board spacing perfect, but you are building it for free out of your job site waste.
Smack it Home with a Rubber Mallet
Once you have your spacer, the installation becomes a rhythmic process. You don’t just lean the board against the spacer and drive a screw. Wood has a memory and a temper; it often carries a slight bow or crown. I learned this the hard way while helping a neighbor mix black metal and cedar for a modern industrial look on their backyard retreat. We were just pushing the boards by hand, and by the end of the first ten feet, the slats were leaning like a row of falling dominos. Now, I always use a mallet. There is a specific reason why you should use a rubber mallet for seating composite boards or cedar slats: it provides a blunt force that seats the board firmly against your spacer without marring the wood fibers or cracking the grain. Hold the spacer at one end, smack the board until it’s tight, drive your fastener, and then move to the other side.
The Five Board Rule that Saves Your Project
Even with a perfect spacer, physics can be a cruel mistress. Small variations in the actual thickness of the lumber (which happens more than you’d think) can add up. Every five boards, you need to put the spacer down and grab your tape measure for a ‘sanity check.’ Measure from your starting point to the leading edge of the current board on both ends of the pergola. If one side is 60 inches and the other is 60 and 1/8 inches, you have a drift. This is where you apply a modified version of the string line method for perfectly level deck surfaces to snap a reference line across your rafters. By catching a 1/8-inch error early, you can ‘cheat’ the next few boards by a hair to bring everything back into alignment before the eye can even register the mistake. It’s about managing the cumulative error before it turns into a visual disaster that ruins your hard work.
Most DIYers think that a ‘seamless’ look is the hallmark of a professional job. They want their deck boards or pergola slats so tight that you can’t see the joists underneath. In my experience, that is the fastest way to rot your framing. While you’re aiming for pergola designs that turn your garden into a sanctuary, ignoring the physics of airflow creates a petri dish for mold. I’ve seen beautiful cedar structures fall apart in five years because the owner thought tighter was better. You need to understand the secret to preventing leaf rot between deck boards: if the debris can’t fall through, it sits there, holds moisture, and eats your wood from the inside out.
Why Your Maintenance-Free Composite Deck is Actually Moving
People often choose composite because they want to skip the staining, but they fail to account for thermal expansion. Everyone says composite is stable, but that’s only true for rot, not for size. Why dark composite boards need extra expansion space is a question of thermodynamics. According to the Journal of Materials in Civil Engineering, the thermal expansion coefficient of wood-plastic composites can be significantly higher than natural timber, leading to buckling if you don’t leave room at the ends. If you jam those boards tight against the house in the spring, they’ll pop your fasteners by August. This is a classic ‘oops’ moment I see on almost every DIY inspection.
Should You Ever Bolt Your Pergola to the House Roof?
I get asked this at least once a month by folks looking for innovative deck design ideas that elevate your homes curb appeal. My answer is almost always a hard ‘no.’ While it looks sleek, why you should never bolt a pergola directly to your roof comes down to leak protection and structural leverage. You’re essentially creating a giant sail that, during a high wind, can pry up your shingles and cause thousands in water damage. Instead, stick to a free-standing design or ledger-mounted system. Beyond just the roof, the foundation matters too; why your pergola posts need to be 6×6 minimum for stability is a nuance often skipped by builders trying to save a buck, but a 4×4 will twist and bow under the weight of a wet roof every time. Have you ever fallen into this trap or noticed your boards moving with the seasons? Let me know in the comments below!
Don’t Let Invisible Rot Kill Your Hard Work
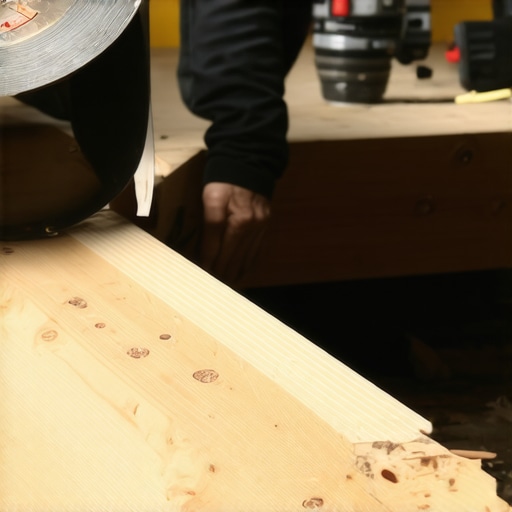
It’s one thing to get those boards laid straight, but it’s another to keep them that way for twenty years. The biggest mistake I see DIYers make isn’t in the design; it’s in the protection of the sub-structure. Even if you use the most expensive composite decking secrets, the pressure-treated lumber underneath is still susceptible to the elements. I never start a project without a few rolls of butyl joist tape. Using the joist tape secret for doubling your decks life is a non-negotiable step in my book. It creates a waterproof seal over the top of the joist where the screw penetrates, preventing the ‘tea-bag’ effect where water wicks down the fastener and rots the wood from the inside out. I personally switched to using a high-torque impact driver specifically for those long timber screws to avoid stripping heads. This simple shift in equipment prevents the ‘cam-out’ that often leaves you with a half-driven bolt that is nearly impossible to remove without damaging your rafters.
The $30 Tool That Solves ‘Mushroom’ Heads
If you’ve ever worked with composite, you know the frustration of ‘mushrooming’—that ugly little ring of plastic that flares up around the screw head. It ruins the look of even the best pergola designs that turn your garden into a sanctuary. You don’t need a miracle to fix this; you just need the specific screw type that prevents composite board mushrooming. These screws have reverse threads at the top to pull that material back down into the hole. I also recommend a ‘smart’ bit that countersinks to a precise depth every time. It’s about repeatability. According to the American Wood Protection Association (AWPA), improper fastener selection in treated lumber can lead to galvanic corrosion, which literally eats the metal away in a few seasons. If you are building in a harsh environment, why wood decks are still better for cold climates often comes down to how natural wood handles these chemical stresses versus a poorly installed composite system that uses the wrong hardware. Choosing why solid-core composite is worth the extra bulk can also prevent moisture from wicking into the ends of the boards.
How do I maintain my outdoor sanctuary over time?
Maintenance isn’t just about a pressure washer once a year. In fact, if you’re working with natural materials, why you should never use bleach to clean a cedar deck is the first lesson you should learn. It breaks down the lignin in the wood fibers, leaving them brittle and gray. Instead, look into how to restore faded wood railings without sanding for hours by using oxygen-based cleaners that lift the dirt without killing the wood. For the structural side, I perform a the structural vulnerability assessment for checking deck joist rot every spring. Check the ledger board, the post-to-beam connections, and any place where leaves accumulate. I am predicting that by 2030, we will see a massive shift toward light-gauge steel framing for decks because why pressure-treated wood still warps under composite decking remains the number one complaint in the industry. Until that becomes the standard, go out and grab a dedicated composite countersink bit before you drive another screw—it is the single best way to upgrade your finish quality instantly.
The Hardest Lesson I Learned About Structural Drift
Building a pergola or a deck is a physical conversation with nature, and nature always wants to move. Looking back at my early projects, the biggest ‘lightbulb moment’ wasn’t about a specific cut, but about respecting the cumulative error. If you are even a fraction of an inch off on your first few slats, that gap grows exponentially over a twenty-foot span. I realized that my eyes were the weakest link in the chain, which is why I now rely on the $20 tool that makes deck board spacing perfect or a custom-cut spacer block every single time.
Another reflection: never underestimate the power of protection. I used to think the wood was tough enough on its own, but learning composite decking secrets taught me that the environment is relentless. Your structure needs to breathe, drain, and be shielded from the inside out to survive more than a decade of seasons. Small mistakes in the beginning, like skipping joist protection, lead to catastrophic failures later that no amount of cosmetic staining can fix.
My Essential Toolkit for Your Outdoor Sanctuary
If you’re serious about taking your backyard to the next level, you need a few specialized items that go beyond the standard hammer and saw. First, grab a high-quality rubber mallet. I have seen many DIY projects ruined by hammer marks, which is why you should use a rubber mallet for seating composite boards and cedar slats—it lets you adjust your boards without leaving a single scar. Second, never skip the joist tape secret for doubling your decks life; it’s the cheapest insurance policy you will ever buy. Finally, invest in the specific screw type that prevents composite board mushrooming to ensure your finish is as smooth as a professional showroom.
#IMAGE_PLACE_HOLDER_E#
Don’t Be Afraid to Start Your Project
It is easy to get paralyzed by the fear of making a mistake, but remember that even the most beautiful pergola designs that turn your garden into a sanctuary started as a pile of lumber and a few rough sketches. Every professional you see today once stood exactly where you are, worried about a wavy line or a sinking post. Take it one board at a time, use your spacers religiously, and trust the process of constant checking. Your future self will thank you every time you step out into that perfect, symmetrical shade. Have you ever struggled with getting your slats or boards perfectly straight? Let me know below!