
Ever spent hours agonizing over deck railing designs only to realize that your picturesque backyard slopes away behind it, making your railing look more wonky than stylish? I remember the first time I built my deck, proud of my DIY skills. But as soon as I installed the railing, I noticed it sagging or tilting on the uneven terrain. Frustration swelled. It felt like my beautiful backyard was betraying my efforts. That lightbulb moment hit me – the hidden issues with sloped terrain and railings are sneaky and often overlooked.
Why Sloped Backyards Demand Smarter Railing Fixes
Adjusting a railing system to match a sloped landscape isn’t just about aesthetics; it’s a matter of safety, durability, and long-term satisfaction. Traditional railings often assume level surfaces, but in backyards where the ground dips or rises, these designs can lead to instability and unsightly gaps. The biggest challenge is finding a way to keep the railing straight, secure, and visually appealing without resorting to costly or unsightly shims and brackets.
Is a Fix That’s Hidden Actually Worth the Hype?
Early in my project, I made the mistake of relying solely on adjustable brackets without considering the terrain slope. That mistake caused wobbling and uneven rail heights over time. What’s reassuring is that with proper understanding and techniques, you can tackle this problem head-on. According to experts, addressing terrain irregularities before installation is crucial for railing longevity and safety. It’s a small step that can save you hundreds of dollars in repairs later.
So, if you’ve ever faced the frustration of uneven railings or felt overwhelmed by the perceived complexity of leveling on a slope, you’re not alone. The good news is, I found practical methods that work—methods I’ll be sharing next. Before diving into the technical how-to, I want to ask: have you encountered this issue in your backyard? If so, keep reading. We’re about to make your sloped terrain work FOR you, not against you, transforming your outdoor space into a safer, more beautiful retreat.
Assess Your Terrain Carefully Before Starting
Picture the area where you plan to install your railing. I once jumped into a project assuming a slight slope wouldn’t matter—only to have my railings look crooked and wobbly. The first concrete step is to measure the slope accurately. Use a level or a digital grader to determine the variations in elevation across your deck perimeter. This helps you decide whether you need adjustable brackets, shims, or a custom framing approach. Think of it like adjusting the strings of a guitar—accurate measurements make all the difference in achieving a perfect pitch.
Design Your Railing Layout to Compensate for Slope
Next, draw a detailed plan showing where the posts and panels will go. Instead of installing all posts at uniform heights, plan for variable heights that match the terrain. Imagine walking on a staircase that follows the natural rise and fall of your ground; your railing should emulate that flow for both safety and aesthetics. Use a string line or laser level stretched along the slope to visualize the ideal top rail line. In my experience, this step prevents surprises during installation and ensures a seamless visual line, especially when using composite decking that maintains color and style over time.
Buiden Your Posts with Pinpoint Precision
When it’s time to install the posts, alignment is key. For uneven ground, I anchor temporary supports or use adjustable post bases to fine-tune height until the top rails are level. Apply post bases that feature drainage holes—these help prevent rot, especially in sloped setups prone to water pooling. The image below illustrates how a post can be anchored on a slope, slightly tilted, but still holding steady through proper base selection.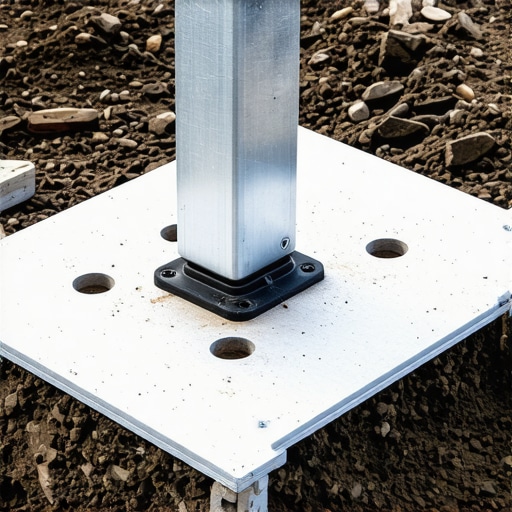
Level the Top Rail Smartly for a Cohesive Look
After the posts are set, position the top rail. Instead of trying to run a straight line across uneven posts, use a chalk line or a laser to mark a consistent height that follows the terrain. Secure the rail at this line to avoid visual dissonance. When I installed my railing, I used a temporary string to make sure the top rail was perfectly straight, even though the posts followed an irregular surface. This approach creates a harmonious appearance that makes your deck look professionally built.
Utilize Custom Fittings to Achieve Precision
If your posts have varied heights, adjustable fittings or custom brackets can bridge the gap efficiently. For example, a flexible bracket allows the top rail to adapt smoothly across multiple heights. Don’t shy away from using spacers or shims where necessary; they’re invaluable for sealing gaps and enhancing stability. Remember, safety comes first—secure fittings prevent wobbling, especially in high-wind areas or with heavy use. For additional ideas on stylish railing options, visit custom railing solutions.
Finish with Practical Touches for Long-Term Durability
Seal all joints with weather-resistant compounds and consider post-sleeves or wraps for extra protection against moisture intrusion. In my last project, I wrapped the base of each post with a protective sleeve, which significantly slowed down rot and deterioration. If you’re using composite decking and railing, ensure the fittings are compatible to avoid discoloration or damage over time. Lastly, consult local building codes and safety standards—particularly regarding railing height and spacing—to avoid costly rework. For comprehensive safety guidelines, check out railing safety standards.
Many homeowners assume that installing a pergola or choosing composite decking is straightforward—simply pick your favorite style and go. But let’s dig deeper into the nuances most people overlook. A common misconception is believing that composite materials require no maintenance. In reality, many brands need regular cleaning and inspections to prevent staining and early wear, contrary to the popular myth that they are completely maintenance-free. According to expert builder insights, neglecting routine upkeep can significantly shorten the lifespan of your deck, making it more prone to warping and discoloration.
Another overlooked aspect is the tendency to focus solely on aesthetics without considering structural integrity. For example, installing a pergola with decorative yet lightweight posts may look stylish but compromise safety over time if not properly supported with diagonal bracing or appropriate load calculations. In fact, many DIY projects fail because homeowners underestimate the importance of load-bearing considerations, especially when adding features like hot tubs or built-in seating. For inspiration on integrating structural safety with beauty, explore innovative deck design ideas.
Let’s talk about deck design myths. Everyone says bigger always means better, but in my experience, overly ambitious layouts can lead to impractical navigation and higher costs. Sometimes, simpler, well-planned designs outperform complex layouts, especially when considering future maintenance and modifications. Advanced homeowners even experiment with multi-level designs that follow the natural terrain, which can be both visually stunning and more resilient if executed correctly.
Now, for the most deceptive myth: that all railing systems are created equal. Many believe that choosing the cheapest railing is a savvy way to save money. However, inferior materials and flimsy fittings can result in safety hazards—wobbly panels, loose posts, or quick deterioration. Properly installed, high-quality railings with the right fittings—like adjustable brackets and weather-resistant fasteners—are critical. For detailed safety standards, check railing safety standards.
Have you ever fallen into this trap of underestimating the nuances? Let me know in the comments. Remember, a well-informed approach helps you avoid costly mistakes and creates a backyard that’s both beautiful and safe. For more advanced tips on deck and pergola projects, consider visiting pergola trends or composite decking innovations to elevate your outdoor space.Maintaining your deck and railing systems over time requires the right tools and a disciplined approach. Personally, I swear by a high-quality cordless impact driver, such as the DeWalt DCF887, which makes installing and tightening fasteners effortless and ensures every connection is secure, especially when working with composite materials that demand precise fastening. For measuring slopes and ensuring level rails, a laser level like the Bosch GLL 55 provides pinpoint accuracy, saving you countless hours of guesswork and rework. Regular inspection is vital; I recommend using a moisture meter like the Protimeter Surveymaster to detect hidden water intrusion or rot in posts or framing, enabling timely repairs before problems escalate.
What I Wish I Knew About Sloped Backyard Challenges
One of the most eye-opening lessons I learned was how terrain irregularities can subtly sabotage even the most well-planned deck projects. Initially, I underestimated the impact of slope, assuming standard measurements would suffice. That mistake led to uneven railings and wasted time. The hard-earned realization? Investing time in precise terrain assessment before starting ensures a smoother installation and a more polished final look.
Another insight came from understanding the importance of visual harmony. I discovered that following the natural slope with the top rail creates a cohesive and professional appearance, avoiding that awkward checkerboard effect of uneven rails. Using simple tools like a laser level transformed my approach, turning a frustrating process into an empowering experience.
Lastly, I learned that proper post anchoring on uneven ground is crucial. Adjustable bases and drainage-friendly fittings might seem like minor details, but they significantly extend the lifespan and stability of your railing. Embracing these nuanced techniques transformed my outdoor space into a sturdy, beautiful retreat that truly compliments the landscape.
The Trailblazing Tools That Elevated My Deck Projects
- Laser Level (Bosch GLL 55): Precision and ease of marking level lines along slopes, making alignment straightforward and accurate.
- Adjustable Post Bases: Flexibility in securing posts on uneven terrain, ensuring stability and correct height adjustments.
- Moisture Meter (Protimeter Surveymaster): Early detection of hidden rot, allowing proactive maintenance for long-term durability.
- Cordless Impact Driver (DeWalt DCF887): Effortless fastening that guarantees tight, secure connections, especially with composite materials.
My experience with these tools not only streamlined the building process but also delivered peace of mind, knowing my deck and railing system would stand the test of time. Check out my favorite tools and see how they can elevate your outdoor projects as well.
Embrace Your Outdoor Plans: The Next Step Awaits
There’s a unique satisfaction in turning a challenging sloped backyard into a stunning, safe outdoor space. If you’ve been hesitant or overwhelmed, remember that mastering terrain assessment and precise installation makes all the difference. Each step of the journey is an investment into a backyard that’s not only beautiful but also enduring and safe. So, why not move forward today? Your ideal outdoor retreat is within reach, waiting for your next creative touch.
Have you ever faced an unexpected obstacle while installing a railing on uneven ground? Share your story below, and let’s learn from each other’s experiences.