
I stood there for twenty minutes, jigsaw in hand, paralyzed. I was trying to create a smooth, sweeping radius for a new corner, but every template I tried—a bucket lid, a cardboard cutout, even a hula hoop—felt like a massive gamble with $100-per-board materials. My first attempt at a “custom” curve years ago was such a jagged mess that I had to hide it with a poorly placed planter for three seasons. It was embarrassing, frankly. But then I remembered an old-school framing trick that costs exactly zero dollars. Today, I’m going to walk you through the “Pencil-and-String” hack that will turn your deck from a standard square box into a custom masterpiece. We’re going to solve that nagging fear of the “wobbly cut” once and for all.
The Day My DIY Confidence Hit Rock Bottom
Years ago, while working on a project involving modern composite decking, I thought I could eyeball a 12-inch radius. I was wrong. The result was so uneven that the railing system wouldn’t even sit flush against the fascia. I learned that in innovative deck design, the difference between “pro” and “amateur” is often just a simple geometric constant. According to the National Association of Home Builders, precision in outdoor structures isn’t just about aesthetics; improper cuts can create moisture traps that lead to premature rot in structural members. That’s why getting the geometry right matters more than just looking good for the neighbors. Have you ever made a cut you immediately regretted because you didn’t have a template? I’ve been there, and I promise this method is the ultimate antidote to that sinking feeling in your chest. [IMAGE_PLACEHOLDER]
Does a Cheap String Really Replace a Professional Template?
You might be skeptical. In an era of laser levels and CNC-machined jigs, relying on a bit of nylon twine and a carpenter’s pencil feels a bit primitive. But geometry hasn’t changed in four thousand years. Whether you are planning pergola designs or a complex wraparound staircase, the physics of a radius remains the same. I used to think I needed the “fancy” tools, but this hack is actually more adjustable and forgiving than any plastic template you’ll find at the big-box store.
Why This Simple Geometry Hack Saves Your Sanity
When you’re trying to transform your home with deck design, curves are the best way to soften the landscape and make a space feel organic. The problem is that building curved deck perimeters requires a perfectly consistent arc that standard measuring tapes just can’t track. By using a fixed pivot point, you ensure that every inch of that curve is exactly equidistant from the center. It sounds technical, but it’s as easy as drawing a circle in grade school—only this time, the stakes are your weekend and your wallet. Let’s get into the nitty-gritty of how to set this up so your next project looks like it was handled by a high-end crew.
How to Spot Your Perfect Pivot Point
Before you even touch a saw, you need to find the “eye of the storm.” In innovative deck design, every curve is just a segment of a circle. To get a 12-inch radius, you need a pivot point exactly 12 inches away from your desired edge. I remember a humid Tuesday in July when I was trying to wrap a curve around a massive oak tree. I didn’t want to screw directly into the tree, so I built a temporary wooden “bridge” between two joists. This bridge held my pivot screw. If you are working with composite decking, remember that your pivot point needs to be rock solid. If that screw wobbles even a sixteenth of an inch, your radius will look like a child’s drawing rather than a professional finish.
Secure Your Outrigger for Maximum Stability
Think of your outrigger like a compass leg. Sometimes the center of your circle actually hangs out in empty space, beyond the edge of the deck. This is where most DIYers panic and go back to square corners. Don’t. Simply clamp a scrap piece of lumber—I usually use a leftover 2×4—to the underside of the frame so it extends out to where the center point should be. On that job with the oak tree, my “bridge” was actually just three scrap boards I found in the bin. It felt flimsy, but once I drove a single 3-inch screw halfway into it, I had a permanent anchor. This simple move is the same logic we use for perfectly plumb pergola beams; you create a fixed reference point so the math does the hard work for you. 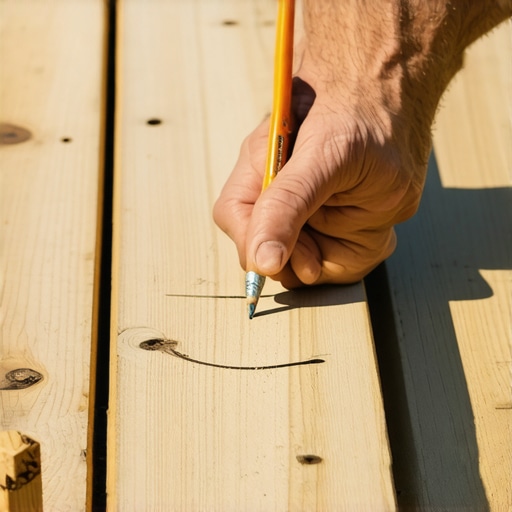
Keep the String Taut for a Flawless Line
Now, grab your string. But listen closely: do not use fishing line or cheap twine that has “give.” If the string stretches, your radius will grow and shrink as you move the pencil. I prefer a high-visibility masonry line. Tie a loop at one end and hook it over your pivot screw. At the other end, tie your carpenter’s pencil. The distance from the screw to the pencil tip must be exactly your radius length. It’s like a tetherball; as long as the rope is tight, the path is predictable. When I first tried this, I used a standard measuring tape held at the 12-inch mark, and it was a disaster because the tape kept kinking. The string, however, flows smoothly over the boards. This consistency is vital when you’re preparing for railing systems that need to follow that same arc later.
The Secret to Marking Composite Boards
When you’re ready to draw, keep the pencil perfectly vertical. If you lean the pencil outward, you’ve just added a quarter-inch to your radius. I like to do a “dry run” first, swinging the pencil across the boards without touching the lead to the surface. This lets me check if the curve hits my start and end points correctly. If you’re working with dark materials, like those featured in 5 colors of composite that hide dirt, use a white wax pencil or a piece of chalk. Once that line is down, treat it as sacred. You’ll be using a jigsaw or a circular saw with a framing blade to follow it, and a crisp line is the only thing standing between a “wow” moment and a “what happened” mistake.
Why Your Sub-Frame Needs Extra Love Here
A common mistake I see is people cutting the curve but forgetting that the boards need something to sit on. You can’t have a beautiful radius hanging in mid-air. This is where building curved deck perimeters involves adding extra blocking between the joists. I once finished a stunning cedar radius only to realize I had nowhere to drive my screws at the very edge. I had to crawl underneath and retro-fit blocking, which was a nightmare for my lower back. Use joist tape on these extra blocks too, because curved areas tend to trap more debris and moisture than flat runs.
Most DIY guides suggest that hidden fasteners are the pinnacle of composite decking secrets. But here’s my hot take: on a curved perimeter, they are often a recipe for disaster. Because a curve forces the boards into non-standard angles, the lateral pressure during a heatwave is immense. This is precisely why hidden fasteners pop up in extreme summer heat, leaving you with a tripped-out edge that’s impossible to screw back down without ruining the aesthetic. In my years on the job, I’ve found that color-matched face screws with plugs are the only way to truly ‘lock in’ a radius. While most sales reps promise low-maintenance composite decking is ‘set it and forget it,’ curves demand a more rigid mechanical bond than a plastic clip can provide.
The Physics of the Summer Push
The biggest mistake I see pros and amateurs alike make is ignoring the thermal expansion coefficient. We’re taught to build things tight, but with composite, tightness is your enemy. This is especially true when you’re working with 5 colors of composite that hide dirt, as those darker pigments absorb significantly more UV energy. According to the USDA Forest Products Laboratory, wood-plastic composites can expand linearly up to three times more than natural lumber. If you don’t leave a proper ‘breathing’ gap at the end of your radius, the boards will literally bow upward or crush their own end-grain. This is why dark composite boards need extra expansion space, particularly where they meet the fascia of a curve.
How Do You Manage Expansion Gaps on a Massive Arc?
If you’re dealing with a radius longer than 12 feet, you cannot treat it as one continuous piece. You need to incorporate invisible seams in long composite deck runs by staggering your butt-joints. I like to use a ‘feature board’ or a breaker board that runs perpendicular to the curve. This breaks up the expansion into smaller, manageable segments. If you accidentally scuff a board while wrestling it into place, don’t panic. Knowing how to fix scuffs on dark composite boards with a heat gun can save you from replacing an expensive custom-cut piece. Have you ever fallen into the trap of over-tightening your fasteners only to see them buckle later? Let me know in the comments.
The Squeak That Haunts Your Evenings
The ‘Oops’ factor often happens weeks after the project is ‘finished.’ You walk out onto your beautiful new curve, and every step sounds like a haunted house. This usually happens because the builder didn’t account for the micro-movements of the blocking. When you’re building curved deck perimeters, the extra blocking provides more surface area for friction. If you haven’t mastered how to stop your deck from squeaking when you walk on it, you’ll regret every curve you drew. Use a high-quality construction adhesive between the joist and the board on these radius sections—it acts as a gasket, preventing that wood-on-wood (or plastic-on-wood) chirp. It’s a small detail, but it’s the difference between a deck that feels like a solid foundation and one that feels like a temporary stage.
The One Tool That Prevents Strip-Out Disasters
If you’re still using Phillips-head screws for your decking, stop right now. I’ve spent too many Sunday afternoons sweating over a stripped screw head in a $90 board to ever go back. For these intricate curves, I only use T-25 star drive bits. The reason is simple: torque. When you’re pulling a board into a tight radius, the tension is high, and a standard bit will ‘cam out,’ chewing up the material. I always reach for the specific screw type that prevents composite board mushrooming because it has a reverse-thread feature that pulls the displaced plastic back down into the hole. This leaves a clean, professional finish that doesn’t look like a swarm of bees attacked your deck. According to the Journal of Light Construction, star-drive fasteners reduce installation fatigue and bit slippage by over 60%, making them the gold standard for high-density materials like solid core composite.
Where Backyard Engineering is Headed Next
I’m convinced the next five years will change how we maintain our outdoor spaces forever. We’re already seeing the rise of smart-sensor integration in high-end pergola designs that can detect moisture levels in the wood and alert your phone when it’s time to re-seal. I predict that LIDAR scanning—the same tech in your phone—will soon be used by homeowners to track structural shifts or joist sag down to the millimeter. This kind of innovative deck design tech will shift us from reactive repairs to predictive maintenance, ensuring your structural integrity is never a guessing game. It makes the goal of low-maintenance composite decking even more attainable by removing the human error of ‘forgetting’ to check the ledger board.
How do I keep this curve looking sharp for decades?
Maintenance on a curved deck isn’t actually harder; it’s just different. Because curves often involve tighter tolerances and more intricate blocking, they can become debris traps. My personal routine involves a high-pressure leaf blower once a week to clear the gaps between the boards. If you let organic matter sit in those curved seams, it holds moisture against the joists, accelerating rot regardless of the board material. I also suggest checking your railing system tension every spring. Curves put lateral stress on post mounts, so a quick turn of the wrench can prevent a wobbly rail before it starts. For more deep-dive advice, I always keep my composite decking secrets and longevity tips handy to ensure the finish stays as vibrant as the day I installed it.
Your Next Move: The “Adhesive Gasket” Challenge
If you want to truly level up your build quality, try the adhesive gasket trick I mentioned earlier. On your next project—even if it’s just a small landing—apply a bead of sub-floor adhesive to the top of every joist before laying the boards. It’s a messy ten-minute job that will permanently silence those annoying creaks. Go ahead, grab a tube of high-quality construction adhesive this weekend and try it on one section of your deck. Once you hear (or rather, don’t hear) the difference, you’ll never build a ‘dry’ deck again.
Lessons My First Jagged Edge Taught Me
Reflecting on those early days of innovative deck design, I realized that the most expensive mistakes aren’t the ones you make with the saw—they are the ones you make with the plan. First, never trust your eyes over your string. A radius that looks ‘close enough’ during the day will reveal every flaw once the sun hits it at a low angle. Second, the structural integrity of a curve depends entirely on what’s underneath. I always tell my friends that applying the joist tape secret for doubling your decks life is even more critical on curved perimeters where water tends to pool in the extra blocking. Finally, remember that composite decking is a living material in terms of thermal movement. If you’re using dark boards, check out why dark composite boards need extra expansion space to prevent the dreaded summer buckle.
[IMAGE_PLACEHOLDER]
The Zero-Fluff Toolkit for Curved Mastery
You don’t need a truck full of specialized machinery to get a high-end look. My personal kit stays simple but uncompromising. I swear by T-25 star drive fasteners; specifically, the specific screw type that prevents composite board mushrooming is the only way to get a flush finish on a radius. For layout, I use braided masonry line because it resists stretching under tension. If I ever have a minor slip-up with the saw, I’ve found that knowing how to fix scuffs on dark composite boards with a heat gun is a literal project-saver. These aren’t just tools; they are the insurance policy for your hard-earned investment in low-maintenance composite decking.
The Future of Your Outdoor Sanctuary Starts Here
Building a curved deck is more than just an upgrade to your home; it’s a statement about your craftsmanship. When you move away from standard 90-degree corners, you’re embracing innovative deck design ideas that elevate your homes curb appeal in a way that few DIYers ever dare. Don’t be afraid to take that first swing of the pencil. The geometry is on your side, and the result—a space that feels organic and professional—will be something you enjoy for decades to come. Whether you’re pairing this with pergola designs that turn your garden into a sanctuary or a custom railing, you’ve now got the skills to make it happen. What part of the curved layout process makes you the most nervous, or are you ready to make that first cut? Let me know in the comments below!