
Ever tried to build a pergola only to discover that your backyard has other plans? Maybe the ground slopes just enough to make you second-guess every level you set, or perhaps the concrete pad isn’t as perfect as your vision. I remember the lightbulb moment when I realized my carefully planned pergola was leaning, giving off the impression that it was about to topple at any moment. It was frustrating—and honestly, a bit embarrassing. But that experience shifted my approach entirely, leading me to discover a game-changing trick that I wish I had known from the start.
The Hidden Challenge of Uneven Surfaces
Built on a sloped yard or uneven concrete? No worries, right? Well, not so fast. Without proper leveling, even the sturdiest pergola can become a wobbling eyesore or even compromise safety. I’ve learned the hard way that ignoring ground inconsistencies can turn a beautiful outdoor project into a permanent headache. The stakes are higher than just aesthetics—structural integrity depends on precise leveling. This is where the trusty shim trick comes into play, turning what seems like a daunting obstacle into a manageable task.
Is the Shim Trick Really Worth the Effort?
Early in my DIY journey, I made the mistake of assuming a level foundation was a luxury rather than a necessity. I skipped extra precautions, thinking a little adjustment here and there wouldn’t matter. Spoiler alert: it did. My pergola ended up bowing at the corners, and I spent more than I’d like to admit making repairs. According to experts, ensuring proper leveling from the outset can save you time, money, and headaches—plus, it results in a safer, more durable structure. When I finally added shims to level the posts properly, everything changed. The structure sat perfectly, and I knew I’d avoided future problems. This simple addition made all the difference, and I want to help you avoid the same pitfalls.
So, if you’ve faced similar frustrations with uneven ground or wondered whether a little imperfection is just part of outdoor building, stick around. We’ll explore exactly how to use shims to achieve a perfectly level pergola—no matter how uneven your surface is. Trust me, once you master this trick, you’ll build with confidence and pride, transforming your backyard into a true sanctuary.
How to Use Shims for a Perfectly Level Pergola
When I built my pergola over a slightly sloped backyard section, I knew I needed to prevent wobbly posts that could compromise safety and style. My first step was to measure the height difference using a simple carpenter’s level and a straightedge. This revealed unevenness in ground elevation. To correct this, I employed the shim trick—placing thin, durable shims beneath the support posts to achieve precise leveling. I started by supporting each post temporarily with cinder blocks, then slipped shims of appropriate thicknesses under each post until the top beams sat perfectly horizontal. I secured the shims with long galvanized screws, ensuring they wouldn’t shift over time. This method saved me hours of effort and prevented future structural issues.
Selecting the Right Shims
Use pressure-treated or composite shims to withstand weather and moisture. When I built my pergola, I chose composite shims with a high resistance to rot—these are perfect for outdoor structures and ensure longevity. If the elevation change is minor, you can stick with thin plastic shims; for larger gaps, stack multiple shims or opt for thicker ones. Remember, the goal is to eliminate any slope in your support posts, making the entire structure level and safe.
Placing and Securing Shims Effectively
Position shims directly under the vertical support posts, centered on the footing or footing block. When I did this, I made sure to double-check leveling with a carpenter’s level after each shim placement. Once satisfied with the positioning, I fastened the posts securely with lag bolts, compressing the shims tightly to prevent shifting. This approach not only stabilizes the structure but also distributes weight evenly, defeating the wobble that can occur on uneven surfaces.
For more advanced project ideas that can elevate your backyard aesthetic, explore innovative deck design ideas for 2025.
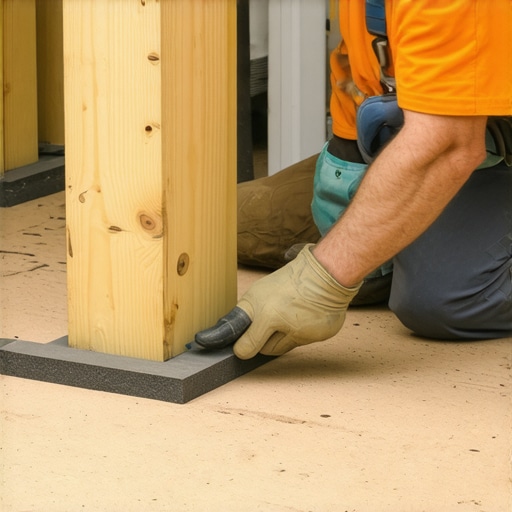
Using the shim trick transformed my leaning, unstable pergola into a snug, perfectly aligned structure, demonstrating that a small adjustment like this can make a big difference in your backyard projects.
When it comes to outdoor structure projects, many enthusiasts and even seasoned builders fall prey to misconceptions that can lead to costly mistakes. One prevalent myth is that choosing the most aesthetically appealing railing system guarantees safety and durability. However, as advised by industry experts, selecting a system solely on looks without considering material quality and installation standards can compromise structural integrity. For instance, relying on decorative aluminum railings without proper load testing might seem attractive but could fail under heavy use or adverse weather conditions—something not immediately obvious to the untrained eye. To make informed choices, it’s beneficial to consult resources like this comprehensive railing guide.
Another misconception involves pergola design. Many assume that a simple, uniform structure suffices for aesthetic and functional needs. Yet, overlooking the intricacies of spacing, cross-bracing, and load distribution can lead to sagging or sway over time. For example, neglecting to incorporate diagonal bracing or appropriate supports, especially on larger spans, can cause instability. This is a nuanced area where understanding the physics, supported by studies such as those from the CDC’s structural safety research, helps prevent future failures. Advanced homeowners might ask: How do I ensure my pergola withstands high winds and heavy snow loads? The answer lies in precise engineering—considering factors like span length, material strength, and proper anchoring.
Deck design, often perceived as straightforward, harbors its own set of pitfalls. A common mistake is underestimating the importance of proper drainage and ventilation, especially when using composite decking materials. Many believe that composite boards are entirely maintenance-free, but without adequate slope and spacing, water can accumulate, leading to warping or mold growth. Investing in knowledge about best practices for composite decking can significantly extend the lifespan of your project. Interestingly, certain color choices, like dark composite tones, can absorb heat and accelerate material degradation—something often overlooked but with real consequences, as noted by materials specialists.
Finally, advanced builders should consider the subtle effects of material expansion and contraction. For example, composite decking and aluminium railings expand and contract with temperature changes, potentially causing unsightly gaps or tightening screws. Proper spacing and flexible fastening methods mitigate these issues. Addressing these nuances is vital for a long-lasting and pleasing aesthetic.
Are you aware of how these hidden details might be influencing your outdoor projects? The key is to go beyond the surface and understand the material behaviors and engineering principles involved. Have you ever fallen into this trap? Let me know in the comments and share your experiences, so we all can build better, safer, and more beautiful outdoor spaces.
When it comes to maintaining and scaling your outdoor structures like decks, pergolas, or railing systems, having the right tools can make all the difference. Over the years, I’ve refined my toolkit to include specialized equipment that not only streamlines installation but also ensures durability over time. Let me share some of my personal favorites and how they can help you keep your projects in top shape.
The Power of Precision with Laser Levels
Gone are the days of relying solely on traditional spirit levels. I use a laser level for establishing accurate horizontals and verticals over large spans, which is crucial when constructing or repairing long pergolas or expansive decks. The 20-Tool for Perfect Spacing is a perfect example of how technology can elevate your precision. Not only does it save time, but it significantly reduces errors, preventing costly adjustments in later stages.
Power Sanders for Seamless Finishing
Maintaining composite decking involves routine cleaning and sometimes sanding to remove stains or uneven surfaces. I recommend a random orbital sander with variable speed settings, which allows gentle yet effective material removal without damaging the surface. Using quality abrasive pads ensures a smooth finish, especially when restoring older boards or preparing surfaces for re-staining. Proper sanding extends the lifespan of your decking by keeping the surface free of splinters and divots that can trap moisture.
Durable Fastening Systems
For long-term stability, I swear by hidden fastening systems. These fasteners secure deck boards and railings without projecting screws or nails, preventing snagging and reducing corrosion risks. My go-to is the Simpler Fastener brand, which combines ease of installation with superior hold, especially in weather-exposed environments. Investing in high-quality fasteners is an upfront cost that pays dividends in safety and aesthetics.
Weather Monitoring and Maintenance Scheduling
Monitoring environmental conditions is vital to maintaining outdoor structures. I utilize a digital weather station that alerts me to rain, humidity, and temperature fluctuations. These insights help me schedule cleaning, inspections, or repairs timely, preventing long-term damage. For example, after heavy rains, I inspect for water pooling or inadequate drainage—issues that, if ignored, can compromise structural integrity. Resources like this guide offer excellent tips on sustainable maintenance routines.
Looking Ahead: Smarter Maintenance?
The future of outdoor structural upkeep is headed toward integrated smart systems. Imagine sensors embedded in decks or pergolas that detect weather threats or material fatigue and alert you via smartphone. Already, emerging technologies are making this feasible, promising to extend the lifespan of your backyard investments with proactive care. I encourage you to try out a digital weather station this season—it’s a simple step that yields immediate benefits.
How do I maintain my deck or pergola over time?
The key is consistent inspection, cleaning, and timely repairs. Regularly check fasteners, surface coatings, and drainage paths. Using tools like laser levels and smart sensors can identify issues early, preventing minor problems from turning into costly repairs. Remember, proactive maintenance preserves your structure’s safety, aesthetic appeal, and value for years to come. For in-depth guidance on finishing touches or fixing common issues, explore advanced design strategies.
What I Wish I Had Known Before Building My Pergola
One of the most valuable lessons I learned was that rushing the foundation can lead to long-term headaches. Ensuring the ground is properly leveled and using shims for support is a game-changer—saving time, money, and future repairs. I also realized the importance of selecting the right materials and tools, like high-quality shims and laser levels, to achieve professional results. There’s a satisfaction in knowing that your outdoor space is not only beautiful but also safe and sturdy, thanks to attention to these details.
Recommendations That Elevated My Outdoor Projects
I highly recommend investing in a laser level to achieve precise, even decks and pergolas. For finishing touches, a good quality orbital sander helps keep composite surfaces smooth and appealing. When it comes to fasteners, hidden fasteners provide a clean look and prevent water pooling. Lastly, a smart weather station keeps me proactive about outdoor maintenance—an underrated tool for longevity.
The Power of DIY: Building Confidently and Safely
Choosing the right approaches and tools transforms the often intimidating process of outdoor construction into a rewarding experience. Remember, mastering details like proper leveling, material choices, and maintenance routines can extend your structure’s lifespan greatly. With patience and a passion for outdoor living, you can craft a backyard sanctuary that’s both beautiful and enduring. So, what will you build next? Share your ideas or challenges below—I love seeing how fellow DIY enthusiasts turn visions into reality.