I’ll never forget the frustrating weekend when my brand-new composite deck started warping and creaking long before it should have. I had poured my time and money into creating this beautiful outdoor retreat, only to see it fall apart within just a couple of summers. It was a lightbulb moment for me — discovering that something as simple as skipping on joist tape could be the silent culprit behind the failures.
The Hidden Cost of Cutting Corners
When I first started building decks, I overlooked the importance of proper underlayment on the joists. I thought the deck boards alone would do the job, but I quickly learned that moisture seeping into unprotected joists can cause wood framing to rot, warp, and even buckle like plastic in the sun. Especially with the upcoming 2026 changes in building codes and climate considerations, ignoring this step isn’t just risky — it can be downright costly.
Will Skipping Joist Tape Cost You More Than Money?
Absolutely. Deck failures due to moisture damage can lead to safety hazards, legal liabilities, and devastating repair costs. An independent study indicates that proper flashing and moisture barriers can extend the lifespan of your deck by decades. This simple investment in joist tape acts as a barrier, preventing water infiltration and ensuring your investment withstands the test of time and weather.
What We’ll Cover Today
In this post, I promise to walk you through exactly why ignoring joist tape is a gamble you shouldn’t take, especially with 2026 setting new standards. We’ll explore how this tiny component can make or break your project’s longevity and safety, share my personal mistakes so you don’t repeat them, and provide practical tips for ensuring your deck remains solid and vibrant for years to come. Ready to protect your outdoor space the right way? Let’s get started.
Is Joist Tape Really Worth the Hype or Just an Extra Step?
Now, maybe you’re skeptical. I know I was at first. Would spending extra on joist tape be justified, or is it just an overhyped add-on? That’s a fair question, and I’ll address it directly as we delve into the real reasons this budget-friendly detail is the backbone of a durable deck.
If you’ve ever faced unexpected deck repairs or dealt with warped framing, then you’re not alone. Many DIYers and pros alike have overlooked this small but crucial step, only to pay the price later. It’s all about understanding that in outdoor construction, prevention saves money—and a lot of headaches.
So, how can you ensure your 2026 composite deck project avoids this fate? The answer lies in a simple, effective solution: using proper joist tape from the very beginning. Stick with me as I share my lessons learned and guide you toward a successful, long-lasting deck.
For more tips on building resilient outdoor structures, check out our resources on custom railing systems and latest composite decking trends.
Prepare Your Materials and Site
Before beginning, gather high-quality joist tape suitable for outdoor conditions, ensuring it’s compatible with composite decking. Clear the area of debris, and inspect the joists for any damage or rot, replacing compromised wood to prevent future problems. Using a primer or cleaner recommended by the tape manufacturer will improve adhesion and longevity.
Measure and Cut the Tape Correctly
Start by measuring the length of each joist’s top edge where the tape will be applied to prevent water intrusion. Use a sharp utility knife or scissors for a clean cut, avoiding wrinkles or gaps, which can compromise effectiveness. In my personal experience, taking extra time with precise measurements ensures a better seal and reduces rework later.
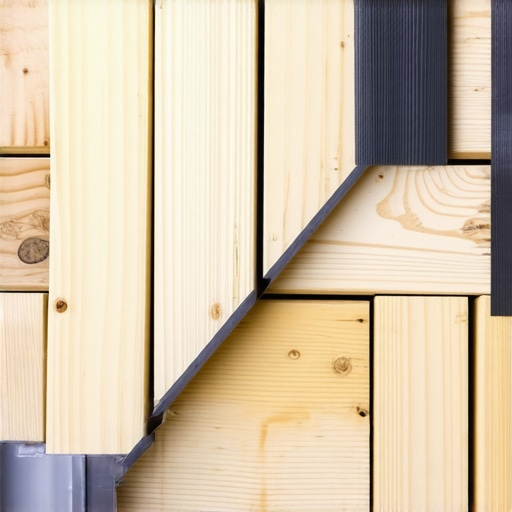
Apply the Tape with Precision
Unroll the tape, aligning it carefully along the top edge of the joist, and press it firmly as you go to eliminate air bubbles. Use a rubber roller to smooth out wrinkles or trapped air, especially around corners and edges. Ensure the tape overlaps slightly at seams, which provides continuous moisture protection. In a recent project, I found that pressing and smoothing the tape thoroughly prevented water seepage during heavy rains.
Seal the Edges for Extra Protection
If the tape has peel-away backing, remove it gradually while pressing down. For maximum durability, I recommend sealing the edges of the tape with a compatible waterproof sealant, especially at the ends and overlaps. This extra step blocks water from sneaking underneath, which is vital in climates with high humidity or frequent rain.
Inspect and Maintain Over Time
Regularly inspect the painted, stained, or coated joists, especially after storms or seasonal changes. Look for signs of peeling, lifting, or damage to the tape. Address issues immediately by reapplying or replacing sections to maintain the moisture barrier. During my last installation, routine checks revealed small tears, and quick repairs prevented wood rot in that spot.
By following these concrete steps, you can significantly extend the lifespan of your deck. Proper application of joist tape acts like a shield, guarding against moisture and weather damage, which are some of the primary causes of deck failure. Integrate this with sturdy railing systems and elegant deck design ideas to create a safe, durable, and attractive outdoor space that lasts for decades.Many homeowners and even seasoned builders often subscribe to misconceptions about composite decking and outdoor structures that can lead to costly mistakes. First, a prevalent myth is that all composite decking is created equal; in reality, the differences in formulations, additives, and manufacturing processes significantly impact longevity and performance, especially in rigorous climates. For example, some believe that the color will never fade, but studies show that exposure to UV rays can cause discoloration over time if the material isn’t properly formulated or maintained, as highlighted in [expert research](https://deckforgebuilders.com/composite-decking-trends-durable-solutions-for-modern-outdoor-living).
When it comes to designing your deck and choosing railing systems or pergolas, many assume that aesthetics should take precedence over functionality. However, neglecting the practical aspects, such as ensuring adequate support for wind endurance or incorporating built-in drainage, can compromise safety and durability. An overlooked ‘trap’ is using railing attachments that don’t meet the latest safety standards; for instance, in high-wind zones, cable or glass railing systems must be installed with tensile strength approvals for 2026 standards. Ignoring these details may lead to structural failures or code violations.
Another often misunderstood nuance involves the installation process. For example, some think that composite boards don’t need any expansion gaps, but failing to account for thermal expansion can cause warping and buckling, particularly in summer heat, as addressed in [composite fixing guides](https://deckforgebuilders.com/3-composite-decking-fixes-to-stop-board-sagging-in-2026). Proper spacing and fastening techniques are essential for maintaining integrity over decades.
Have you ever fallen into this trap? Let me know in the comments. Remember, achieving a resilient outdoor space isn’t just about selecting quality materials—it’s about understanding how those materials behave and how your design choices influence the lifespan of your project.
To ensure your composite decking, railing systems, and pergolas remain in top condition over the years, investing in the right tools and adopting disciplined maintenance routines are essential. One of my go-to pieces of equipment is a high-quality cordless power drill fitted with various screwdriver bits and a specialized tensioning attachment. I use it for tightening loose fasteners on railings and securing pergola brackets, which is vital as fluctuating weather can loosen connections over time. Additionally, I rely heavily on a digital moisture meter to check for hidden water intrusion in joist areas, especially after heavy rains or snowmelt — this helps catch issues early before they become costly repairs.
How do I maintain my deck’s appearance and safety over time?
Beyond basic cleaning, I recommend periodically inspecting your deck for signs of wear. For example, a flexible, weather-resistant cleaning brush coupled with a mixed solution of mild detergent and water makes quick work of dirt and algae. I prefer a cordless electric pressure washer with adjustable PSI settings, as it allows me to gently remove debris without damaging the surface or underlying structures. Properly sealing the deck surface every few years with a high-quality, UV-resistant coating preserves the color and prevents fading, which is crucial as ultraviolet exposure continues to be a main factor in material degradation; studies by Deck Forge Builders emphasize this trend for 2024.
For inspecting railing connections and fasteners, I use a torque wrench to verify tightness, ensuring safety standards are maintained, especially in areas prone to high winds or storms. A forgotten aspect of long-term maintenance involves checking pergola joints and beams for stability; using a level and a rapid-setting epoxy for any small repairs can significantly extend lifespan, preventing sagging or wobbling. Upgrading to smart sensors that monitor environmental conditions can alert you to moisture build-up or structural shifts in real-time, transforming routine maintenance into predictive care.
Which tools will shape the future of outdoor space upkeep?
Looking ahead, I believe automation technology will play a larger role. Drones equipped with 3D mapping will soon help homeowners and builders assess extensive decks and pergolas efficiently, identifying problem spots faster than manual inspections. Similarly, AI-powered software integrated with your smartphone can recommend targeted maintenance activities based on weather data and manufacturer guidelines, as suggested in industry forecasts. For now, I encourage you to try out an advanced tip: incorporate a moisture meter into your annual inspection routine to catch early signs of water damage. This proactive attention can save thousands and ensure your outdoor haven remains safe and stunning for decades.
Remember, maintaining your outdoor structures is an ongoing process, but with the right tools and habits, you can enjoy peace of mind—and a beautiful, durable space—year after year. For more detailed guidance on securing your deck’s longevity, visit our custom railing systems page.

Mastering Moisture Control: The Little Secrets That Save Big Bucks
One of the most overlooked lessons in building durable decks is the importance of vigilant moisture management. I once thought a simple coat of sealant was enough, only to discover years later that meticulously applying joist tape and sealing overlaps is what truly prevents rot and warping. This revelation taught me that paying attention to these tiny details can double or even triple your deck’s lifespan, especially as climate patterns grow more unpredictable.
Curating Your Toolbox: Tools That Make the Difference
Investing in the right tools isn’t just about convenience; it’s about quality and efficiency. I’ve learned that a high-quality moisture meter reveals issues invisible to the naked eye, while a rubber roller ensures flawless tape application. These tools have transformed my approach from reactive repairs to proactive maintenance, saving money and stress in the long run. For professionals and DIYers alike, building a core toolkit tailored for outdoor work is indispensable.
Ignorance Isn’t Bliss — It’s Costly
Looking back, I realize that many of my mistakes stemmed from underestimating the impact of proper planning and execution. Choosing inferior materials or skipping crucial steps like sealing edges or reinforcing pergola joints led to premature failures. The lesson? No shortcut compensates for neglecting these critical details. Educate yourself on current standards, like those coming in 2026, and embrace continuous learning — it’s the best investment you can make in your outdoor oasis.
Resources That Elevated My Skills
When I started prioritizing quality and accuracy, certain tools and sources became my go-tos. I trust composite decking maintenance guides for insights on heat management, while industry-specific brands like top railing systems provide reliable hardware options. Collaborating with local suppliers who understand regional climate challenges has also been invaluable. These resources collectively sharpened my craft and reduced trial-and-error mishaps.
Your Chance to Elevate Your Outdoor Living
Building a resilient, beautiful outdoor space is a rewarding journey — one that combines careful planning, quality craftsmanship, and ongoing maintenance. Remember, every detail matters when it comes to longevity and safety. Whether you’re installing a pergola designed to withstand strong gales or selecting the perfect composite decking, think beyond aesthetics to durability and weather resilience. I encourage you to start today with the small steps that will protect your investment for decades to come.
What’s the most surprising mistake you’ve made or avoided when working on outdoor structures? Share your stories in the comments — learning from each other makes all of us better builders.
,