
I still remember the sinking feeling in my gut when I laid my first premium board against my client’s 1920s fieldstone foundation. I had spent weeks on the framing, ensuring every joist was perfectly level, but when it came time to butt the decking against that jagged, beautiful, and utterly frustrating stone, I froze. I tried to ‘eye it’ with a jigsaw and ended up with a gap so wide you could drop a framing hammer through it. It looked terrible, and worse, it felt like I’d failed the house. That moment of humble pie taught me that no amount of fancy innovative deck design ideas can save a project if you can’t master the transition where the wood meets the earth.
The Day My Pride Met an Uneven Stone Wall
We’ve all been there—staring at a piece of expensive composite or hardwood, wondering how on earth to make a straight line follow the chaotic path of natural rock. My early mistake was thinking I could just cover the mess with a piece of trim later. Spoiler alert: it never looks right. Today, I’m going to walk you through the exact process of scribing, a technique that makes your deck boards look like they were custom-molded to the stone. Whether you are working with a modern farmhouse deck aesthetic or a rustic cabin, getting this tight fit is the difference between a DIY job and a masterclass in craftsmanship. We will solve the gap problem once and for all, ensuring your gap between your deck and the house disappears into a seamless professional finish.
Is Scribing Really Worth the Extra Labor?
I get this question all the time from folks who are tired and just want to be done with their project. The short answer is a resounding yes. Beyond the sheer beauty of a tight fit, gaps against a foundation are magnets for debris, leaves, and moisture. According to the International Code Council, moisture trapped against a ledger or foundation is a leading cause of premature structural decay in wooden structures. When you scribe a board perfectly, you aren’t just showing off; you are protecting the integrity of your home. If you are investing in low-maintenance composite decking, why would you undermine that longevity with a sloppy transition that invites rot? Have you ever tried to hide a massive gap with a pound of caulk and regretted it the very next season? I certainly have, and that’s why I switched to the ‘pencil and compass’ method I’m about to share.
Why That Ugly Gap Is Your Deck’s Worst Enemy
When you leave a jagged opening between your deck and a stone foundation, you’re creating a five-star hotel for rodents and a highway for water to reach your rim joist. I once had to tear out a three-year-old section of a garden sanctuary deck because the owner didn’t want to spend the extra hour scribing the boards. The resulting rot was a mess of mold and soft wood that could have been easily avoided. Scribing isn’t just a decorative flourish; it’s a functional necessity that ensures water sheds away from the house properly. It’s about respect for the materials and the structure. In the next section, we’ll dive into the simple tools you need—most of which you probably already have in your bucket—to make these complex cuts feel like second nature. It’s time to stop fearing the stone and start working with it.
Set the Stage for a Perfect Scribe
Start by placing the board exactly where it needs to sit, overlapping the stone as much as possible while remaining parallel to your joists. If you are using low-maintenance composite decking, remember it does not compress like cedar or pressure-treated pine. I once tried to force a board against a jagged granite outcrop, thinking I could just beat it into place with a rubber mallet. I ended up snapping the hidden fastener and scuffing the finish. Lesson learned: the board stays straight, and the cut does the work. You want the board pinned temporarily so it cannot move while you mark it.
Dial in Your Compass for Success
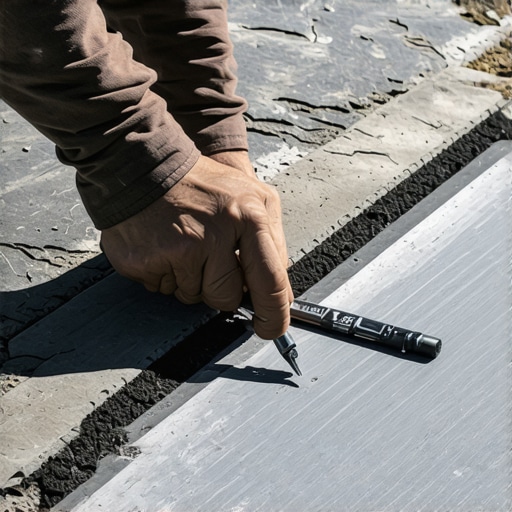
This is where the magic happens. You need a simple carpenter’s compass—nothing fancy. Think of the compass like a record player needle following the groove of a vinyl record; the metal point follows the stone, and the pencil transfers that exact chaos onto your wood. Set the distance between the point and the pencil to match the widest gap between your board and the stone, then add about an eighth of an inch for breathing room. Keep the compass perfectly perpendicular to the board as you drag it. Using the pencil trick for marking dark composite boards by using a white wax pencil can make this line much easier to see when the dust starts flying.
Why Back-Beveling Changes Everything
When you go to cut that line with your jigsaw, do not cut straight down at a 90-degree angle. This is the amateur mistake I made for years. Instead, tilt the base of your saw to a 15-degree angle so you are cutting ‘underneath’ the board. This back-bevel means only the very top edge of the board actually touches the stone. It’s a trick I picked up while struggling with a modern farmhouse deck project where the fieldstone was so irregular I could barely get a pencil mark on it. By back-beveling, I gave myself a little ‘cheat’ room to shave off tiny bits with a rasp until the fit was airtight. It makes the transition look like the stone grew right through the wood.
Don’t Rush the Jigsaw Blade
If you’re working with composite decking secrets like high-density capped polymers, the material can be brittle if you force the blade. Use a fine-tooth laminate blade and let the tool do the work. I remember a humid Tuesday on a job site where I rushed the last three inches of a complex six-foot scribe and the board splintered right at the finish line. I had to start over on a $90 plank, which is a mistake you only make once. Keep your eyes on the line and your hand steady.
Check the Gap Before You Fasten
Before you drive a single screw, dry-fit the board against the foundation. You want it close enough to look seamless to the naked eye, but you must still respect the expansion gap rule. Stone doesn’t move, but your deck certainly will. If you fit it too tight during a cold morning, that board will have nowhere to go when the afternoon sun hits it, leading to unseemly buckling. A gap the thickness of a nickel is usually the sweet spot for a professional look that won’t fail in six months.
While we’re on the subject of precision, let’s talk about a mistake I see even seasoned builders make: the obsession with hidden fasteners. We’re often told they are the ‘premium’ choice for a clean look, but in reality, why hidden fasteners can be a nightmare often comes down to simple physics. In high-heat areas, why your hidden fasteners are popping up in heat is a common complaint because the composite material expands faster than the metal clip can accommodate. I’ve seen expensive decks look like a wavy ocean by July because the builder didn’t account for the ‘creep’ of the material. Sometimes, traditional face-screwing with matching plugs is actually the superior structural choice, especially in regions with significant temperature swings.
Stop Chasing the Ghost of a Perfectly Hidden Fastener
The trap most DIYers and even pros fall into is ignoring the thermal bridge effect. A study by the Forest Products Laboratory suggests that metal fasteners in contact with wood can experience accelerated moisture issues if the substructure isn’t properly ventilated. When you use hidden fasteners, you often create a tighter joint that traps water on top of the joist, which is exactly where rot begins. This is why I always insist on the deck joist tape test. If you aren’t protecting the top of your frame with flashing, you’re essentially building a beautiful surface over a ticking time bomb. 
The Structural Lie That Makes Decks Feel Like Trampolines
Have you ever walked on a brand-new composite deck and felt a slight bounce? People often blame the boards, but why your composite deck feels like a trampoline is usually a result of standard joist spacing that works for wood but fails for polymer. Composite material doesn’t have the internal structural stiffness of natural timber. While the code might allow 16 inches on center, 12 inches is my personal gold standard for a ‘rock solid’ feel. If you try to save a few dollars on lumber by stretching your spans, you’ll pay for it in a deck that feels cheap underfoot. It’s also where the 3-inch screw mistake that ruins composite joists comes into play; using fasteners that are too long or too aggressive can split the top of your joists, reducing their lateral stability and contributing to that ‘wobbly’ sensation.
Can Your Joist Spacing Handle That Heavy Ceramic Planter?
When planning your layout, you have to think about ‘point loads’ that go beyond simple foot traffic. Most people design for people, but they forget about the 300-pound ceramic planter or the heavy stone pizza oven they plan to buy next year. This is where the joist spacing secret for decks with heavy ceramic planters becomes vital. You need to double up your joists or add blocking under areas where you anticipate permanent heavy features. Failure to do this doesn’t just cause a dip; it can cause a permanent ‘set’ in your composite boards that no amount of repair can fix. We need to stop thinking about decks as simple platforms and start viewing them as engineered floors. Have you ever fallen into the trap of over-relying on ‘standard’ spacing only to have a board sag under a heavy grill? Let me know in the comments, and let’s figure out how to beef up your next frame together.
I used to think that once the last board was fastened, my job was done. I couldn’t have been more wrong. The longevity of your outdoor space—whether it is a sprawling platform or a complex structure featuring a ledger-free pergola—depends entirely on the maintenance routine you establish in the first twelve months. Most homeowners treat their decks like a ‘set it and forget it’ appliance, but professional builders know that even the best materials require a watchful eye. It is the difference between a structure that lasts thirty years and one that needs the simple way to fix a sagging deck beam before the decade is out.
Grab These Tools Before You Start Your Railing
If you are tackling a DIY installation, do not rely on a standard tape measure alone. For a truly professional finish, especially on complex transitions, I always carry a dedicated post-level. Using the simple tool for making sure your railing posts are plumb saves you from the visual nightmare of a leaning baluster that ruins your home’s curb appeal. For those installing cable systems, forget about eyeballing the tension. I recommend a dedicated tension gauge; otherwise, you will find out why your cable railing sagged over winter the hard way. Precision is not just about looks; it is about structural safety. I also swear by the drill guide hack for centered baluster holes because there is nothing more frustrating than a row of crooked spindles on an otherwise beautiful deck.
How do I keep my composite deck looking brand new for years?
The biggest mistake I see is people treating composite like concrete. You must understand why you should never use a pressure washer on composite. High-pressure water can actually delaminate the protective cap of the board, creating micro-fissures where mold can thrive. Instead, I use a soft-bristle brush and a pH-neutral cleaner. Furthermore, why you should never use bleach on your composite deck is a lesson in chemistry; bleach can permanently discolor the UV inhibitors in the polymer. According to the North American Decking and Railing Association (NADRA), regular inspections are the most effective tool in your kit. I suggest every homeowner perform the 15-minute deck inspection every homeowner should do at the start of every spring. Checking for loose hardware and blocked drainage paths—specifically how to stop moss from growing in the gaps of your deck—will prevent the moisture traps that lead to catastrophic joist failure. #IMAGE_PLACE_HOLDER_D#
Stop Guessing and Start Using a 3D Model
Looking ahead, the industry is moving toward total digital integration. I predict that within five years, building departments will require digital twins of every structure. This is why you need a 3D model before buying a single deck board today. It allows you to visualize sun paths and load-bearing points before you ever pick up a saw. If you are struggling with a sagging cable or an uneven railing, do not reach for the expensive hardware first. Instead, learn how to tension cable rail systems without specialized expensive tools by using a simple turnbuckle technique I’ve used on dozens of coastal projects. This level of planning ensures that even as your deck ages, its foundation remains as solid as the day it was built. I want you to try this one advanced tip tonight: take a high-powered flashlight and check the ledger board where it meets the house; if you see any staining, it is time to address your flashing before the next rainstorm hits.
The Moments That Forced Me to Rethink Everything About Composite
Over the years, I have learned that the most expensive materials do not guarantee a high-end result if the fundamentals are ignored. One of my biggest lightbulb moments was realizing that why wood-look composite often fails the barefoot test has more to do with heat absorption than the grain pattern itself. I also had to accept that while I love the look of natural timber, why ipe wood is the only real competitor to high-end composite often comes down to its incredible density, which requires a completely different set of drilling techniques. These hard-won composite decking secrets have taught me that a deck is a living system, not just a static floor. If you ignore the substructure, the surface will eventually betray you, no matter how much you spent on the boards.
The Gear That Separates the Pros From the Weekend Warriors
If you want to move beyond basic DIY, there are a few resources and tools that I never step onto a job site without. First, stop guessing at your layout and understand why you need a 3d model before buying a single deck board; it is the only way to catch structural conflicts before they cost you money. For the physical build, I swear by high-quality flashing tape to seal every joist. I also recommend checking your local building department for the specific frost line depth for your deck footings rather than relying on a generic online guide. These tools and data points are what ensure your project remains safe and level for decades, rather than sagging after the first hard winter.
#IMAGE_PLACEHOLDER_E#
Build the Space Your Future Self Will Thank You For
Your backyard is more than just an extension of your house; it is a sanctuary where memories are made and stress is left at the door. By mastering techniques like scribing and respecting the structural needs of your materials, you are doing more than just building a platform; you are practicing a craft. Do not be afraid to push the boundaries with innovative deck design ideas that reflect your personal style. Whether you are fitting a board against a 100-year-old stone wall or tensioning a modern cable rail, take your time and enjoy the process. The pride you will feel when you walk out onto a perfectly flush, rock-solid deck is worth every single extra cut. Have you ever found a nasty surprise behind a ledger board or struggled with a gap that just would not close? Let me know in the comments below.