
I remember sitting out back last August, ice melting in my glass before I could even take a sip. My “dream” pergola looked like a high-end art piece, but it was basically just a fancy set of shadows that missed my chair by three feet. My skin was sizzling, and my guests were huddled in a tiny rectangle of cool air like they were waiting for a bus. That was the moment I realized my pergola design inspiration had failed the most important test: actual utility. I had spent weeks on the aesthetic, but I forgot that the sun is a moving target. It is a classic homeowner blunder, and honestly, I felt like a total novice in my own backyard.Stop Squinting and Start ExtendingEarly on, I made the huge mistake of thinking I could just slap on some cheap wood extensions and call it a day. I learned the hard way why I stopped using pine for pergola rafters after the first humid summer turned my makeshift extension into a twisted, warped mess of splinters. It looked like a DIY disaster. Today, I am going to walk you through the most straightforward ways to stretch that shade footprint without starting from scratch. We are not just talking about temporary umbrellas; we are looking at structural tweaks and smart additions that look like they were part of the original plan. Have you ever found yourself moving your patio chair every twenty minutes just to stay out of the direct glare? It is exhausting. We are going to fix that.
Is adding more wood actually worth the effort?
A lot of people worry that extensions will make their beautiful structure look “bolted on” or, worse, make it structurally unstable. It is a fair concern. If you do not account for the weight, you might end up realizing why your pergola needs a mid-span post after it starts to sag in the middle. However, when you use the secret to perfectly centered pergola rafters, the new section blends in seamlessly. According to the Skin Cancer Foundation, even in the shade, up to 50% of UV radiation can reach you through reflection off surfaces like concrete or water. This makes a solid shade extension not just a matter of comfort, but a genuine health priority for your family. I want to show you how to gain those extra feet of protection while keeping your backyard looking like a professional shade elegance sanctuary. It is easier than you think, provided you use the right techniques to keep the lines clean and the water shedding away properly with the 15-degree cut that keeps water off beams. Let us dive into how we can turn that skeleton of a frame into a true shield against the sun.
Build a Frame That Won’t Fail Under Pressure
Before you even think about adding slats or fabric, you have to look at the skeleton. Extending a pergola is like adding a leaf to a dining table; if the center legs aren’t positioned correctly, the whole thing tips when someone leans on it. I learned this the hard way during a humid July weekend when I tried to ‘eyeball’ a three-foot extension. I just sistered some new boards onto the old ones and thought I was a genius. Within a month, the weight caused a noticeable dip, and I spent the rest of the summer explaining the structural reason your pergola is leaning to my neighbors. Don’t be like past-me. You need to ensure your existing beams can handle the cantilever, or better yet, plan for new support.
Stop the Pirate Lean with Better Hardware
If your extension reaches out more than a foot or two, you are changing the center of gravity of your entire structure. This is often why your pergola needs a mid-span post you didn’t account for. To keep the lines clean, use heavy-duty connectors rather than just nails and luck. I highly recommend the steel bracket move for high wind pergolas, which locks the new rafters to the existing beams with zero wiggle room. Think of these brackets as the joints in a suit of armor; they provide the flexibility to expand while maintaining a rigid core that won’t buckle when the wind picks up.
Prevent the Twist Before It Happens
One thing nobody tells you about extending rafters is that longer boards love to warp. You might start with a perfectly straight line, but the sun is brutal. If you see a board starting to curve, you need to know how to fix a pergola rafter that is starting to twist before it pulls the rest of your shade out of alignment. I usually install blocking between the new rafters to keep them perfectly vertical. 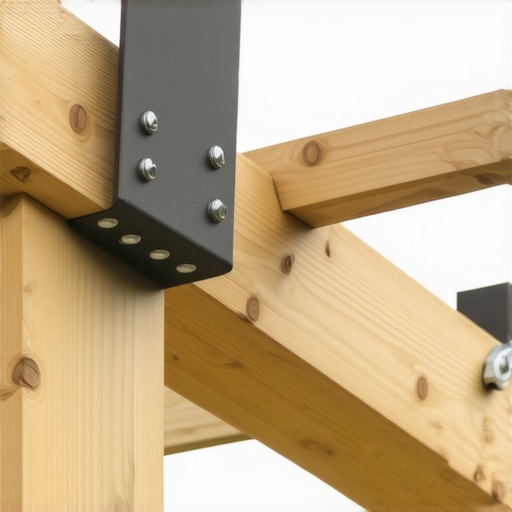
The Spacing Trick for Symmetrical Shade
The biggest giveaway of a ‘DIY-gone-wrong’ extension is inconsistent spacing. If your original rafters are six inches apart and your extension is five and a half, your eyes will catch it every single time you look up. To avoid this, I always use the scrap wood spacer for perfectly uniform pergola slats. It is a simple block of wood cut to your exact desired gap. You just slide it between the boards as you screw them down. This ensures that even as you expand the footprint, the aesthetic remains as intentional as a professional garden sanctuary. Finally, as you finish the tips of your new rafters, don’t forget the small details that prevent rot. Applying the 15-degree cut that keeps water off your pergola beams to the ends of your extension will ensure that the new wood lasts just as long as the original structure.Most people assume that if a structure feels heavy, it is safe. That is a dangerous myth. In my experience, the biggest mistake is over-building the posts while under-building the connections. You can have 8×8 cedar beams, but without proper lateral resistance, your structure is just a house of cards waiting for a storm. This is exactly why your pergola shakes when the wind blows even if it looks like a fortress. Professionals know that stability comes from triangles, not just thick timber.Stop Obsessing Over Post ThicknessEveryone tells you to buy the biggest wood available, but the real secret to a rock-solid build is understanding lateral force. If you strip away the decorative elements, you need to know why your pergola needs knee braces to prevent the dreaded ‘parallelogram effect.’ I have seen beautiful modern designs fail because the owner wanted a ‘clean’ look without braces. According to the American Wood Council’s DCA6 manual, lateral loads from wind or seismic activity require specific bracing or post-to-beam connectors to prevent collapse. Skipping these for aesthetics is the fastest way to a structural nightmare.
Should you really skip the knee braces for a cleaner look?
The short answer is: only if you enjoy watching your expensive investment lean. If you absolutely hate the look of wooden braces, you can opt for the steel bracket move for high wind pergolas which provides that same rigidity in a smaller, more modern footprint. But do not just ignore the physics. Another ‘expert’ nuance involves the surface you are walking on. While people flock to composite decking trends for low maintenance, they often forget that plastic-based materials behave differently than wood. For instance, I have had clients call me panicking because their deck feels like a science experiment; specifically, why your composite deck is statistically likely to static shock you in dry climates. It is a nuance that ‘beginner’ guides never mention. 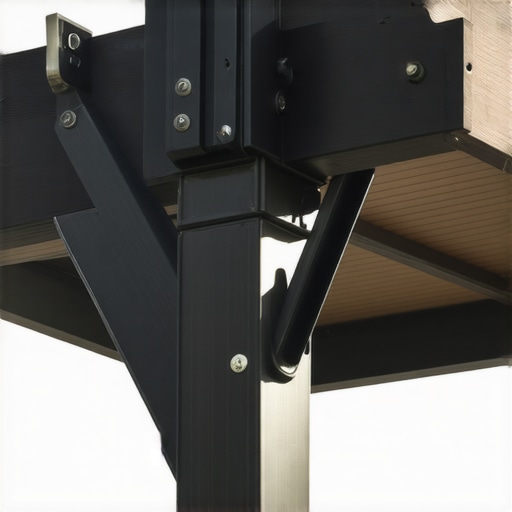 The Thermal Expansion TrapIf you are moving from wood to composite, you cannot treat the installation the same way. Wood shrinks; composite grows. I have seen entire siding panels buckled because a DIYer did not know how to stop composite deck boards from expanding into your siding. You need to account for the ‘living’ nature of these boards. Even your railings have hidden quirks. For example, if you choose a dark finish, you might realize too late why your black aluminum railing gets too hot to touch during a July barbecue. It is these small, environmental factors that separate a ‘good’ deck from a ‘masterpiece.’ Have you ever fallen into this trap where a design choice backfired because of the weather? Let me know in the comments.After years of fighting with a traditional bubble level, I finally invested in the level and laser method for setting pergola heights alone. It was a total game-changer. When you are working with a 12-foot span, being off by just an eighth of an inch at the post can mean a noticeable slope by the time you reach the rafters. I use a self-leveling rotary laser because it gives me a constant 360-degree reference point around the entire yard. No more shouting across the deck or dealing with a sagging string line. While we are on the topic of precision, if you are working with high-end composite decking trends, you have to be careful with your finishes. I always swear by the painters tape hack for cutting composite boards without fraying. I wrap the cut line in blue tape before the blade even touches the surface; it keeps the plastic fibers from ‘mushrooming’ and gives you that factory-finish edge every time.
How do I keep my deck looking brand new over the years?
Maintenance is where most homeowners lose the battle against the elements. They wait until the grime is thick and then reach for a power washer, which is a massive mistake. I tell everyone why you should never use a power washer on composite boards—it can actually etch the surface and create permanent scars that hold onto more dirt later. Instead, I use the vinegar and water mix that cleans composite better than chemicals. It is cheap, effective, and won’t kill your hydrangea bushes. For the structural side, you need to be proactive. Every spring, I perform the ice pick test for checking joist strength on older decks to ensure the substructure isn’t rotting silently. According to the Simpson Strong-Tie ‘Deck Connection and Fastening Guide’ (F-DECKRP20), the ledger-to-house connection is the primary point of failure for most residential decks, so checking those bolts for corrosion is non-negotiable. Following these composite decking secrets for longevity will keep your space safe for decades. Smart Structures are the Next Big Thing Looking ahead, I predict we are going to see a massive shift toward modular, ‘smart’ deck systems where integrated sensors can detect structural fatigue or moisture trapped under the boards before rot even starts. For now, focus on the fundamentals and high-quality hardware. I challenge you to try the painters tape trick on your next cut—it is a small, five-second move that makes a huge professional difference in the final look of your deck.
Lessons My Sunburned Back Taught Me
One of the biggest shifts in my perspective came when I stopped treating my deck like a static furniture piece and started seeing it as a living machine. Wood moves, metal reacts to heat, and composite expands more than you would think. I realized that why your pergola needs a mid-span post you didn’t account for is not just a suggestion; it is the difference between a structure that lasts and one that sags after three seasons. Another lightbulb moment was finally understanding composite decking secrets for longevity. It is not just about the boards; it is about how you treat the frame beneath them. If the foundation is weak, even the most expensive boards will not save the project from a bouncy, uncomfortable feel.
Tools That Saved My Sanity and My Structure
I do not go to any job site without my curated kit anymore. First, the level and laser method for setting pergola heights alone is non-negotiable for precision. It prevents that annoying slight slope that ruins your aesthetic. For hardware, I always rely on the steel bracket move for high wind pergolas because standard nails just do not offer the lateral resistance needed for a long-term build. And for the finishing touch, skip the harsh chemicals and use the vinegar and water mix that cleans composite better than chemicals to keep the surface pristine without damaging your landscaping or your pets’ paws. These tools are the bridge between a weekend hobby and professional-grade craftsmanship.
#IMAGE_PLACEHOLDER_E#
Stop Planning and Start Building Your Oasis
Your backyard should be more than just a place to store a grill; it should be an extension of your home’s personality. Do not let the fear of a DIY disaster stop you from pursuing your pergola design inspiration. With the right bracing and a focus on structural physics, you can create a space that offers both shade and stability. Start with a solid plan, verify your angles with the 3-4-5 triangle move for squaring up a new deck frame, and watch your vision come to life. Have you ever run into an unexpected structural wobble during a build, or did your spacing get wonky at the very last minute? Let me know in the comments below!