
It started as a tiny gap. One day, I was sitting out on my patio with a cold drink, looking up at the rafters of the pergola I’d finished just six months prior. One of those 2x8s was throwing a tantrum. It was twisting—slowly but surely—pulling away from the beam like it was trying to escape. It looked like a piece of rotini pasta made of cedar. I’d spent weeks obsessing over pergola design inspiration to get the look just right, only to have nature decide it had other plans for my lumber. It’s a gut-punch. You put in the sweat equity, you buy the expensive materials, and then the wood decides to go rogue. I felt like a failure, honestly. I thought I’d built a sanctuary, but I’d actually built a slow-motion wood-warping experiment. Every time I looked out my window, my eyes went straight to that one defect. It’s like a crooked tooth in a beautiful smile—it’s all you can see. I promise you, we are going to get that board back in line without tearing the whole structure down.
Stop the Corkscrew Before It Ruins Your Roofline
Wood is a living, breathing thing, even after it’s been milled, planed, and mounted high above your head. When that rafter starts to spiral, it’s not just an eyesore; it’s a structural headache waiting to happen. If you don’t catch it early, the torque can actually pull your heavy-duty hardware right out of the beam or cause unsightly cracking in the surrounding wood. I learned this the hard way years ago when I realized why I stopped using pine for pergola rafters—the high moisture content and fast growth cycles make it a nightmare for stability. But don’t panic. You don’t have to demo the whole structure or replace the board just yet. We’re going to use some old-school mechanical advantage and a bit of patience to force that board back into submission. It’s about being smarter than the timber. It’s that distinct sound of a screw straining against wood—a high-pitched creak—that still haunts my dreams from my first botched attempt to fix this. I’ve learned that brute force usually ends in a split board, so we are going to be more strategic.
Is My Twisted Rafter Actually Beyond Saving?
I know exactly what’s going through your head right now. You’re looking at that corkscrew and thinking, “Once the internal tension is that high, isn’t it impossible to fix?” It’s a valid skepticism. We’ve all seen wood that looks like it belongs in a modern art museum rather than a backyard. However, according to research from the USDA Forest Products Laboratory, wood is surprisingly plastic when you apply consistent force over time. The memory of the wood can be challenged. If you can see the twist, you can likely fight it. Early on, I made the amateur mistake of just driving a massive 6-inch screw into a twisted board, hoping it would pull it straight. I ended up snapping the screw head off and marring the wood. Today, we’re going to use a much more sophisticated approach—something I call the clamp and lever move. It’s safer for the wood and much more effective.
Why Your Lumber Is Fighting You
Most of the time, twisting happens because of uneven drying and grain orientation. If one side of your rafter is getting baked by the relentless afternoon sun while the other stays in the damp shade, those fibers are going to shrink at different rates. It’s basic physics, but it’s annoying as heck. Think about it like a sponge. If you leave a wet sponge on a radiator, it curls up. Your pergola rafters are no different. When the moisture leaves the wood cells, they collapse. If that collapse isn’t uniform, the whole board starts to pull. I used to ignore the little details, thinking they were just for pros, like the 15-degree cut that keeps water off beams. But I eventually realized that every single choice, from the way you seal the end grain to the way you orient the crown of the board, dictates whether your pergola stays straight for a decade or starts twisting by July. Have you ever looked up at your DIY project and realized a board was slowly turning into a pretzel? Drop me a comment if you’ve ever dealt with a piece of lumber that had a mind of its own—I’d love to hear how you handled it. You aren’t alone, and you don’t have to live with it. Let’s get that rafter back where it belongs.To fix a twisted rafter, you need more than just muscle; you need mechanical leverage. I learned this the hard way on a project in Georgia where the summer humidity turned my fresh rafters into corkscrews overnight. I tried to pull the board straight with my bare hands while my brother-in-law drove screws. Result? A stripped screw, a bruised knuckle, and a board that hadn’t moved an inch. That’s when I discovered the clamp and lever move. It’s like using a chiropractor’s touch on a 200-pound piece of wood, applying pressure exactly where the grain is most stubborn.
Force the Twist Out with a Heavy Duty Pipe Clamp
You’ll need a long pipe clamp and a sacrificial block of wood to protect the finish of your rafter. Secure the clamp to the main beam and the twisted end of the rafter. Slowly crank the handle. You want to hear the wood groan slightly, but never crack. If the twist is severe, do this over forty-eight hours rather than all at once. Crank it a quarter-turn, let it sit, then come back later to tighten it further. This gradual pressure allows the internal fibers to relax into their new shape. It’s the same logic we use when we’re making sure railing posts are plumb; precision and patience beat raw power every single time.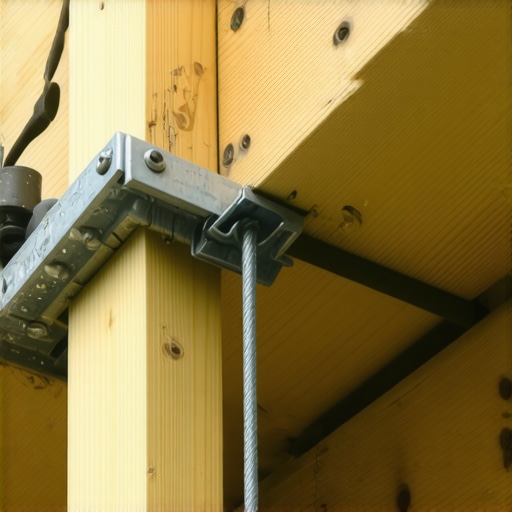
Use Structural Lags to Prevent Spring-Back
Once the rafter is flush against your beam and the twist is neutralized, don’t just reach for any old screw. Using the wrong length or type of screw is a recipe for a spring-back disaster that could damage your frame. I recommend structural lag screws with a wide, built-in washer head. These act like a permanent clamp, holding that tension forever so the wood can’t regain its memory. Think of it like the blocking trick that stops railing post wobble; you are creating multiple points of heavy-duty resistance so the lumber is forced to behave.
Add a Mid-Span Post for Long Spans
Sometimes a board twists because it’s simply working too hard over too long a distance. If your rafter is spanning fourteen feet or more without support, physics is working against you. You might find that your pergola needs a mid-span post to break up that tension and provide a new anchoring point. I once built a sixteen-foot span that looked like a roller coaster by the second year. Adding a central support post not only straightened the rafters but also stopped the entire structure from swaying when the wind picked up.
Seal the End Grains to Stop Future Warping
Moisture is the primary driver of wood movement. While you have the tools out and the board is finally straight, check your end grains. If they aren’t sealed, they are drinking in rain and humidity like a straw, which leads to the uneven drying that causes twists. This is exactly why pergola rafter tails always rot first. Use a high-quality wax-based sealer on the ends you just forced back into place. It’s a five-minute job that saves a weekend of repairs down the road. It’s the same attention to detail required when you’re learning how to select the perfect railing system; the small maintenance choices you make today prevent the massive structural failures of tomorrow.
Why Your Maintenance-Free Deck Still Needs a Professional Eye
The biggest myth in modern outdoor construction is that composite materials are a ‘set it and forget it’ solution. I see homeowners spend a fortune on high-end boards only to be heartbroken when they start to buckle. The reality is that while the boards themselves won’t rot, they are often victimized by the structure beneath them. In my experience, why your pressure-treated frame is pulling your composite apart is the most overlooked factor in deck longevity. Southern yellow pine—the standard for framing—shrinks and expands at a completely different rate than wood-plastic composites. This creates a mechanical tug-of-war that can shear off screws or pop boards loose. According to a study in the Forest Products Journal, wood-plastic composites can exhibit significant thermal expansion, often requiring much larger gaps than traditional timber to prevent ‘crowning.’ If you ignore this, you’ll likely face the frustration of why your composite boards are crowning and how to fix it within just a few seasons.
The Hidden Trap of Over-Cleaning Your Composite
People love the look of a fresh deck, and the first instinct when it gets a little muddy is to blast it with a pressure washer. This is a massive mistake. I’ve seen beautiful projects ruined because someone wanted a ‘quick clean.’ Understanding why you should never use a power washer on composite boards is essential because the high-pressure stream can etch the surface and drive moisture into the core, leading to mold issues that you can’t scrub away. Instead, I always recommend the vinegar and water mix that cleans composite better than chemicals. It’s gentler and preserves the factory finish that you paid a premium for. This is part of the broader composite decking secrets and longevity tips that differentiate a deck built for five years from one built for twenty-five.
How Do I Stop My Composite Deck from Feeling Like a Trampoline?
This is a sophisticated concern that separates the amateurs from the pros. If you’ve ever walked on a deck and felt a slight ‘bounce’ or ‘spring’ underfoot, you’re likely dealing with a joist spacing issue. While building codes often allow for 16-inch spacing, why your composite deck feels spongy between joists usually boils down to the fact that composite isn’t as stiff as natural wood. For a truly high-end feel, you have to use the framing move that stops deck boards from bouncing, which usually involves tightening those joists to 12 inches on center. Furthermore, if you are using wider profiles, you need to be aware of why hidden fasteners fail on wide profile boards. The lateral force from thermal expansion on a wider board can easily overwhelm standard clips. Have you ever fallen into this trap or noticed your deck feeling a bit soft underfoot? Let me know in the comments. We should always be aiming for a structure that feels as solid as your indoor living room floor.
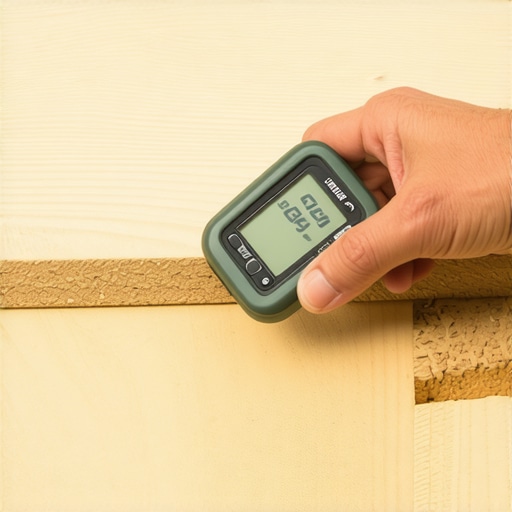
That spongy feeling underfoot or the slow spiral of a pergola rafter is usually a symptom of a deeper issue: moisture management. To keep your outdoor sanctuary from becoming a maintenance nightmare, you need to transition from being a weekend warrior to a structural guardian. I never step onto a job site without my pin-style moisture meter. While most homeowners focus on the aesthetic of the boards, I’m obsessed with the internal percentage of the pressure-treated frame. If those joists are reading above 19% moisture, I won’t lay a single composite board. Installing expensive decking over ‘wet’ lumber is a recipe for the frame pulling apart as it dries, which is exactly why I prioritize composite decking secrets and longevity tips that start with the skeleton, not the skin.
Why a Moisture Meter is My Most Trusted Sidekick
I use a Wagner Orion meter because it gives me a non-destructive look into the core of the timber. Most people think they can eyeball ‘dry’ wood, but you’d be surprised how much water stays trapped in the center of a 4×10 beam. If you cap wet wood with composite, you’re essentially creating a humidor that accelerates rot. This is often the hidden culprit behind why your pressure-treated frame is pulling your composite apart. Beyond that, I swear by the jig I use for consistent deck screw depth. It ensures every fastener sits exactly 1/8th of an inch below the surface, allowing for thermal expansion without creating those ugly ‘mushroom’ bumps around the screw heads. If you aren’t using a depth-setting driver, you’re leaving your deck’s finish to chance.
How do I maintain structural integrity over twenty years?
Maintenance isn’t just about cleaning; it’s about forensic inspection. Every spring, I recommend the ‘ice pick test.’ You take a simple awl or ice pick and probe the areas where wood meets metal—specifically around the ledger board and joist hangers. If the wood feels soft like a ripe peach, you’ve got a localized rot issue that needs immediate attention. This is the most effective way of the ice pick test for checking joist strength on older decks. According to the Simpson Strong-Tie Technical Bulletin (T-C-CORROSION), the chemicals in modern pressure-treated lumber are incredibly corrosive to standard zinc-plated hardware. I only use G185 galvanized or stainless steel connectors to ensure that the ‘glue’ holding the deck together doesn’t dissolve over the next decade. If you’re unsure about your frame’s health, learning how to test your deck for structural fatigue can save you from a catastrophic failure during your next summer BBQ.
Predicting the High-Tech Future of Backyard Builds
Looking ahead, I suspect we are moving toward ‘smart’ decks. We’re already seeing the emergence of integrated IoT sensors that can be embedded into the ledger board to alert homeowners of moisture spikes via a smartphone app. In the next five years, I predict that selecting the perfect railing system will involve integrated low-voltage lighting and sensors that can detect structural movement in real-time. This tech will take the guesswork out of maintenance. For now, your best defense is a proactive offense. Take ten minutes this weekend and perform the ice pick test on your ledger board. If you find something that worries you, don’t wait for it to get worse—reach out to a professional through our contact us page and let’s get it fixed before the season hits its peak.
The Hardest Lessons I Learned Fighting Rogue Lumber
Over the years, I’ve realized that wood isn’t a static building material; it’s a dynamic force. When I first started, I thought a few extra nails would hold a twist, but I was wrong. Here is what I know now: First, the orientation of the grain matters more than the thickness of the board. If the ‘rings’ are tight, that board is going to fight you twice as hard. Second, heat is your ally. If a board is particularly stubborn, I’ve occasionally used a heat gun to gently warm the fibers before applying the final crank on the clamp. Finally, never underestimate the power of composite decking secrets and longevity tips that focus on the substructure. If your frame isn’t solid, your beautiful finish will never stay level.
My Personal Kit for Taming Wild Rafters
I don’t believe in buying every gadget at the hardware store, but these three are non-negotiable for me. I trust the Wagner Orion Moisture Meter because it prevents me from installing boards over ‘wet’ frames that will inevitably pull apart. For the actual straightening, a set of 3/4-inch heavy-duty pipe clamps provides the consistent torque needed for the clamp and lever move. Lastly, I always keep a box of structural lag screws handy. They have the shear strength to hold a twisted rafter in place forever, avoiding the common 3-inch screw mistake that ruins composite joists and wooden structures alike. When you are finalizing the look, using the jig I use for consistent deck screw depth ensures a professional finish that won’t distract the eye.
Your Path to a Perfectly Straight Sanctuary
Building a pergola is about more than just shade; it’s about creating a space where you can relax without staring at defects. Don’t let a single twisted board ruin the hours of work you put into your pergola design inspiration. Whether you are adjusting a rafter or figuring out how to select the perfect railing system, the key is attention to detail and respecting the material. With the right leverage and a little bit of patience, you can reclaim your roofline and ensure your outdoor living area remains a source of pride rather than a list of chores. Go grab those clamps and get to work—you’ve got this.
Have you ever had a piece of lumber that felt like it was trying to wrestle you during a build? Let me know how you handled it in the comments below.