
I remember the Saturday I finished my backyard renovation. Those white vinyl railings looked like a pristine picket fence straight out of a luxury magazine. I sat there with a cold drink, admiring how they popped against my green lawn. Fast forward three summers, and that ‘crisp white’ had transformed into a sickly, jaundiced yellow that made my whole house look neglected. It was embarrassing. I tried scrubbing with regular soap, then I got desperate and reached for the heavy-duty stuff, which was a massive mistake. I didn’t realize that the very thing I was using to ‘clean’ was actually making the problem worse. Today, I am going to show you exactly why this happens and how you can restore that bright finish without buying an entirely new railing system for safety and style.
Why Your Crisp White Finish Is Turning Into an Eyesore
The truth is, your railings aren’t just ‘dirty.’ What you are seeing is likely a chemical reaction called oxidation or UV degradation. Most white railings are made of PVC, and manufacturers add titanium dioxide to act as a sunscreen. When that protective layer gets worn down by the sun or harsh cleaners, the plastic underneath begins to break down. This is especially common if you live in a high-heat area or if your deck gets direct afternoon sun for six hours a day. I learned the hard way that you can’t just treat vinyl like wood. While you might be used to maintaining pressure-treated wood, vinyl requires a much gentler, specific touch. According to the International Association of Certified Home Inspectors (InterNACHI), the breakdown of exterior plastics is often accelerated by environmental pollutants that ‘bake’ into the surface under UV light. If you’ve invested in low-maintenance composite decking, seeing your railings fail can be incredibly frustrating, but it is rarely a death sentence for the material.
Is This Staining Permanent or Can We Save It?
One of the biggest fears I had when I saw the yellowing was that I’d have to rip the whole thing out and start over. I’ve seen neighbors give up and just paint over their vinyl, which is a disaster waiting to happen. You might be wondering if it’s even possible to get that factory-white glow back once the sun has done its damage. The answer is usually yes, but only if you stop using the wrong tools. My biggest mistake early on was using bleach. I thought more power meant more clean, but I quickly found out why you should never use bleach on your deck surfaces. It dries out the material and creates microscopic cracks where even more yellowing can take hold. Have you already noticed a few yellow patches starting to creep up on your posts, or has the whole run already turned that dreaded shade of ‘old tooth’? I want to hear about your struggles in the comments, because believe me, I have tried every ‘miracle’ spray on the market before finding what actually works. Understanding why vinyl railings yellow and how to fix the look is the first step toward a backyard you aren’t ashamed to show off to the neighbors.
Start with a Simple Wash Down
Before you tackle the yellowing itself, you have to get the environmental film off the surface. I’m talking about the pollen, dust, and spider webs that act like a shield for the oxidation underneath. I use a bucket of warm water mixed with a generous squirt of grease-cutting dish soap. When I did this on my own back corner post, I realized that half of what I thought was permanent damage was just ‘organic buildup.’ Use a soft-bristle brush to get into the crevices. If you used the simple tool for making sure your railing posts are plumb during installation, you’ll find it much easier to scrub the vertical lines without missing those awkward angles. Don’t use a pressure washer here; you aren’t trying to blast the color off, just clear the field.
Use Melamine Sponges for the Tough Stuff
This was the game-changer for me. If the soap doesn’t work, reach for a melamine sponge—you probably know them as Magic Erasers. These sponges are micro-abrasive, which sounds scary, but they are just gentle enough to lift the oxidized top layer without gouging the plastic. I remember the first time I tried this; I was skeptical, but seeing the yellow tint literally melt onto the sponge while the factory-white finish emerged underneath was incredibly satisfying. It’s a bit like exfoliating your skin. This technique works wonders on any railing system for safety and style that has lost its luster. Just keep the sponge wet and use light, circular motions. 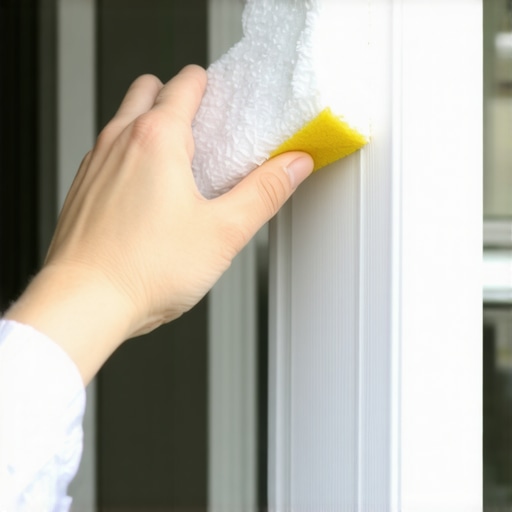
The Vinegar and Baking Soda Paste Trick
If the melamine sponge isn’t enough to handle stubborn ‘old tooth’ yellowing, I go for a DIY paste. Mix two parts white vinegar with one part baking soda until it bubbles into a thick slurry. The vinegar acts as a mild acid to break down the UV-damaged polymers, while the baking soda provides just enough grit to lift the stains. I applied this to my stairs three years ago when the afternoon sun had baked the yellowing deep into the PVC. I let it sit for ten minutes—long enough to see the paste start to pull the discoloration out—then wiped it clean with a microfiber cloth. It is a much safer alternative than the harsh chemicals some people suggest when they are selecting the perfect railing system for long-term durability.
Protect Your Progress with a UV Inhibitor
The biggest mistake people make is stopping once the railing looks white again. You’ve just stripped away the dead plastic, leaving the fresh material exposed to the same sun that caused the problem in the first place. You need a ‘sunscreen’ for your deck. I use a high-quality marine-grade UV protectant spray, the kind designed for boat seats or vinyl car tops. This creates a barrier that reflects UV rays and prevents the titanium dioxide from breaking down again. When you’ve invested time into low-maintenance composite decking, adding this five-minute step to your annual routine ensures the railings don’t become the weakest link in your backyard’s aesthetic. I usually apply it with a clean cloth once every spring, and since I started doing that, the yellowing hasn’t returned. It’s a small price to pay for keeping that ‘new house’ look for a decade or more.
Everyone tells you that once you switch to composite, your work is done. That is a dangerous half-truth that often leads to homeowners ignoring the structural bones beneath their beautiful boards. While you are busy applying UV protectants to your railings, the skeleton of your deck might be slowly losing its fight against the elements. I have seen too many people focus on the aesthetics of durable solutions for modern outdoor living while neglecting the pressure-treated lumber underneath. The reality is that composite decking acts as a thermal blanket, trapping moisture against the wood joists. This is a common trap: if you do not use something like the flashing tape move that doubles the life of your joists, you are essentially setting a timer for structural failure. According to the North American Deck and Railing Association (NADRA), nearly half of the 60 million decks in the U.S. are past their useful life, often due to hidden decay that goes unnoticed because the surface looks brand new.
The Low-Maintenance Myth Everyone Buys Into
The biggest contrarian view I hold is that ‘low maintenance’ does not mean ‘no maintenance.’ In fact, composite requires a more analytical eye than wood because wood tells you when it is failing—it splinters, cracks, and rots visibly. Composite hides the truth. I once visited a client who had beautiful low-maintenance composite decking that looked flawless, but the stairs were literally bouncing. We discovered that the installer had missed the expansion gap rule that stops boards from buckling, which put so much pressure on the rim joists that the fasteners were shearing off. This is why I always tell people to check their longevity tips for a lasting deck at least once a year. If you treat your deck like a ‘set it and forget it’ appliance, you are going to be in for a five-figure surprise in a decade. Have you ever noticed your boards shifting or heard a strange ‘pop’ on a hot day? Let me know in the comments, because that is the first sign of a major expansion issue.
Why Are My Fasteners Popping Even Though I Used a Professional Kit?
This is a sophisticated question I get from DIYers who did everything ‘by the book.’ The answer usually lies in the thermal physics of capped polymers. Unlike wood, which expands mostly in width with moisture, composite expands in length with heat. If you have a long run of boards and didn’t account for the temperature at the time of installation, the boards will move like an accordion. This is exactly why your hidden fasteners are popping up in heat. It is a nuanced mistake that even pros make. I highly recommend that before you lay a single board, you look into why you need a 3d model before buying a single deck board. A good model doesn’t just show you colors; it helps you calculate the layout to minimize butt-joints where these failures usually happen. This is also why I’m a huge advocate for why pressure-treated wood still needs maintenance under composite; if the frame moves even slightly due to rot, the rigid composite will have nowhere to go but up. If you are feeling a bit of a ‘give’ when you walk, it might be the structural reason your deck feels bouncy rather than a board issue. Take the time to look underneath this weekend—it’s the difference between a deck that lasts fifteen years and one that lasts fifty.
Throw Away Your Old Level for a Rotary Laser
I used to be a purist with my 4-foot spirit level, but when you are dealing with a 40-foot run of composite, that little bubble is more of a suggestion than a rule. Now, I never set a post without a rotary laser level. Why? Because it allows me to establish a single, perfectly flat datum point across the entire backyard. If you are aiming for those innovative deck design ideas that elevate your homes curb appeal, you cannot afford a half-inch sag over the length of your frame. I’ve found that using a laser also helps me spot when a joist is ‘crowned’ too high before the decking goes down. If you want to get professional results, start by using the string line secret for perfectly level railing runs in conjunction with your laser. It’s the only way to ensure your top rail looks like a laser beam cutting through the air.
Scale Your Space with Invisible Connections
Once the deck is solid, most of my clients want to move vertically with a pergola. This is where the amateurs get separated from the pros. I refuse to use bulky, galvanized hurricane ties that look like something from a warehouse. Instead, I rely on the hidden bracket hack for invisible pergola connections. These internal structural fasteners allow you to achieve those clean, minimalist lines found in pergola trends crafting shade elegance in your outdoor space. According to the American Wood Council’s National Design Specification (NDS) for Wood Construction, the withdrawal strength of your fasteners is the single most critical factor in preventing uplift during high-wind events. Using high-quality, specialized structural screws instead of standard lag bolts gives you a much higher safety margin while keeping the hardware completely hidden from view. 
How do I maintain my composite deck and pergola over time?
The secret to a deck that looks brand new for twenty years isn’t a magic chemical; it’s a schedule. Every spring, I perform the 15-minute deck inspection every homeowner should do. I’m looking specifically for any debris caught in the gaps. If you let wet leaves sit in those spaces, they turn into a localized compost pile that will eventually rot your joists, even if the boards themselves are plastic. I also suggest checking your longevity tips for a lasting deck to ensure your drainage is still flowing away from the house. For pergolas, I take a soft cloth and wipe down the rafters to prevent spider nests and dust from ‘baking’ into the finish under the summer sun. It sounds tedious, but thirty minutes of work once a year saves you three days of scrubbing five years down the road.
Automation is Coming to Your Backyard
Looking ahead, I predict the next big shift in outdoor living isn’t a new material, but integrated technology. We are already seeing ‘smart’ pergolas with louvers that close automatically when they sense rain. In the next few years, I expect durable solutions for modern outdoor living to include built-in sensors that alert you if a joist is retaining too much moisture or if a railing post has become loose. The ‘low-maintenance’ dream is evolving into a ‘self-monitoring’ reality. If you want to stay ahead of the curve, I challenge you to try one advanced move this weekend: go under your deck and apply flashing tape to just one exposed joist. Once you see how it sheds water, you’ll never build without it again.
The Truth About Low-Maintenance Decks I Learned the Hard Way
After years of building and maintaining these structures, I’ve realized that the term ‘maintenance-free’ is the biggest marketing lie in the industry. First, remember that white vinyl is a UV magnet; restoring it is great, but applying a protectant is what actually saves your weekends. Second, I’ve learned that the most expensive durable solutions for modern outdoor living are only as good as the airflow beneath them. If your deck is close to the ground, you must prioritize the drainage secret for decks built close to the ground to prevent the frame from rotting while the top looks perfect. Finally, never ignore a ‘creak’ or a ‘pop.’ These are the sounds of thermal expansion, and catching a tight board early can save you from a complete hardware failure where boards might warp or fasteners snap.
The Gear That Lives in My Truck for Every Deck Build
I don’t leave for a job site without a few specific items that have saved my reputation more than once. For perfectly straight lines, I rely on a rotary laser level; it’s the only way to ensure your railing system for safety and style looks professional across a long span. For cleaning, I always keep a bulk pack of melamine sponges—they are the ‘magic’ behind removing oxidation without harsh chemicals. When it comes to planning, I swear by 3D modeling software. I’ve seen too many people waste thousands of dollars because they didn’t realize why you need a 3d model before buying a single deck board to visualize the expansion gaps and structural layout. Lastly, marine-grade UV inhibitor spray is my secret weapon for keeping vinyl from yellowing again after a deep clean.
Reclaim Your Backyard Sanctuary Today
Building and maintaining a deck shouldn’t feel like a second job. It’s about creating a space where you can relax without staring at yellowed posts or worrying about a bouncy step. By taking these small, proactive steps—like checking your joists or refreshing your railing’s UV coat—you ensure your composite decking remains the centerpiece of your home for decades. Don’t let the fear of ‘doing it wrong’ stop you from starting. Your outdoor space is an extension of your life, and it deserves the care that keeps it beautiful. Whether you’re researching pergola designs that turn your garden into a sanctuary or just trying to get your white fence back to its original glow, the effort you put in now pays off every single summer evening. Have you noticed your vinyl railings losing their luster, or are you struggling with popping fasteners in the summer heat? Let me know in the comments below!