
I remember standing on my back patio, holding a four-foot level against a chunky 6×6 post, and feeling a slow sense of dread. My concrete wasn’t flat; it was a gentle, deceptive hill designed to whisk rainwater away from my foundation. When I first tried to just ‘bolt it down’ using standard brackets, the entire frame looked like a ship listing in a heavy swell. I made the classic rookie mistake of thinking a few plastic shims would fix a half-inch gap—a move that eventually led to a wobbly structure and a lot of wasted cedar when the wind picked up. I’ve learned since then that while the 2-degree slope trick for proper deck water runoff is a lifesaver for your home’s dry basement, it is a total headache when you are trying to build a perfectly level overhead structure. Today, we are going to fix that. I am going to show you how to get a rock-solid, perfectly plumb pergola even when the ground beneath your feet is playing tricks on you.
Your Pergola Does Not Have to Lean with the Patio
Creating pergola designs that turn your garden into a sanctuary starts with a foundation that will not move a single inch. Most homeowners realize too late that a concrete slab is rarely level. It should not be! You need that pitch to prevent puddles against your siding. But when you are trying to master the notched rafter secret for a pergola that never wobbles, starting with uneven posts is a recipe for a structural disaster. In my early days, I tried to skip the ‘scribe and cut’ method and just tightened the anchor bolts until the steel bracket actually started to bend. It was ugly, it was unsafe, and it is exactly the kind of frustration we are going to avoid today. Whether you are eventually adding composite decking trends around the base or sticking with the raw concrete, the physics of anchoring remains the same: the post must be vertical, regardless of the floor’s angle.
Will My Pergola Look Crooked if the Floor is Slanted?
This is the biggest fear I hear from my neighbors. They worry that if the top of the pergola is perfectly level, but the patio is sloped, the whole thing will look visually ‘off.’ In reality, the human eye craves a level horizon. If your rafters are sloped to match the floor, the whole structure feels like it is sliding away. According to the American Society of Civil Engineers (ASCE), wind uplift forces on open structures like pergolas can be surprisingly high, making the connection between the post and the concrete the most critical failure point. If your hardware is stressed by an uneven fit, it simply cannot do its job. Have you ever started a backyard project only to realize your ‘flat’ ground was actually a hill? I’d love to hear about your patio nightmares in the comments! I have found that why 6×6 posts look better than 4x4s becomes even more apparent on sloped ground, as the thicker timber provides more surface area to hide the necessary adjustments. We are about to dive into the exact tools and shimming techniques you need to bridge that gap between ‘leaning’ and ‘legendary.’
Locate Your High Point Before Cutting Anything
The first rule of thumb is to identify the highest spot on your patio. This is your ‘Zero Point.’ If you start at the low end and try to build up, you will end up with a post floating in mid-air. I remember a job where I rushed this part; I set my first post on the low side, and by the time I reached the house side, the post was practically three inches too short. I had to turn that timber into expensive firewood. Instead, use a clear plastic tube filled with water—a simple water level—to find where the concrete peaks. Once you have that Zero Point, every other post length will be calculated by measuring how much the ground ‘drops’ away from it. This ensures that while the bottom of your posts are at different heights, the tops create a perfectly level plane for your rafters.
Get a Perfect Fit by Scribing the Post Base
Scribing is where the magic happens. You set your 6×6 post in its bracket, get it perfectly plumb using a level on two adjacent sides, and then use a small block of wood—the thickness of your gap—to trace the contour of the concrete onto the wood. It is exactly like how to scribe deck boards to an uneven stone foundation. By following the slope with your pencil, you create a custom cut line that, once trimmed with a circular saw, allows the post to sit flush against the concrete while remaining perfectly vertical. It is the difference between a structure that looks like a professional built it and one that looks like a DIY disaster.

Avoid the Lean by Using the Right Anchors
Once your posts are cut to the slope, the hardware you choose is your last line of defense against the elements. If you use cheap, thin brackets, the weight of the pergola will eventually cause the metal to deform to the angle of the floor. I highly recommend using elevated post bases. Not only do they keep the wood out of standing water—preventing the same issues where why your post bases are rusting and the fix becomes a necessity—but they also allow for slight adjustments. If you are dealing with a particularly nasty slope, the 5-shim trick for leveling out-of-square deck frames can be adapted here using stainless steel washers to provide a stable, level platform for the post to sit on inside the bracket.
Square the Top Frame Using the 3-4-5 Rule
Precision does not stop at the ground. Once your posts are anchored, you need to ensure the top frame is a perfect rectangle, not a parallelogram. I always use the 3-4-5 rule for squaring your deck frame every time, even for overhead structures. On one project, the patio was so skewed that the posts looked square but the rafters were nearly four inches out of alignment. If you do not catch that before you start the notched rafter secret for a pergola that never wobbles, the notches simply will not line up. You will be fighting the wood for the rest of the day. To keep things clean, I often use the hidden bracket hack for invisible pergola connections so that all your hard work leveling and squaring is not cluttered by bulky galvanized steel hardware.
A common misconception I see on DIY forums is that attaching your pergola to your house via a ledger board is always the ‘safer’ bet for stability. In my experience, I have found that the ledger-free pergola is often better precisely because it avoids the complexity of flashing and potential rot at your home’s foundation. When you attach to a house, you are marrying two structures with different vibration frequencies. If the ground shifts slightly—and on a sloped patio, it often does—one structure will inevitably pull on the other. By keeping it freestanding, you allow the pergola to be its own independent, flexible unit. However, the ‘Oops’ factor here is skipping the mid-span support. Even a perfectly level top will eventually sag under its own weight if you have not implemented the simple blocking move that stops your deck from shaking when you walk, which I frequently adapt for overhead rafters to prevent that annoying ‘pergola bounce’ in high winds.
Why rigid connections might be your worst enemy
You would think the tighter you crank those bolts, the more stable the pergola becomes. But the American Institute of Timber Construction (AITC) notes that wood needs to expand and contract with moisture cycles. If you over-tighten a steel bracket against a 6×6 post, you risk ‘crushing’ the wood fibers. This creates a microscopic reservoir where water can sit, leading to internal rot that you will not see until the post snaps. This is why why pressure-treated wood still needs maintenance even if it is rated for ground contact. I have seen homeowners use impact drivers to bury bolt heads an inch deep into the timber—do not do this. It compromises the structural integrity and makes why your post bases are rusting and the fix a much more expensive conversation down the road.
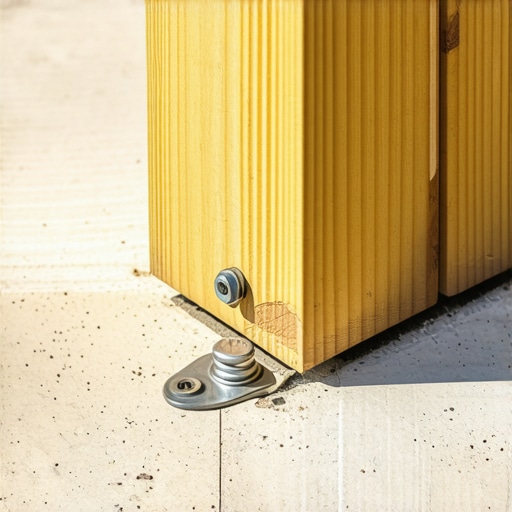
How do you stop lateral sway without ugly knee braces?
This is the question I get from homeowners who want a clean look but do not want giant 45-degree angles blocking their view. The secret lies in the depth of your notches and the thickness of your hardware. While most people focus on the vertical load, the lateral load (wind pushing from the side) is what actually causes collapses. By using the notched rafter secret for a pergola that never wobbles, you are creating mechanical ‘shoulders’ that resist swaying. If you combine that with recessed structural screws, you get the strength without the bulk. Also, never forget that the expansion gap rule is not just for floorboards; it applies to where your rafters meet your beams too. If you lock them down too tight without a millimeter of breathing room, the wood will twist as it dries. Have you ever tightened a bolt so hard the wood started to groan, thinking you were making it stronger? I definitely have, and I paid for it two seasons later. Have you ever fallen into this trap? Let me know in the comments.
Stop Guessing with a High-End Laser Level
I used to be a string-and-bubble purist until a client asked me to build a twenty-foot pergola over a multi-tiered patio. Trying to keep a string line perfectly tight over that distance without it sagging in the middle is a fool’s errand. Now, I never set foot on a job site without a self-leveling rotary laser. It is not just about speed; it is about absolute precision over long spans. If your post heights are off by even an eighth of an inch, your rafters will ‘walk’ out of alignment as you install them. Beyond the physical tools, I strongly suggest you realize why you need a 3d model before buying a single deck board. Seeing your structure in a digital space helps you catch those weird slope intersections before you ever fire up the saw. This is especially true if you plan on eventually adding pergola trends like motorized louvers or heavy shade systems, which require surgical precision at the frame level to function without binding.
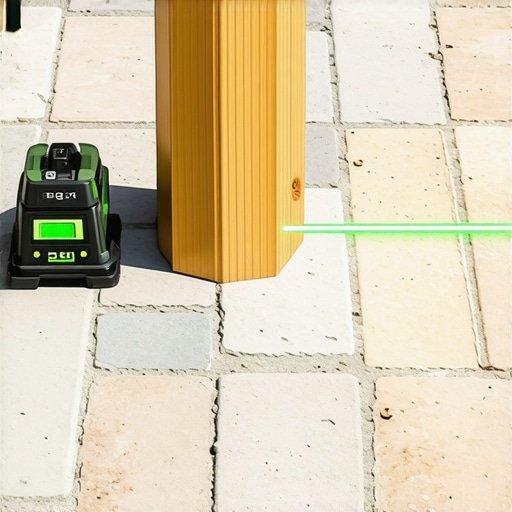
How do I keep my pergola from rotting in five years?
Maintenance is more than just a fresh coat of stain every two seasons; it starts with protecting the wood where water naturally pools. According to Simpson Strong-Tie’s Technical Bulletin T-C-FAST24, high-copper wood treatments in pressure-treated lumber can cause severe galvanic corrosion on standard fasteners in wet environments. This is why I only use 316-grade stainless steel for any hardware touching the post base. To extend the life of your overhead beams, I swear by the flashing tape move that doubles the life of your joists. Applying a butyl-based tape to the top of your horizontal rafters creates a permanent waterproof barrier that prevents the ‘top-down’ rot that usually kills these structures. Even with high-end timber, remember that why pressure-treated wood still needs maintenance is a reality you cannot ignore. Every spring, you should perform the 15-minute deck inspection every homeowner should do, paying close attention to the post bases and checking for any signs of rust or wood softening at the ground level.
High-Tech Shades and Integrated Lights are the Next Big Thing
Looking ahead to 2025, the industry is moving away from static structures toward ‘smart’ outdoor living spaces. We are seeing a massive shift where pergola designs are integrated with sensor-driven shade sails and low-voltage lighting that automatically adjusts based on the sun’s position. If you are building today, you should be pre-drilling your posts and beams for internal wiring, even if you are not installing the tech yet. It is significantly easier to hide a wire inside a notched post now than to try and retro-fit it later. To ensure your investment holds its resale value, I recommend following composite decking secrets longevity tips for a lasting deck, even for your overhead trim pieces. If you want to really level up your DIY game, try my favorite advanced tip: use a router to create a 1/8-inch ‘drip edge’ groove on the underside of your main beams. This forces rainwater to fall straight off the beam rather than tracking back toward your posts and hardware. Give it a shot on your next build—it is a small detail that makes a massive structural difference a decade down the road.
What Most Backyard Guides Forget to Tell You About Leveling
Building over a slope isn’t just about math; it’s about managing the reality of natural materials. First, never assume a post is straight just because it came from a reputable yard. Always check for crowns and twists before you scribe. Second, remember that ‘close enough’ is the enemy of structural integrity; an eighth of an inch out of plumb at the base can translate to three inches of lean at the top of a tall structure. Finally, prioritize the air gap. If your post touches the concrete directly, you are inviting rot, no matter how much sealer you apply. These are the small nuances that separate a weekend project from a generational addition to your home.
The Shortlist of Tools That Saved My Sanity
If you are serious about getting this right, you need to move beyond a standard bubble level. I rely heavily on a high-end rotary laser level to establish my benchmark heights across wide spans; it is much more reliable than the old the string line secret for perfectly level railing runs when you are working solo. For the hardware, I never compromise on 316 stainless steel elevated post bases; they are the only things that truly stop the corrosion cycle. I also recommend checking out pergola design inspiration from modern to classic looks to help you visualize how your hardware choice will impact the final aesthetic before you buy your materials.
#IMAGE_PLACE_HOLDER_E#
The View from Your New Level Horizon
There is a specific kind of magic that happens when you set that last rafter into its notch and realize the whole structure is perfectly level, despite the ground beneath it sloping away. It transforms your backyard into a deliberate, architecturally sound space. Whether you are aiming for innovative deck design ideas for 2025 or a simple traditional retreat, mastering these leveling techniques ensures your work will stand the test of time and weather. Don’t let the slope intimidate you; use it as a guide to build something better. If you are looking to complete the look, consider how custom railing systems for safety and style can further define your outdoor sanctuary.
Have you ever spent hours trying to level a post only to realize your level was actually the thing that was broken? Let me know your biggest DIY frustration in the comments!