
I remember sitting in my kitchen three years ago, watching horizontal rain lash against the window. Every time a gust hit, my beautiful cedar pergola—the one I’d spent three grueling weekends building—shook with a sickening, hollow thud. I hadn’t just built a backyard sanctuary; I’d built a massive wooden kite. That night, I didn’t sleep. I just waited for the sound of splintering wood and the inevitable crash of timber against my siding.
Why Your Pergola is Secretly Trying to Fly Away
Most of us spend weeks obsessing over pergola design inspiration, picking the perfect stain, or debating the cedar vs pressure-treated debate. We focus on gravity—keeping the heavy wood up. But we completely ignore uplift. Wind doesn’t just push against your structure; it gets underneath the rafters and tries to rip the whole thing out of the ground. I’m going to show you the “steel bracket move” that changed everything for my builds. It’s the specific way we bridge the gap between the post and the beam using structural steel that actually locks the skeleton together. I learned the hard way why most DIY pergolas fail the uplift test in storms because I once relied on simple toe-nailing screws that snapped like toothpicks under pressure.
Do These Brackets Actually Make a Difference?
You might think a few extra timber screws or a heavier beam will keep things grounded, but physics is a cruel mistress. I made the classic mistake early on of using thin, decorative L-brackets from a big-box store. They looked “industrial,” but they were essentially tinfoil against a 60-mph gust. According to the Federal Emergency Management Agency (FEMA), wind loads on open-roof structures can create hundreds of pounds of upward force, often exceeding the actual weight of the lumber itself. If you aren’t using heavy-gauge, through-bolted steel, you’re just gambling with your property. Before you start your next project, you need to master the level and laser method for setting pergola heights to ensure those brackets sit perfectly flush. Have you ever stood on your deck during a storm and felt that subtle, terrifying vibration under your feet? That’s the sound of your structure gasping for better hardware. If you’re worried about your current setup, it might be time to look into how to anchor a pergola without digging massive holes using these reinforced steel techniques. Let’s get into the nitty-gritty of how to install these without making your backyard look like a construction site.
Build a Skeleton That Outlasts the Storm
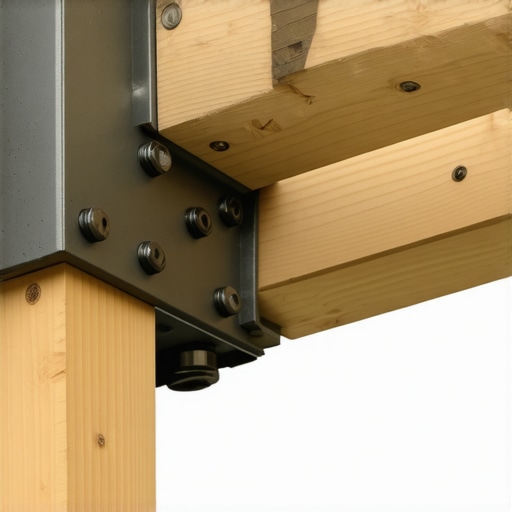
To keep your structure from becoming a neighborhood hazard, you have to treat the joint where the post meets the beam as the ‘knee’ of the building. In my early days, I thought a few 6-inch structural screws driven at an angle would be enough. Then came a June thunderstorm in Ohio. I watched from my porch as the entire 12×12 structure swayed like a drunk sailor. The screws hadn’t snapped yet, but the wood fibers were crushing under the pressure. I ended up spending the next Saturday morning with a bottle of jacks and a box of heavy-duty galvanized steel brackets, essentially performing emergency surgery on a brand-new build. Now, I never start a project without 12-gauge structural connectors that wrap the post and cradle the beam. These aren’t just ‘L-shaped’ pieces of metal; they are engineered tension ties designed to resist the exact uplift forces FEMA warns us about.
The Proper Way to Seat Your Beams
Before you even think about the hardware, you need to ensure your frame is perfectly square. I always use the 3-4-5 triangle move for squaring up a new deck frame or pergola footprint. Once square, the beam needs to sit directly on top of the post, or in a notch cut into the post. Never, ever rely on ‘bolting’ a beam to the side of a post where the bolts are the only thing holding the weight. That’s called a shear connection, and it’s a recipe for disaster. You want a bearing connection where the wood does the heavy lifting and the steel bracket acts as the insurance policy. While you’re at it, keep an eye on your spans; I’ve seen many projects fail because the builder didn’t realize why your pergola needs a mid-span post you didn’t account for when using heavier materials like wet-treated lumber.
Stop Guessing and Use a String Line
Alignment is where most DIYers lose their minds. You get one post perfectly vertical, then the second one is a quarter-inch off, and by the time you reach the fourth post, your beams look like a mountain range. To avoid this, I swear by the string line trick for perfectly plumb pergola beams. It’s a low-tech solution that beats a high-tech laser every time when the sun is too bright to see a red beam. You run a mason’s line tight across the tops of your posts to find the common height. This ensures that when you drop your steel brackets into place, they are all on the exact same plane. If they aren’t, the beam will ‘bridge’ over the low posts, creating a gap. That gap is where vibration starts, and vibration is what leads to hardware fatigue. I learned this the hard way when a client’s railing started rattling, and I realized why your railing bracket keeps snapping in the cold: it was because the metal was under constant pre-load stress from a frame that wasn’t level.
Through-Bolting is Your Secret Weapon
When you finally install those brackets, skip the lag screws and go for through-bolts with washers and nuts. A lag screw is only as strong as the wood grain it’s biting into. A through-bolt, however, clamps the entire assembly together. It’s like the difference between taping two boxes together and tying them with a heavy-duty ratchet strap. When you tighten that nut, you are compressing the wood and the steel into a single, rigid unit. This is the only way to ensure the ‘kite’ stays on the ground. This level of rigidity is a core principle of high-end pergola design inspiration, where the beauty of the wood is matched by the invisible strength of the engineering.
Why Your Over-Built Frame Might Be Fighting Itself
Most pros tell you to “beef it up,” but there is a point where over-engineering becomes a liability. I see guys driving twenty screws into a single joint, thinking they’re building a bunker. In reality, they are turning their lumber into Swiss cheese. The National Design Specification (NDS) for Wood Construction actually warns that placing fasteners too close together reduces the “net section” of the wood, making it more likely to split along the grain under stress. This is exactly why your pressure-treated frame is pulling your composite apart; the wood is trying to move, but the sheer density of hardware is causing internal fractures. If you don’t allow for the natural expansion and contraction of timber, the hardware you installed to protect the structure ends up becoming the very thing that destroys it.
Why Do Most Custom Railings Fail the Wind-Load Calculation?
I used to think solid privacy panels were the peak of luxury. Then I saw a client’s deck frame twist three inches because they’d installed solid glass panels without calculating the “drag coefficient.” High winds turn a solid railing into a literal sail, putting thousands of pounds of lateral pressure on your deck’s footers. This is why solid railing panels cause wind damage in storms while cable or baluster systems let the air bleed through. If you’re feeling a vibration during high winds, you might need to learn how to fix the bounce in your over-spanned deck joists before that lateral force pulls your ledger board away from the house. Safety isn’t just about weight; it’s about aerodynamics.
#IMAGE_PLACE_HOLDER_C#
The Leverage Trap Most Builders Ignore
Let’s talk about the railing post. Everyone bolts them to the rim joist and calls it a day. But a 36-inch post is a giant lever. If you don’t have internal blocking, you’re essentially trying to hold a sledgehammer by the very tip of the handle. I always use the blocking trick that stops railing post wobble by transferring that force into the second and third joists. Without it, you’ll fail the 3-second push test for wobbly railing systems before the first summer party is over. It’s these hidden nuances—the things you can’t see once the floorboards are down—that separate a project that lasts five years from one that lasts fifty. Have you ever fallen into this trap? Let me know in the comments.
The Gear That Separates Pros From Weekend Warriors
I’ve spent thousands on tools over the years, but if you forced me to keep just two for a deck or pergola build, I’d grab a high-quality depth-control bit and a simple roll of butyl tape. Most people think their deck dies from the top down, but it’s actually the moisture trapped between the board and the joist that kills it. That is exactly why I obsessed over the joist tape secret for doubling your decks life. It creates a waterproof seal around every screw penetration. Speaking of screws, stop guessing how deep to drive them. I always use the jig i use for consistent deck screw depth to ensure every fastener is perfectly countersunk without mushrooming the material. According to the American Wood Council’s DCA 6 guide, proper moisture management at these connection points is the single most important factor in preventing structural decay over a twenty-year span. If you aren’t protecting the crown of your joists, you’re essentially building a ticking clock.
#IMAGE_PLACE_HOLDER_D#
How do I keep my outdoor retreat from aging overnight?
Maintenance isn’t about a once-a-year power washing session. In fact, please put the power washer away. I’ve seen too many homeowners ruin their investment because they didn’t realize why you should never use a power washer on composite boards—it tears the protective ‘cap’ and leaves the core vulnerable to mold. Instead, I stick to the vinegar and water mix that cleans composite better than chemicals. It’s cheap, effective, and won’t kill your hostas. For those inevitable scratches from moving patio furniture, don’t panic. I’ve mastered how to fix scuffs on dark composite boards with a heat gun by gently blending the plastic back together. These composite decking secrets and longevity tips are what keep a deck looking like a showroom piece years after the contractor has cashed the check.
Steel and Sensors are the Future of Decking
Looking ahead to 2025 and beyond, the trend is moving toward ‘immortal’ framing. We are seeing a massive shift toward light-gauge steel joists that won’t warp, rot, or twist like pressure-treated pine. I also predict that integrated tech will become the standard, not the exception. We’re already installing 7 lighting ideas for modern outdoor kitchens that can be controlled via smartphone to change the ‘mood’ of the wood grain at night. The goal is to spend more time enjoying the space and less time worrying about the hardware. If you’re ready to stop maintaining and start living, I challenge you to try the heat gun scuff-fix on a scrap piece of board this weekend—it’s the kind of ‘magic trick’ that makes you feel like a true craftsman. For more tailored advice on your specific layout, feel free to contact us directly.
Hard Lessons from My First Storm-Struck Build
Looking back at that night in the rain, I realize my biggest mistake wasn’t the lumber choice; it was my arrogance toward physics. I treated my pergola like a piece of furniture rather than an architectural element. I’ve since learned that the skeleton is only as good as its weakest connection. One ‘lightbulb moment’ for me was realizing that steel doesn’t just hold things together; it absorbs the energy that would otherwise split your wood. Another hard-earned truth? Never trust a level when a string line can give you the truth across a twenty-foot span. Most importantly, I learned that composite decking secrets and longevity tips are worthless if the frame underneath is compromised. You have to build from the ground up with the assumption that nature wants your structure back.
The Tools That Rescued My Projects
If you’re stepping into the world of high-end outdoor construction, don’t walk onto the site without these three essentials. First, get a dedicated depth-control bit; the jig i use for consistent deck screw depth is the only way to avoid those ugly, water-trapping mushrooms in your boards. Second, invest in a roll of butyl tape to master the joist tape secret for doubling your decks life. It’s the cheapest insurance policy you’ll ever buy. Finally, keep a simple mason’s string line in your pocket. It’s more reliable in the high noon sun than any laser I’ve ever owned for ensuring your pergola design inspiration translates perfectly into a level reality.
#IMAGE_PLACE_HOLDER_E#
Turning Your Vision into a Legacy
Building an outdoor sanctuary isn’t just about the aesthetics; it’s about the peace of mind that comes when the wind starts to howl and you don’t feel the need to look out the window. Whether you are debating how to select the perfect railing system for every deck or just trying to get your first post in the ground, remember that every screw and every bracket is a commitment to quality. Don’t be afraid to over-engineer. Your future self, sitting comfortably under a rock-solid pergola while a storm passes, will thank you. If you ever hit a wall or need a second set of eyes on a complex layout, feel free to reach out through our contact page. Now, get out there and build something that lasts.
Have you ever had a DIY project that made you lose sleep during a big storm? Let me know in the comments below!