
I remember the first time I finished a “perfect” staircase. I had used the best lumber, checked my levels twice, and even used the 3-4-5 triangle move to ensure everything was square. But as I sat there with a cold drink, all I could see were those bulky, galvanized steel brackets screaming for attention against the warm cedar. It felt like wearing a tuxedo with bright orange hiking boots. It wasn’t just a minor detail; it was a distraction that made my professional-grade work look like a DIY weekend blunder. Today, I’m going to show you how to ditch that industrial look and give your stairs the high-end finish they deserve using custom trim blocks.
Those Industrial Brackets Don’t Belong on Your Masterpiece
When we talk about custom railing systems for safety and style, we often focus on the balusters or the top rail. We forget that the connection points are usually the ugliest part of the build. Most off-the-shelf hardware is designed for strength, not beauty. I’ve seen gorgeous composite decking trends ruined because the installer didn’t want to spend an extra twenty minutes hiding the nuts and bolts. I’ll be honest with you: early in my career, I tried to “hide” hardware by just slapping some wood putty over the bolt heads and painting it. It looked terrible. The paint peeled, the putty cracked, and it actually drew more attention to the area. That’s when I realized that custom trim blocks are the only way to achieve that seamless look. Have you ever stepped back from a project and felt like one tiny detail was sabotaging the whole vibe?
Is this just a waste of good lumber?
You might be thinking that nobody is going to crawl under your stairs to look at brackets. But here’s the thing: according to data frequently cited by the National Association of Realtors, the “joy score” of a completed outdoor project is significantly higher when the finished product feels cohesive and intentional. It’s about the “curb appeal” of your backyard. When you learn how to select the perfect railing system, you’re making a commitment to the overall design, and skipping the trim is like skipping the baseboards in your living room. We’re going to fix that today. We’ll look at how to create “u-shaped” sleeves that slide right over those stair headers and hide the hardware without compromising structural integrity. It’s a game-changer for anyone who wants their deck to look like it was built by a craftsman, not a kit.
Grab Your Offcuts and a Speed Square
Before you start cutting, you need to measure the footprint of your bracket with more precision than a tailor. I once worked on a massive project featuring innovative deck design ideas for 2025 where we used heavy-duty 6×6 posts. I thought I could eyeball the trim blocks, but the bolt heads stuck out just enough to make the trim sit crooked. It looked like a cheap hat on a statue. Now, I always measure the total depth from the wood face to the furthest tip of the bolt. You aren’t just building a box; you’re building a cavity. Use the pencil trick for marking dark composite boards or cedar to ensure your lines are crisp. If you’re using composite decking trends like dark greys or browns, that white carpenter’s pencil is your best friend here.
Build a Sleeve That Swallows the Hardware
The goal is a three-sided “U” sleeve. Think of it like a holster for your hardware. You’ll want two side pieces and one front face. If your bracket is 4 inches wide, your front face needs to be 4 inches plus the thickness of your two side walls. I prefer using 1x material for this—usually cedar or a ripped-down piece of your main decking. In 2019, I was finishing a staircase for a client who wanted a totally “floating” look. I tried to use 2x4s for the trim, but they looked too bulky, like a swollen thumb. I switched to 1×4 cedar and mitered the edges at a 45-degree angle. That small change shifted the project from “sturdy DIY” to “architectural masterpiece.” It’s these small custom railing systems for safety and style details that define the high-end market.
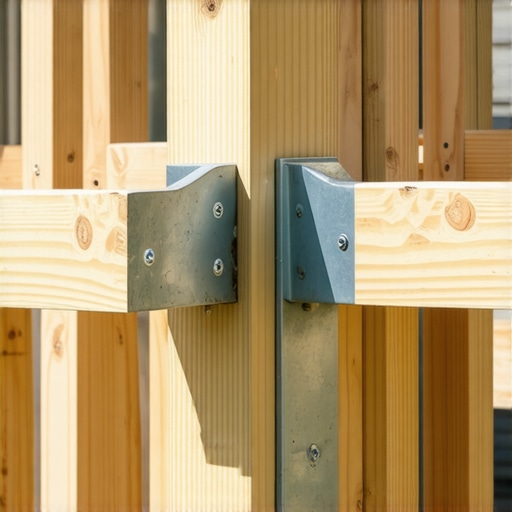
The Glue and Pin Nail Strategy
Because these blocks are mostly aesthetic, you don’t need giant structural screws. In fact, using them will just create more holes you have to hide. I use a high-quality exterior wood glue and a 23-gauge pin nailer. The pin nails are virtually invisible, especially if you’re working with the grain. This is similar to the blocking trick that stops railing post wobble—it’s about creating a tight, cohesive unit that doesn’t move. Slide the sleeve over your stair headers and the bracket. If it’s a tight fit, don’t force it. Use a wood rasp to clear out a little space inside the block rather than hammering it on. A hammered block is a block that will eventually crack when the seasons change and the wood expands.
Cut a Slope to Shed Rainwater
Stairs aren’t flat, which means the top of your trim block shouldn’t be either. If your stairs are set at a standard angle, your blocks need a matching bevel on the top edge to shed water. If you leave them flat, water will pool against the stair stringer, leading to rot faster than you can say “warranty claim.” It’s the same logic behind the 15-degree cut that keeps water off your pergola beams. I learned this the hard way on a lakefront property where the constant mist turned my flat-topped trim blocks into little bird baths. Within two seasons, the wood had softened and started to mold. Now, I always incorporate a slight slope or a matching miter to the stair pitch to ensure everything stays dry and durable.
Most people think the job is done once the stairs are “rock solid.” But there’s a nuance many pros miss: aesthetic longevity. You can have the strongest stair headers in the neighborhood, but if you don’t account for wood expansion, your trim blocks will pop off by next July. I used to believe that tighter was better. I wanted zero gaps, thinking it looked more professional. But wood is a living thing, even when it’s been pressure-treated. If you don’t leave room for it to breathe, you’re essentially building a pressure cooker for rot. In my experience, leaving a 1/16th-inch gap at the bottom of your trim sleeve allows for drainage and airflow without sacrificing the look.
Don’t Let Your Trim Become a Moisture Trap
The biggest mistake I see with railing systems for safety and style is the “over-sealing” error. Builders get so obsessed with a seamless finish that they caulk every single edge of their trim blocks. This is a massive mistake. When you seal the top and the bottom, any moisture that seeps in—and it will seep in through capillary action—is trapped against the metal bracket and the wood stringer. This is the exact reason why hidden fasteners can be a maintenance nightmare; they can hide structural decay until it’s too late. I’ve seen 4×4 posts rotted halfway through inside a perfectly “sealed” trim box because the water couldn’t escape.
Do You Really Need to Worry About the Thermal Move?
Absolutely, especially if you’re mixing materials to keep up with composite decking trends. If you’ve used composite boards for your trim but a pressure-treated frame, they will expand and contract at completely different rates. This is a common mistake when builders try to elevate your backyard with innovative deck design ideas without understanding material science. According to the Forest Products Laboratory, moisture-induced decay in wood joints increases significantly when evaporation is inhibited. Their research shows that “trap points” can accelerate fungal growth by up to 300% compared to ventilated joints. Learning how to stop composite deck boards from expanding effectively into your trim starts with choosing the right fasteners that allow for that tiny bit of lateral movement.
Why Material Science Beats Brute Force
I’ve had many DIYers ask me why they shouldn’t just use structural screws to pin their trim blocks. The answer is simple: the wood will win. If a 1×4 cedar block wants to swell in the humidity, a 3-inch structural screw will either split the trim or create a massive hole. That’s why the glue and pin nail strategy is superior. It allows the block to move as a single unit rather than being pinned rigidly to a stationary post. When you’re trying to transform your home with stunning deck design strategies, remember that the best builds are the ones that work with nature, not against it. Have you ever fallen into the trap of building something too tight, only to see it fail a year later? Let me know in the comments. If you’re currently planning a build and want to avoid these technical pitfalls, feel free to contact us. It’s better to plan for the ‘move’ now than to rebuild your stairs in three years.Once the dust settles and the tools are packed away, the real test of your craftsmanship begins. I’ve seen $50,000 projects look like junk in three years because the owner didn’t have a plan, and the builder didn’t provide one. To avoid that, you need to transition from a builder mindset to a steward mindset. I always tell my clients that maximizing outdoor living with low-maintenance composite decking doesn’t mean zero maintenance. It means smarter maintenance.
Tools That Separate the Pros from the Weekend Warriors
If you want those perfectly tight miter joints to stay tight, you need to stop using a standard circular saw for your finish cuts. I personally swear by a plunge-cut track saw with a 60-tooth carbide blade. Why? Because it eliminates the chatter that happens when a standard saw plate vibrates against a composite board. If you’re struggling with edges, try the painters tape hack for cutting composite boards without fraying; it’s a simple trick that saves hours of sanding. For the framing side, I never step onto a job site without a high-quality moisture meter. I won’t install composite over a frame that’s holding more than 19% moisture, or you’re just asking for your pressure-treated frame to pull your composite apart as it dries.
Keep Your Composite Looking Fresh Without Harsh Chemicals
How do I maintain my deck over time? Most people reach for the pressure washer, but that’s the fastest way to ruin the protective cap layer of your boards. I’ve seen homeowners literally peel the wood-grain texture right off. Instead, I recommend the vinegar and water mix that cleans composite better than chemicals. It’s gentle, it’s cheap, and it won’t kill your landscaping. It’s all part of the composite decking secrets and longevity tips that I’ve gathered over two decades. Combine this with the garden hose test for proper deck water runoff once every spring to ensure your slope is still doing its job.
The Ten-Minute Inspection That Saves Five Figures
You don’t need to be a structural engineer to spot trouble. Every October, I perform what I call the seasonal sweep. I grab a high-lumen LED light and perform the 10-minute flashlight test for finding hidden ledger rot. I’m looking for soft spots where the joists meet the house. As noted in the technical manuals by the American Wood Council (AWC), the ledger connection is the most common point of catastrophic failure in residential decks. They emphasize that proper flashing is more critical than the number of bolts used. If you see any staining or dampness behind that board, you need to act fast. I predict that in the next five years, we’ll see smart deck frames with embedded sensors to detect moisture levels before rot even starts. But until then, your eyes and a good flashlight are your best defense. If you’re worried about your current setup, I highly suggest you test your deck for structural fatigue this weekend. It’s better to find a loose bracket now than during your next summer BBQ.
The Secret to Making Hardware Disappear Without Trapping Rot
The hardest lesson I ever learned wasn’t how to cut a miter, but when to leave a gap. Early on, I thought a seamless look meant a hermetically sealed joint. I was wrong. If you don’t allow for airflow, even the best custom trim blocks become moisture traps. Always leave that tiny 1/16th-inch breathing room at the bottom. Another lightbulb moment? Realizing that why pressure-treated wood still rots under joist tape is often due to the same lack of ventilation. High-end work is as much about what you don’t see—like air circulation—as what you do see. If your stairs are technically sound but still vibrate, you might want to investigate why your deck stairs feel bouncy before you worry about the trim.
#IMAGE_PLACEHOLDER_E#
Essential Gear for That High-End Finish
To get these results, I rely on a few specific tools that save me from headaches. First, a 23-gauge pin nailer is non-negotiable for trim work; it leaves a hole so small you can’t find it after a coat of finish. Second, a high-quality moisture meter ensures the frame is dry enough to accept the trim without warping later. Finally, the simple tool for making sure your railing posts are plumb is essential before you even think about measuring for your custom sleeves. I also recommend checking the technical guides from the American Wood Council for the latest on ledger and stair safety—they are the gold standard for structural peace of mind.
Take Your Stairs Beyond the Basic Kit
Building a deck is a massive undertaking, but the difference between a ‘good’ deck and a ‘great’ one is always in the final 5% of the work. By taking the time to hide those industrial brackets with custom trim blocks, you are telling everyone who walks up those steps that you care about the details. It is about creating a space that feels like an extension of your home, not just an outdoor platform. Don’t be afraid to take it slow and get those miters tight. You have the skills and the plan—now go make it happen. If you hit a snag or need professional advice on your next build, don’t hesitate to contact us. Have you ever had an ugly bracket or bolt ruin the look of a project you were proud of? Let me know in the comments below!