
I remember standing on my deck at sunset, looking at what should have been a sleek, modern finish. Instead, I saw lines of stainless steel that had the structural integrity of cooked linguine. I had spent a small fortune on the materials, but when I realized the ‘official’ tensioning tool cost more than the cables themselves, I balked. I’ve been there, staring at a railing system wondering if I’d just made a very expensive mistake. It’s frustrating. You want that crisp, minimalist look, but the barrier for entry feels like it’s guarded by a paywall of specialized equipment. Today, I’m going to share the exact methods I used to get that perfect ‘ping’ from my cables using basic tools you probably already own. We’re going to bypass the marketing hype and get your deck design looking like a million bucks for next to nothing.
The $200 Tool Trap That Stops Most Deck Projects Cold
When I first started messing with custom railing systems, I made the rookie mistake of trying to tension the cables by hand while tightening the set screws. I ended up with bruised knuckles and a railing that rattled every time the wind blew. I thought I needed the proprietary hydraulic crimper everyone on YouTube was using. But here’s the thing: those tools are great if you’re a professional installer doing this five days a week, but for us homeowners, they’re a luxury, not a necessity. According to the International Code Council (ICC), residential guards must be designed to resist a 200-pound concentrated load, which sounds daunting, but achieving that tension is more about physics than having a specialized kit. If your cables are loose, you’re failing the safety test and ruining the aesthetic.
Can a Regular Wrench Really Do the Job Safely?
I get the skepticism. You’re worried that without the ‘official’ gear, the cables will eventually slip or the posts will warp under the pressure. I had those same doubts. But after years of maintaining my own low-maintenance composite decking, I’ve learned that the secret isn’t in the tool, but in the leverage you create. By using a simple tension cable move, you can achieve the same PSI as a professional kit. The physics doesn’t change just because you aren’t using a tool with a fancy logo. Have you ever started a DIY project only to find out you supposedly needed a tool you’d never use again? Tell me about your most frustrating ‘required’ tool purchase in the comments. We are going to look at how to use a basic vice-grip and a standard turnbuckle to get results that would make a contractor jealous.
Stop the Spin Before You Start Turning
The biggest hurdle isn’t the force you apply; it’s the cable’s desire to twist. When you turn a threaded terminal, the cable wants to follow that rotation. If it spins, you aren’t actually increasing tension; you’re just coiling a spring. To fix this, use a pair of vice-grips lined with a small piece of rubber or heavy tape to protect the finish. Clamp down about two inches from the fitting. This creates a literal anchor for your leverage. This is a vital part of how to select the perfect railing system for every deck and ensure it stays rigid for years. Without this grip, your cables will eventually slacken as the metal un-twists over time. 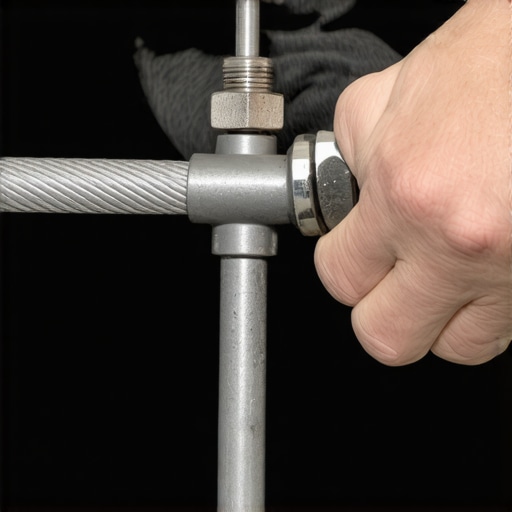
Tighten from the Middle to Save Your Posts
Most people start at the top and work their way down. This is a mistake. It is like tightening the bolts on a car tire; you have to balance the pressure across the entire surface. If you start at the top, you put massive lateral stress on the top of your posts before the bottom is even secure. I learned this the hard way while I was trying to transform your home with stunning deck design strategies on my neighbor’s property. I started at the top rail, and by the time I hit the third cable, the corner post was visibly leaning in by nearly half an inch. I had to back everything off and start over. Now, I always start with the center cable, then move to the ones immediately above and below it, alternating until I reach the top and bottom. This distributes the ‘squeeze’ evenly across the frame.
Protect Your Frame with Internal Blocking
Before you even think about the final ping of the cable, ensure your posts aren’t going to budge. Cable railing can exert hundreds of pounds of cumulative pressure. If you haven’t used the blocking trick that stops railing post wobble, your tensioning efforts will just pull the posts toward each other. I once saw a deck where the homeowner had skipped the blocking; the posts looked like they were bowing toward the center of the deck like a recurve bow. It is not just an aesthetic issue; it is a structural failure. Always use the simple tool for making sure your railing posts are plumb—a standard 4-foot level—periodically as you tighten to ensure the frame is staying square.
The Piano String Test for Perfect Tension
How do you know when to stop? You do not need a digital gauge. I use the 4-inch rule combined with an auditory check. Try to pull the cable away from its path in the center of the span. If you can move it more than 4 inches, it is too loose and will fail code inspections. But the real pro tip is the sound. Give it a sharp pluck. It should have a clear, resonant ping rather than a dull thud. If you are working with long spans, remember that why your pergola needs a mid-span post you didn’t account for also applies to railings; any span over 4 feet usually requires a stabilizing spacer to prevent the cables from being spread apart by weight or wind.
While that perfect ‘ping’ is satisfying, there is a dangerous nuance that most DIY guides skip: the ghost of over-tensioning. I’ve seen homeowners get so obsessed with rigidity that they actually pull their corner posts out of plumb, essentially turning their deck into a giant, expensive bow and arrow. If you feel like you are fighting the material, you probably are. This is exactly why your pressure-treated frame is pulling your composite apart; the wood is a living, breathing organic material that reacts to humidity, while your cables and composite boards have entirely different expansion rates.
Why Does Your Deck Feel Spongy Even with Expensive Boards?
I get asked this constantly by people who spent a fortune on high-end materials. The truth is, the boards aren’t the problem; it’s the joist spacing. If you are noticing a bounce, check why your composite deck feels like a trampoline. Many installers stick to 16-inch centers, but for a truly premium feel, especially with certain composite decking trends, dropping that to 12-inch centers makes a world of difference in foot-feel. It’s an ‘oops’ factor that usually happens during the framing stage and is nearly impossible to fix once the surface is down. Always prioritize the skeleton of the project before the skin.
The Maintenance-Free Myth That Leads to Rot
Everyone tells you that composite is maintenance-free. That is a lie that sells boards but ruins decks. While the boards themselves won’t rot, the debris that gets trapped between them can create a localized moisture trap. I’ve found that composite decking secrets for longevity always involve a simple cleaning routine. If you ignore the organic buildup, you’re just inviting mold to live in the shadows of your expensive deck design. According to the North American Decking and Railing Association (NADRA), nearly 30 million decks in the U.S. are beyond their useful life, often due to moisture-related failures at the connection points that were hidden by ‘maintenance-free’ surfaces.
Your Pergola is Shaking Because You Skipped the Triangles
When it comes to pergola design inspiration, everyone focuses on the rafters and the shade. But if you don’t account for lateral load, your sanctuary will turn into a swaying hazard in the first summer storm. This is why your pergola shakes when the wind blows. Most people think big bolts are enough, but without knee braces or steel reinforced brackets, you have no resistance against ‘racking.’ It’s the same principle as the cable railing—leverage is either your best friend or your worst enemy. Have you ever fallen into this trap of over-prioritizing aesthetics over structural physics? Let me know in the comments. We need to start looking at pergola designs that turn your garden into a sanctuary through the lens of engineering first, and fashion second.
The One Cleaning Tool You Will Actually Use Every Sunday
I have spent thousands on high-end pressure washers, only to realize I was slowly destroying the protective cap stock of my boards. If you want to keep your investment pristine, put the power washer away. I cannot stress enough why you should never use a power washer on composite boards; it forces water into the wood-fiber core and creates micro-fissures that trap dirt. Instead, my ‘secret weapon’ is a soft-bristled deck brush and a simple garden hose. For the actual cleaning agent, I stopped buying the $40 specialized jugs from the big box stores. I found that the vinegar and water mix that cleans composite better than chemicals works wonders without killing the grass surrounding my deck. It breaks down the tannins and pollen that cause those ugly grey spots without stripping the UV inhibitors. This isn’t just a weekend chore; it’s the core of composite decking secrets for ensuring your deck outlasts your mortgage.
How do I keep my composite deck looking new for twenty years?
Consistency beats intensity every single time. Every spring, I do a ‘flashlight test’ on my ledger board and joists. I’m looking for any sign of moisture stay or wood softness. According to the technical specifications in the AWC DCA6 Prescriptive Residential Wood Deck Construction Guide, the connection between the house and the deck is the most common point of structural failure. Beyond the structure, the aesthetics require a gentle touch. If you see an oil stain from a dropped burger, don’t scrub it with a wire brush. Use the soap and sponge fix for oil stains on composite decking immediately. The longer that oil sits, the more it bonds with the plastic polymers in the board, making it nearly impossible to lift later. This proactive approach is what separates a deck that looks ‘lived in’ from one that looks neglected.

What the Next Decade of Outdoor Living Looks Like
We are moving away from the ‘platform in the yard’ phase and into true architectural integration. I predict that pergola trends will soon focus almost entirely on automated climate control—think louvered roofs that close automatically when sensors detect rain. We are already seeing this shift in innovative deck design ideas for 2025, where the line between the kitchen and the patio is completely blurred. Materials are also evolving; the next generation of composite decking trends is leaning toward ‘cool-deck’ technology that uses heat-reflective pigments to keep boards comfortable even in direct July sun. If you are planning a build now, think about how you can transform your home with stunning deck design strategies that account for these smart technologies. The ‘smart deck’ isn’t a gimmick; it’s the next standard for luxury outdoor living. I challenge you to try the vinegar-and-water cleaning method this weekend—you will be shocked at how much better the grain looks compared to harsh chemical cleaners.
What My Most Expensive Mistakes Taught Me About Longevity
I used to think that the most expensive materials would automatically yield the best results, but I was wrong. The real value is in the ‘invisible’ work that happens before the first board is even laid. For example, I finally realized that the deck joist tape test isn’t just a marketing gimmick—it is the difference between a deck that lasts ten years and one that lasts thirty. I also learned that you can’t rush the layout phase; the secret to a perfectly square deck frame is all about taking the time to verify your diagonals before you commit. If you get that foundation wrong, every single piece of trim and every cable will fight you. Finally, remember that tension is dynamic; metals expand in the heat and wood moves with the seasons, so giving your cables a quick check every spring is just a normal part of the homeowner journey.
The Kit I Never Leave the Garage Without
When I’m heading out to a site, I rely on a few specific items that have never let me down. I always use the jig I use for consistent deck screw depth because it ensures that the surface looks uniform and professional, avoiding those ugly dimples that trap water. Beyond hardware, I highly recommend the AWC DCA6 guide—it is the industry standard for residential wood construction and will ensure your project meets code. I also value the wisdom found in local builder forums where real people discuss how different materials hold up in your specific climate. These resources are often better than any glossy brochure found at a big-box store.
Your New Favorite Room is Waiting for You
It is easy to get paralyzed by technical specs and the sheer volume of choices, but don’t let the fear of a ‘wrong’ decision stop you from starting. Once you hear that first ‘ping’ of a perfectly tensioned cable on your custom railing systems, all the stress of the build starts to fade. Your home is your sanctuary, and a thoughtfully executed deck design is one of the best investments you can make for your family’s daily comfort. Don’t wait for the ‘perfect’ time to start; just pick up the level and set that first post. Have you ever been surprised by how much tension a cable actually needs to stay taut without sagging over time? Let me know in the comments below!