
I stood on my back porch last summer, admiring the sunset and the new innovative deck design ideas I had finally finished implementing. Everything looked pristine. I had stained the posts a rich mahogany, the railing was tight, and I felt like the king of the cul-de-sac. Then I leaned against the corner post to adjust a hanging planter. I didn’t fall, but I felt a vibration—a hollow, sickening thud deep inside the timber that didn’t match its solid appearance. It turns out, my posts were rotting from the inside out while looking perfect on the surface. If I hadn’t stumbled onto a simple spray bottle trick used by old-school inspectors, that post might have snapped during our next family barbecue.
Stop Trusting Your Eyes When It Comes to Post Safety
Most of us look for cracks or peeling paint and assume our deck is healthy. That was my first mistake. I spent years thinking that a fresh coat of sealant was enough, but as the experts at the USDA Forest Products Laboratory have noted, wood can lose up to 50% of its structural integrity before decay even becomes visible on the exterior. This is especially true if you are dealing with older timber where the structural vulnerability assessment is often overlooked. I used to just poke around with a screwdriver, but that is invasive and often misses the heart of the post. Today, I am going to show you how a mixture you can make for pennies in a spray bottle will reveal exactly where the wood fibers have collapsed, even if the wood looks brand new. We are going to stop guessing and start knowing.
Is a simple spray bottle actually better than a professional?
I know what you are thinking. You are worried that a DIY hack can’t possibly replace a thousand-dollar structural inspection. I had the same skepticism. I worried that I would miss a spot and end up with a collapsed pergola or a dangerous railing. But here is the reality: professionals use moisture meters and chemical indicators every day; we are just simplifying the delivery. By using a specific surfactant spray, we can see how the wood ‘drinks’ the liquid. Healthy wood resists it; rotten wood gulps it down like a sponge. I once ignored a small soft spot because I thought pressure treated wood still rots was just a myth for newer builds—I was wrong, and it cost me a full post replacement. Have you ever noticed a soft spot on your deck but convinced yourself it was ‘just the grain’? Let me know in the comments, because you might be sitting on a ticking time bomb. Before you even think about grabbing the ice pick test, you need to see how this spray reacts to your posts. It’s the difference between a minor repair and a total structural failure.
Mix Your Detection Fluid for Under a Dollar
You do not need high-end chemicals or expensive laboratory equipment to find out if your wood is failing. A simple mixture of 70% water and 30% isopropyl alcohol—or even just water with a heavy dose of grease-cutting dish soap—acts as a surfactant. This breaks the surface tension of the liquid. Think of it like a dry, compressed kitchen sponge; when it is brand new and tight, water might bead on top for a second. But once those internal fibers have been eaten away by fungi or moisture, the wood becomes a thirsty vacuum. This cheap solution is designed to bypass the surface tension and get straight to the ‘heart’ of the timber. I remember the first time I used this on a neighbor’s property; the wood looked like it had just been stained, but the moment the spray hit the grain, the liquid vanished as if it had fallen into a hole. That was the first sign that the internal structure was toast.
Spray the Base Like Your Deck Health Depends on It
Focus your efforts on the ‘splash zone.’ This is the bottom 12 inches of the post where it meets the concrete pier, the soil, or where water tends to pool. When I was auditing a massive wrap-around project last fall, I sprayed every single vertical support. While the first few posts stayed damp and shiny on the surface, the fourth post turned dark instantly. The liquid did not run down the side in a stream; it was sucked inward. 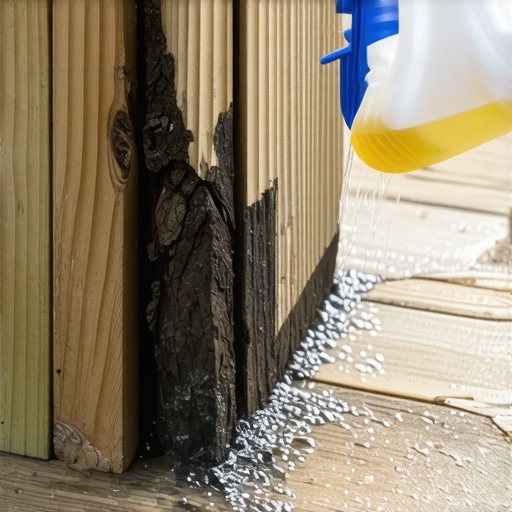 If you see this happen, you are looking at capillary action on steroids. This indicates that the wood’s cellular structure has collapsed, leaving behind a network of microscopic tunnels. This is a much more reliable indicator than just looking for surface mold, especially if you are considering whether to maximize outdoor living with low-maintenance composite decking in the future; you cannot build a heavy new surface on a foundation that ‘drinks’ water.
Spot the Difference Between Surface Dampness and Deep Decay
If the liquid beads up or the wood remains light-colored and the water slowly trickles down to the footing, your fibers are likely still tight and resilient. However, if the liquid disappears in under ten seconds and leaves a dark, matte stain, you have internal ‘pockets’ of air where the cellulose has been destroyed. This is a red flag that the structural vulnerability assessment for checking deck joist rot is no longer optional—it is an emergency. I once ignored a ‘drinker’ post on a pergola because the wood felt hard to the touch. Three months later, a heavy wind caught the canopy and snapped the post at the base like a dry twig.
Combine the Spray Test with Mechanical Probing
Once the spray identifies a suspect area, it is time to verify the depth of the damage. The spray is your scout, but the ice pick test for checking joist strength on older decks is your infantry. Use the spray results to target where you probe. If the pick sinks in more than a quarter-inch with minimal pressure in the same spot the water vanished, you have active rot. This often happens because builders skip the under-joist flashing move that stops post rot, allowing water to sit directly on top of the end grain. If you find multiple ‘drinkers’ near your stairs, you should also check how you select the perfect railing system for every deck to ensure the new weight will not cause a total collapse.
Big Posts Might Be Your Deck’s Silent Killer
Most homeowners believe that swapping a 4×4 post for a massive 6×6 timber is the ultimate safety upgrade. In my experience, this is often a dangerous oversimplification. While a larger post offers more compressive strength, it also creates a massive internal volume of ‘untreated’ heartwood. When I spoke with engineers familiar with the American Wood Protection Association (AWPA) standards, they confirmed a frustrating reality: chemical preservatives often only penetrate the outer inch of large timbers. This means the core of your massive post is essentially raw, unprotected wood. If you use my spray bottle trick and see the base ‘drinking’ water, that moisture is likely migrating to a core that will never dry out. Have you ever fallen into this trap of thinking bigger is always better? Let me know in the comments, because I’ve seen 6×6 posts fail years before their smaller counterparts simply because they trapped internal moisture like a sponge.
Don’t Put a 30-Year Surface on a 5-Year Frame
The biggest mistake I see during the current trend to maximize outdoor living with low-maintenance composite decking is the ‘surface-only’ mindset. You might be tempted to peel off old wood and slap down expensive boards, but this is where the ‘Oops’ factor hits hardest. I’ve walked onto decks that looked brand new from the top, but used the 3-second push test for wobbly railing systems only to find the entire structure swayed. This happens because the new, heavier material hides the fact that your pressure-treated frame is pulling your composite apart from below. Composite is heavy and flexible; it doesn’t provide the same structural ‘stiffness’ as wood planks. If your spray test showed even a hint of rot in the posts, putting composite on top is like putting a marble countertop on a cardboard box. 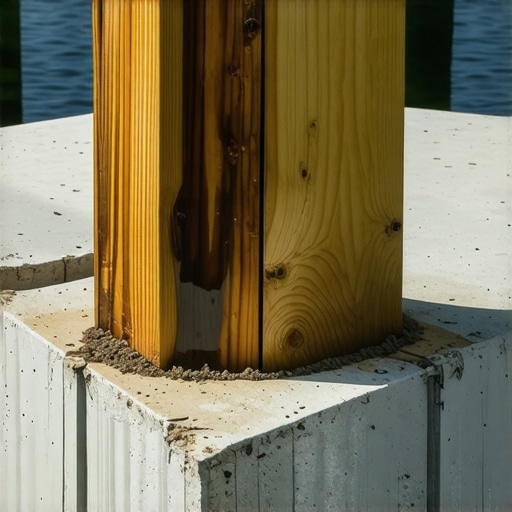
Can your existing joists actually handle the weight of a modern upgrade?
Advanced DIYers often ask if they can just ‘reinforce’ a suspect post. The sophisticated answer lies in the load path. If your post is drinking water, your joists are likely suffering too. You need to look for the structural reason your deck needs a mid-span beam before you invest in high-end aesthetics. According to a study in the Journal of Materials in Civil Engineering, the hydro-thermal expansion of composite can put 40% more stress on fasteners than traditional wood. If those fasteners are anchored into a post that failed your moisture spray test, they will eventually ‘wallop’ out the hole, leading to a sudden, catastrophic shear failure.
Check the Hidden Anatomy of Your Railing Posts
Finally, stop assuming your railing is safe just because the bolts are tight. I once spent a weekend wondering why a client’s railing felt ‘mushy.’ It passed the visual check, but when I applied the surfactant spray to the transition point where the post met the frame, the liquid disappeared instantly. The post was rotting from the bottom up, inside the framing sleeve. This is a common nuance: the hardware stays shiny, but the wood fibers it grips turn to pulp. When you learn composite decking secrets for longevity, you realize that protecting these connection points is more important than the boards themselves. Don’t wait for a railing to give way during a party; use the spray, find the ‘drinkers,’ and replace them before the rot spreads to the main ledger.Once you have identified the weak points in your timber, the focus must shift from discovery to long-term preservation. You cannot just leave those exposed end-grains open to the elements and hope for the best. I have found that the simplest way to prevent future ‘drinkers’ is to seal the top of the post before the cap even goes on.
Give Your Posts a Shield That Actually Works
I never install a vertical support now without using the copper cap trick for extending post life. It is not just about the aesthetic; the copper ions actually react with moisture to create a mild fungicidal environment that discourages rot at the most vulnerable point. If you are dealing with horizontal beams, I swear by the shingle trick for protecting the top of your deck beam. By laying a thin strip of asphalt shingle or heavy-duty flashing tape over the beam before the boards go down, you create a literal umbrella for the wood that usually rots first. This is a move I learned from a master builder who has seen decks last forty years instead of fifteen, simply because the water had nowhere to sit.
How do I maintain structural integrity over the next decade?
The secret is a biannual walkthrough that focuses on the connections, not the cosmetics. I use the joist tape secret for doubling your decks life on every new framing job, but for existing decks, you need to monitor the ‘squeeze.’ This means checking where the wood meets the metal hangers. According to the American Wood Protection Association (AWPA) U1 Standard, wood used in these conditions must be treated for ‘Ground Contact’ (UC4A) even if it is technically above ground, because moisture traps between the wood and metal create a micro-environment for decay. If you see white powdery residue or ‘mushrooming’ wood fibers at these brackets, your treatment is failing. 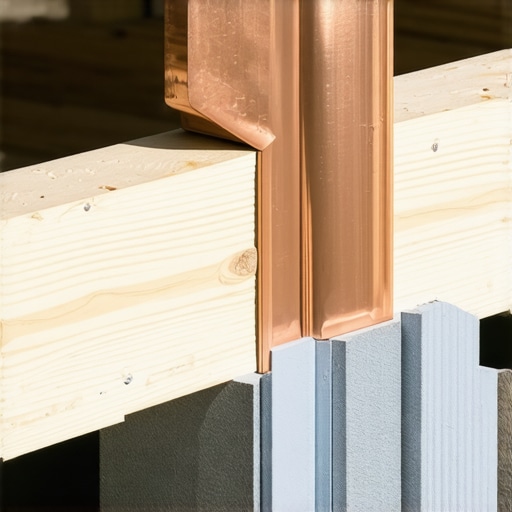
Precision Tools That Save Your Back and Your Budget
I used to struggle with getting my elevations right, especially when trying to elevate your backyard innovative deck design ideas for 2025. Now, I do not even reach for a traditional bubble level for the big stuff. I use the level and laser method for setting pergola heights alone. A rotary laser level allows you to set a consistent benchmark across forty feet of uneven terrain, ensuring your pergola design inspiration from modern to classic looks actually looks professional and not like a funhouse. If your posts are even half an inch off, the stress on your fasteners increases exponentially during a wind event. This is why why most DIY pergolas fail the uplift test in storms; it is rarely the wood that breaks, but the joints that were stressed by poor alignment from day one.
The Future of the Intelligent Backyard
Looking ahead, I predict we are moving toward ‘sensor-integrated’ framing. I am already seeing early adopters install moisture-wicking sensors inside their main carrier beams that sync to a smartphone. While that might be overkill for a small porch, it is the logical next step for those who maximize outdoor living with low-maintenance composite decking. If you are spending twenty thousand dollars on boards, spending a few hundred on a frame-monitoring system is cheap insurance. For now, your best bet is to stay low-tech but high-consistency. Go out there this weekend with your spray bottle and a roll of flashing tape. It is the single best way to ensure your composite decking secrets longevity tips for a lasting deck actually pay off. Stop guessing and start protecting your investment today.I stood on my back porch last summer, admiring the sunset and the new innovative deck design ideas I had finally finished implementing. Everything looked pristine. I had stained the posts a rich mahogany, the railing was tight, and I felt like the king of the cul-de-sac. Then I leaned against the corner post to adjust a hanging planter. I didn’t fall, but I felt a vibration—a hollow, sickening thud deep inside the timber that didn’t match its solid appearance. It turns out, my posts were rotting from the inside out while looking perfect on the surface. If I hadn’t stumbled onto a simple spray bottle trick used by old-school inspectors, that post might have snapped during our next family barbecue.
Stop Trusting Your Eyes When It Comes to Post Safety
Most of us look for cracks or peeling paint and assume our deck is healthy. That was my first mistake. I spent years thinking that a fresh coat of sealant was enough, but as the experts at the USDA Forest Products Laboratory have noted, wood can lose up to 50% of its structural integrity before decay even becomes visible on the exterior. This is especially true if you are dealing with older timber where the structural vulnerability assessment is often overlooked. I used to just poke around with a screwdriver, but that is invasive and often misses the heart of the post. Today, I am going to show you how a mixture you can make for pennies in a spray bottle will reveal exactly where the wood fibers have collapsed, even if the wood looks brand new. We are going to stop guessing and start knowing.
Is a simple spray bottle actually better than a professional?
I know what you are thinking. You are worried that a DIY hack can’t possibly replace a thousand-dollar structural inspection. I had the same skepticism. I worried that I would miss a spot and end up with a collapsed pergola or a dangerous railing. But here is the reality: professionals use moisture meters and chemical indicators every day; we are just simplifying the delivery. By using a specific surfactant spray, we can see how the wood ‘drinks’ the liquid. Healthy wood resists it; rotten wood gulps it down like a sponge. I once ignored a small soft spot because I thought pressure treated wood still rots was just a myth for newer builds—I was wrong, and it cost me a full post replacement. Have you ever noticed a soft spot on your deck but convinced yourself it was ‘just the grain’? Let me know in the comments, because you might be sitting on a ticking time bomb. Before you even think about grabbing the ice pick test, you need to see how this spray reacts to your posts. It’s the difference between a minor repair and a total structural failure.
Mix Your Detection Fluid for Under a Dollar
You do not need high-end chemicals or expensive laboratory equipment to find out if your wood is failing. A simple mixture of 70% water and 30% isopropyl alcohol—or even just water with a heavy dose of grease-cutting dish soap—acts as a surfactant. This breaks the surface tension of the liquid. Think of it like a dry, compressed kitchen sponge; when it is brand new and tight, water might bead on top for a second. But once those internal fibers have been eaten away by fungi or moisture, the wood becomes a thirsty vacuum. This cheap solution is designed to bypass the surface tension and get straight to the ‘heart’ of the timber. I remember the first time I used this on a neighbor’s property; the wood looked like it had just been stained, but the moment the spray hit the grain, the liquid vanished as if it had fallen into a hole. That was the first sign that the internal structure was toast.
Spray the Base Like Your Deck Health Depends on It
Focus your efforts on the ‘splash zone.’ This is the bottom 12 inches of the post where it meets the concrete pier, the soil, or where water tends to pool. When I was auditing a massive wrap-around project last fall, I sprayed every single vertical support. While the first few posts stayed damp and shiny on the surface, the fourth post turned dark instantly. The liquid did not run down the side in a stream; it was sucked inward. If you see this happen, you are looking at capillary action on steroids. This indicates that the wood’s cellular structure has collapsed, leaving behind a network of microscopic tunnels. This is a much more reliable indicator than just looking for surface mold, especially if you are considering whether to maximize outdoor living with low-maintenance composite decking in the future; you cannot build a heavy new surface on a foundation that ‘drinks’ water.
Spot the Difference Between Surface Dampness and Deep Decay
If the liquid beads up or the wood remains light-colored and the water slowly trickles down to the footing, your fibers are likely still tight and resilient. However, if the liquid disappears in under ten seconds and leaves a dark, matte stain, you have internal ‘pockets’ of air where the cellulose has been destroyed. This is a red flag that the structural vulnerability assessment for checking deck joist rot is no longer optional—it is an emergency. I once ignored a ‘drinker’ post on a pergola because the wood felt hard to the touch. Three months later, a heavy wind caught the canopy and snapped the post at the base like a dry twig.
Combine the Spray Test with Mechanical Probing
Once the spray identifies a suspect area, it is time to verify the depth of the damage. The spray is your scout, but the ice pick test for checking joist strength on older decks is your infantry. Use the spray results to target where you probe. If the pick sinks in more than a quarter-inch with minimal pressure in the same spot the water vanished, you have active rot. This often happens because builders skip the under-joist flashing move that stops post rot, allowing water to sit directly on top of the end grain. If you find multiple ‘drinkers’ near your stairs, you should also check how you select the perfect railing system for every deck to ensure the new weight will not cause a total collapse.
Big Posts Might Be Your Deck’s Silent Killer
Most homeowners believe that swapping a 4×4 post for a massive 6×6 timber is the ultimate safety upgrade. In my experience, this is often a dangerous oversimplification. While a larger post offers more compressive strength, it also creates a massive internal volume of ‘untreated’ heartwood. When I spoke with engineers familiar with the American Wood Protection Association (AWPA) standards, they confirmed a frustrating reality: chemical preservatives often only penetrate the outer inch of large timbers. This means the core of your massive post is essentially raw, unprotected wood. If you use my spray bottle trick and see the base ‘drinking’ water, that moisture is likely migrating to a core that will never dry out. Have you ever fallen into this trap of thinking bigger is always better? Let me know in the comments, because I’ve seen 6×6 posts fail years before their smaller counterparts simply because they trapped internal moisture like a sponge.
Don’t Put a 30-Year Surface on a 5-Year Frame
The biggest mistake I see during the current trend to maximize outdoor living with low-maintenance composite decking is the ‘surface-only’ mindset. You might be tempted to peel off old wood and slap down expensive boards, but this is where the ‘Oops’ factor hits hardest. I’ve walked onto decks that looked brand new from the top, but used the 3-second push test for wobbly railing systems only to find the entire structure swayed. This happens because the new, heavier material hides the fact that your pressure-treated frame is pulling your composite apart from below. Composite is heavy and flexible; it doesn’t provide the same structural ‘stiffness’ as wood planks. If your spray test showed even a hint of rot in the posts, putting composite on top is like putting a marble countertop on a cardboard box.
Can your existing joists actually handle the weight of a modern upgrade?
Advanced DIYers often ask if they can just ‘reinforce’ a suspect post. The sophisticated answer lies in the load path. If your post is drinking water, your joists are likely suffering too. You need to look for the structural reason your deck needs a mid-span beam before you invest in high-end aesthetics. According to a study in the Journal of Materials in Civil Engineering, the hydro-thermal expansion of composite can put 40% more stress on fasteners than traditional wood. If those fasteners are anchored into a post that failed your moisture spray test, they will eventually ‘wallop’ out the hole, leading to a sudden, catastrophic shear failure.
Check the Hidden Anatomy of Your Railing Posts
Finally, stop assuming your railing is safe just because the bolts are tight. I once spent a weekend wondering why a client’s railing felt ‘mushy.’ It passed the visual check, but when I applied the surfactant spray to the transition point where the post met the frame, the liquid disappeared instantly. The post was rotting from the bottom up, inside the framing sleeve. This is a common nuance: the hardware stays shiny, but the wood fibers it grips turn to pulp. When you learn composite decking secrets for longevity, you realize that protecting these connection points is more important than the boards themselves. Don’t wait for a railing to give way during a party; use the spray, find the ‘drinkers,’ and replace them before the rot spreads to the main ledger.Once you have identified the weak points in your timber, the focus must shift from discovery to long-term preservation. You cannot just leave those exposed end-grains open to the elements and hope for the best. I have found that the simplest way to prevent future ‘drinkers’ is to seal the top of the post before the cap even goes on.
Give Your Posts a Shield That Actually Works
I never install a vertical support now without using the copper cap trick for extending post life. It is not just about the aesthetic; the copper ions actually react with moisture to create a mild fungicidal environment that discourages rot at the most vulnerable point. If you are dealing with horizontal beams, I swear by the shingle trick for protecting the top of your deck beam. By laying a thin strip of asphalt shingle or heavy-duty flashing tape over the beam before the boards go down, you create a literal umbrella for the wood that usually rots first. This is a move I learned from a master builder who has seen decks last forty years instead of fifteen, simply because the water had nowhere to sit.
How do I maintain structural integrity over the next decade?
The secret is a biannual walkthrough that focuses on the connections, not the cosmetics. I use the joist tape secret for doubling your decks life on every new framing job, but for existing decks, you need to monitor the ‘squeeze.’ This means checking where the wood meets the metal hangers. According to the American Wood Protection Association (AWPA) U1 Standard, wood used in these conditions must be treated for ‘Ground Contact’ (UC4A) even if it is technically above ground, because moisture traps between the wood and metal create a micro-environment for decay. If you see white powdery residue or ‘mushrooming’ wood fibers at these brackets, your treatment is failing.
Precision Tools That Save Your Back and Your Budget
I used to struggle with getting my elevations right, especially when trying to elevate your backyard innovative deck design ideas for 2025. Now, I do not even reach for a traditional bubble level for the big stuff. I use the level and laser method for setting pergola heights alone. A rotary laser level allows you to set a consistent benchmark across forty feet of uneven terrain, ensuring your pergola design inspiration from modern to classic looks actually looks professional and not like a funhouse. If your posts are even half an inch off, the stress on your fasteners increases exponentially during a wind event. This is why why most DIY pergolas fail the uplift test in storms; it is rarely the wood that breaks, but the joints that were stressed by poor alignment from day one.
The Future of the Intelligent Backyard
Looking ahead, I predict we are moving toward ‘sensor-integrated’ framing. I am already seeing early adopters install moisture-wicking sensors inside their main carrier beams that sync to a smartphone. While that might be overkill for a small porch, it is the logical next step for those who maximize outdoor living with low-maintenance composite decking. If you are spending twenty thousand dollars on boards, spending a few hundred on a frame-monitoring system is cheap insurance. For now, your best bet is to stay low-tech but high-consistency. Go out there this weekend with your spray bottle and a roll of flashing tape. It is the single best way to ensure your composite decking secrets longevity tips for a lasting deck actually pay off. Stop guessing and start protecting your investment today.
The Hardest Lesson I Learned About Deck Framing
After years of fixing “minor” issues that turned into major headaches, I realized that wood is essentially a living organism that is constantly trying to return to the earth. One big lightbulb moment was discovering the blocking trick that stops railing post wobble; I used to think a wobbly post just needed a bigger bolt, but it is actually about how the frame distributes the energy. Another hard lesson? Never assume a “clear” sealant is doing its job just because the wood looks wet. If you are not seeing the garden hose test for proper deck water runoff result in immediate beading, your protection has already evaporated. Finally, I have learned that the most expensive deck isn’t the one with the fanciest boards, but the one you have to build twice because you ignored the foundation, perhaps missing the staggered joist trick for ultra long deck spans when you needed it most.
My Essential Kit for Structural Inspections
You do not need a truck full of power tools to keep your structure sound. I always keep a roll of high-quality butyl tape nearby—it is the backbone of the drip-edge trick for protecting deck ledger boards, which prevents the kind of house-side rot that leads to five-figure repair bills. I also recommend checking the AWPA guidelines to understand “Ground Contact” ratings and why certain fasteners fail in high-moisture zones. For those moving into aesthetics, the hidden clip trick for no-visible-screw stairs is my go-to for a professional finish that also reduces water entry points. These simple additions do more for your home’s value than any trendy furniture set ever could.
Step Into a Safer Outdoor Space
Your deck should be a place of relaxation, not a source of constant structural anxiety. By taking thirty minutes once a season to walk around with your spray bottle and a keen eye, you are doing more than just maintenance—you are preserving memories. Whether you are looking to elevate your backyard innovative deck design ideas for 2025 or just want to make sure your current railing is safe for the family, consistency is your best friend. Don’t let the fear of finding a problem stop you from looking; finding it early is the only way to win. You have got the tools and the knowledge now, so go out there and make your outdoor space the sanctuary it was meant to be. Have you ever found a “hidden” pocket of rot during a routine cleaning? Let me know in the comments below—I would love to hear how you handled it!