
I will never forget the sound my deck made the first time I filled up my 450-gallon hot tub. It was not a splash; it was a slow, agonizing creak that resonated right through my kitchen floorboards. I had spent weeks picking out the perfect modern composite decking, but I completely ignored what was happening underneath the surface. I made the classic rookie mistake: I assumed a standard deck frame could handle the weight of a small car filled with water. Spoiler alert: it cannot. If you are dreaming of a backyard spa, you need to stop thinking about aesthetics for a second and start thinking about the dirt. We are going to walk through the math of footings together so you do not end up with a collapsed project and a very expensive repair bill. Have you ever noticed your boards dipping when you walk near your tub area? Let me know, because catching it early is the only way to save your structure.
Why Your Deck is Groaning Under That New Tub
The reality is that water is heavy—unbelievably heavy. According to structural safety data from the International Code Council (ICC), a filled hot tub can exert more than 100 pounds per square foot (psf), while your average residential deck is typically only designed for about 40 psf. When I first started DIYing, I thought I could just double up a few joists and call it a day. I was wrong. I ended up seeing why your composite deck feels like a trampoline firsthand because the load was not transferring to the ground properly. To fix this, you have to understand the tributary load, which is just a fancy way of saying how much weight each individual post is responsible for carrying. If you skip this calculation, you are just guessing with your home’s safety.
Is it really necessary to dig this deep for a portable tub?
Some folks think that because a tub is marketed as portable, it does not need permanent structural support. That is a dangerous myth. You absolutely need a frost line depth for your deck footings regardless of the tub’s name. I once tried to skimp by using pre-cast blocks on a firm patch of grass for a heavy structure. Within one season, the weight had caused the soil to compress, and everything tilted. It looked ridiculous and felt even worse. Today, we are going to look at the soil bearing capacity and the actual diameter of the concrete piers you need to keep everything level. We want to make sure your deck boards around a hot tub stay perfectly flush for years, not just for the first month.
Go Big on Your Footing Diameter
To stop the groaning, you have to think like a structural engineer. The footings are the feet of your project; if they are too small, they will sink into the earth like a stiletto heel in soft mud. For a hot tub, you cannot settle for the standard 12-inch pier. You are looking at 18-inch or even 24-inch diameters depending on your local soil. When I was building a heavy-duty platform last summer, I realized halfway through that my auger was too small. I had to get back in the hole with a shovel and widen those bases by hand to ensure the need a frost line depth for your deck footings was met with enough surface area to distribute the load. Think of it as snowshoes for your tub—the more surface area contacting the dirt, the less likely you are to see a corner dip three inches by next spring.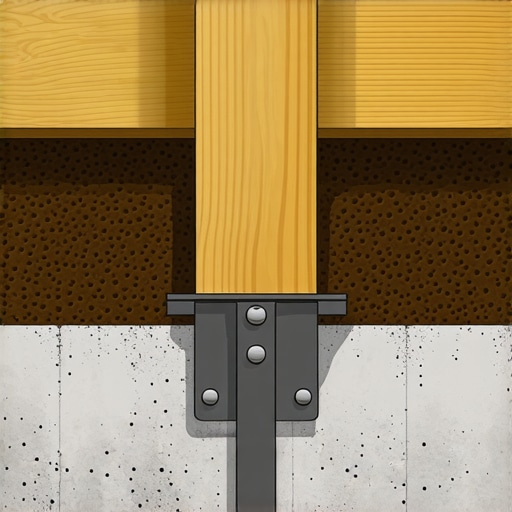
Test Your Soil Before You Pour Concrete
Not all dirt is created equal. Clay holds more weight than sand, but it also expands and contracts with moisture. If you are building on ‘fill’ dirt—the loose stuff contractors dump after excavating a foundation—your tub will sink. I once ignored a soft patch of soil near a client’s retaining wall, thinking a thicker pier would compensate. Three months later, we found the structural reason your deck feels bouncy was actually the pier itself tilting because the soil underneath was essentially soup. Use a soil penetrometer or just the ‘shovel tap’ method to find high-density areas. If the ground feels soft, you need to dig deeper or widen the base further.
Reinforce Your Joists to Stop the Bounce
Even if your footings are solid, the wood between them can still flex. Standard 16-inch on-center spacing is a recipe for disaster under a hot tub. You need to drop that down to 12 inches or even 8 inches directly under the tub’s footprint. This is where I use the double joist trick for perfectly flush picture frame borders, not just for looks, but for raw strength. Doubling up the joists directly under the tub’s edges ensures that the heaviest part of the water weight is sitting on a solid beam of lumber rather than a single 2×10. While you are at it, apply the flashing tape move that doubles the life of your joists. Moisture loves to trapped between doubled-up boards, and rot is the silent killer of structural integrity.
Swap Your 4×4 Posts for 6×6 Brutes
There is a reason why 6×6 posts look better than 4x4s, and it isn’t just about the ‘chunky’ aesthetic. A 6×6 post has significantly more compressive strength and is far less likely to twist or bow under a 4,000-pound load. When the tub is bubbling and people are jumping in, that lateral force needs to be absorbed. A 4×4 can feel like a toothpick when you’ve got half a dozen adults in a tub. Always secure these posts with heavy-duty galvanized brackets rather than just toe-nailing them into the concrete. For the finishing touch, ensure your safety barriers are up to code by following the complete guide to choosing railing systems for safety and style, because a heavy tub requires a rock-solid perimeter.Everyone tells you that switching to composite means you are done with chores. That is the biggest lie in the industry. While why composite decks are the better choice for high traffic areas is true regarding wear and tear, “low maintenance” is not “no maintenance.” If you ignore the organic debris that builds up in the gaps, you are creating a petri dish for mold. I have seen thousand-dollar builds ruined because the owner thought they could treat it like a kitchen floor. And whatever you do, why you should never use a pressure washer on composite is a rule written in blood—well, in ruined warranties. High pressure can etch the surface of the boards, creating permanent scars that catch dirt even faster. To keep your investment looking sharp, stick to a soft-bristled brush and mild soap. Have you ever fallen into this trap? Let me know in the comments.
The Hidden Fastener Trap No One Warns You About
The pro-level “oops” factor that I see most often involves hidden fasteners. Everyone wants that clean, screw-free look, but why hidden fasteners can be a maintenance nightmare becomes clear the moment you need to inspect your ledger or replace a single damaged board in the middle of the deck. Because these clips lock the boards together, you often have to disassemble half the deck just to reach one problem area. If you are building a heavy-load structure like the hot tub platform we discussed, consider using traditional color-matched screws in high-stress zones. This allows for easier access to the joists to check for the structural reason your deck feels bouncy as the years go by.
How do you stop your composite boards from buckling in the summer heat?
This is the nuance that separates the DIYers from the veterans. Composite material is essentially a giant thermometer; it expands and contracts significantly more than natural wood. According to a research paper published in the Journal of Materials in Civil Engineering, the thermal expansion coefficient of wood-plastic composites can be three times higher than timber. If you butt your boards tight against a wall or each other, they will have nowhere to go but up, resulting in crowning or buckling. You must strictly follow the expansion gap rule that stops boards from buckling to allow for this seasonal movement. This is especially critical in areas with direct sun exposure where surface temperatures can skyrocket. 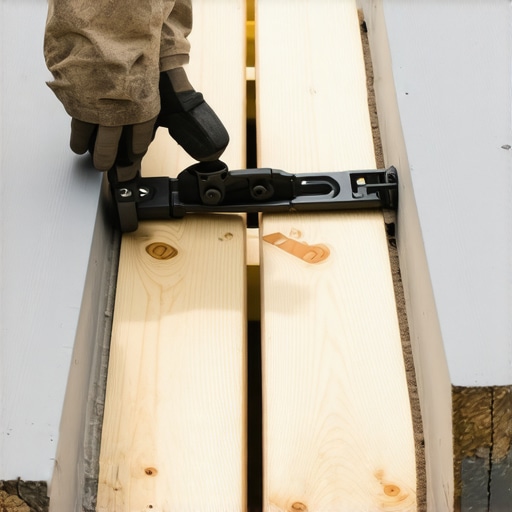
Keep Your Railings From Wrenching Your Joists
Most people think the railing is just a safety handle, but it actually acts as a massive lever. If a 200-pound person leans against the top rail, that force is multiplied at the base of the post. If you just screw your posts into the decking boards, you are asking for a catastrophic failure. I always use the hidden bracket trick for perfectly rigid railing posts to ensure the load is transferred directly into the structural frame, not just the surface skin. For a truly professional finish that lasts decades, combine these structural moves with composite decking secrets and longevity tips for a lasting deck. And don’t forget that water is your frame’s worst enemy; even on a perfectly built deck, you need the 2-degree slope rule for drainage to keep moisture from pooling against your home’s foundation.I have spent enough time staring at crooked boards to know that the secret to a professional finish isn’t just hard work; it’s the tech you use before the first screw even goes in. I used to sketch on napkins, but after a particularly expensive framing error on a multi-level build, I realized why you need a 3D model before buying a single deck board. Software allows you to stress-test your spans and visualize how shadows will fall throughout the day. For the nitty-gritty structural details, I swear by the American Wood Council’s DCA6, which is the industry standard for residential deck safety. If your design doesn’t meet these prescriptive requirements, you are building a liability, not a sanctuary.
Stop Guessing and Start Modeling
Visualizing the transition from your back door to a new pergola that turns your garden into a sanctuary is much easier when you can rotate the view 360 degrees. I personally use specialized CAD tools to ensure my seamless transition from the kitchen to the deck is actually flush. It prevents those awkward step-downs that everyone trips over at housewarming parties. When you see the joist layout in a digital wireframe, you spot the potential conflicts with gas lines or basement windows before they become thousand-dollar problems.
Small Tools That Save Big Projects
Once you are on the job site, the high-tech stuff takes a backseat to clever hacks. If you’re working with those gorgeous midnight-gray or chocolate-brown boards, you will quickly find that a standard graphite pencil is invisible. I always use the pencil trick for marking dark composite boards—usually a white wax pencil or a specialized mechanical carpenter’s pencil—to keep my cuts precise and visible even in bright sun. For railings, don’t just eyeball the balusters. I use the drill guide hack for centered baluster holes to ensure every single spindle is perfectly vertical and spaced to code. It is the difference between a deck that looks DIY and one that looks like a five-star resort. 
How do I maintain my composite deck and pergola over time?
Longevity is a marathon, not a sprint. You should be performing the 15-minute deck inspection every homeowner should do at least twice a year. Check the ledger flashing for signs of water intrusion, look for popped screws, and ensure your composite decking secrets and longevity tips are being followed, like clearing out the organic debris between gaps. If you ignore the gaps, you are essentially inviting moss to eat your pressure-treated frame from the top down. I also recommend a quick annual check using the method to test your deck for structural fatigue, especially after a heavy snow season or a particularly rowdy summer.
What Your Outdoor Space Will Look Like in Ten Years
Looking ahead, I predict we are going to see smart composite materials that change color slightly to alert you to surface heat or internal moisture issues. We are already seeing why capped polymer composite stays cooler than older versions, and that technology is only getting better. If you want to stay ahead of the curve, focus on modularity. Build your structure so you can easily swap out railing panels or add a privacy screen later without tearing up the foundation. **Your move:** Go download a basic 3D modeler this weekend and try to recreate your current deck; you will be amazed at the structural flaws or missed opportunities you spot when you see it in digital wireframe.
Why My First Hot Tub Project Nearly Ended in a Lawsuit
Looking back at my early builds, I realized that my biggest failures weren’t caused by a lack of sweat, but by a lack of skepticism. I used to trust that if a deck felt solid under my feet, it was structural sound. Now, I know better. One lightbulb moment occurred when I used the 10-minute flashlight test for finding hidden ledger rot on a three-year-old deck. The ‘perfect’ composite surface was hiding a crumbling connection to the house.
- The Gravity Trap: Most DIYers focus on vertical load, but they ignore the lateral ‘sway’ that occurs when a tub is full. If you don’t reinforce with knee braces, you’ll eventually see the structural reason your pergola is leaning apply to your deck frame too.
- The Hardware Myth: Galvanized isn’t always enough. In high-moisture zones like a spa area, I’ve switched entirely to stainless steel for structural connectors. It’s more expensive, but it prevents the ‘bleeding’ that ruins the look of your trim.
- The Ledger is Not a Magic Beam: You cannot just bolt a 5,000-pound load to your house’s rim joist and hope for the best. For heavy tubs, I almost always recommend a freestanding structure to keep your home’s envelope safe.
The Small Gear That Saves My Sanity on Site
I don’t believe in buying every gadget at the hardware store, but there are three things I never build without. First, a high-quality moisture meter for your pressure-treated framing; if the wood is too wet when you install it, your composite decking secrets and longevity tips won’t matter because the frame will warp as it dries. Second, I swear by the Simpson Strong-Tie Deck Planner for stress-testing my math before I buy lumber. Finally, don’t overlook how to select the perfect railing system for every deck—having a physical sample of the post-to-deck bracket helps you visualize the structural requirements before you’ve already closed up the floorboards.
Build a Sanctuary That Outlasts the Seasons
Building a deck that can support a hot tub is about more than just avoiding a collapse; it is about creating a space where you never have to worry. When you take the time to widen those footings and double those joists, you aren’t just following code—you’re buying peace of mind. Your investment in composite decking deserves a skeleton that is just as durable as the boards on top. If you ever feel overwhelmed by the math or the dirt, don’t hesitate to contact us for a professional perspective. Your backyard should be your escape, not a source of structural anxiety. Have you checked your joist spacing recently, or are you noticing a little too much spring in your step near the tub? Let me know in the comments below!