
I’ll never forget the smoke alarm screaming at me during my first Labor Day cookout on my brand-new deck. I thought I’d built a masterpiece, but in reality, I’d built a logistical nightmare. The grill was so close to the back door that every time I flipped a burger, the kitchen filled with smoke. Meanwhile, my guests were huddled at the far end because I hadn’t planned for traffic flow. It was a mess. That’s when I realized that a great deck isn’t just a platform of wood or composite decking; it’s a living space that needs a plan. Today, I’m going to show you how to use the Zone Method to stop your outdoor kitchen from feeling like a cluttered afterthought and turn it into a high-functioning extension of your home.
Stop Running Back and Forth and Start Enjoying the Party
The biggest mistake I made early on—and I see neighbors do this all the time—was treating the deck as one big “room.” You wouldn’t put your bed in the middle of your kitchen, so why are we putting the dining table right in the path of the grill? The Zone Method is all about intentionality. It breaks your deck into three specific areas: the Hot Zone (cooking), the Social Zone (dining or bar), and the Chill Zone (lounging). By creating these distinct spaces without walls, you maximize outdoor living without feeling cramped. According to a report by the National Association of Realtors, a well-planned outdoor kitchen can actually recover up to 100% of its value at resale, but only if the layout makes sense for the user.
Is the Zone Method just over-engineering a simple deck?
I get it. You just want to grill some steaks and have a cold beer. You might think drawing zones on a piece of paper is a waste of time. But trust me, once you create a seamless transition from your kitchen to the deck, you’ll understand. Without this structure, you end up with dead space—those awkward corners where nobody sits and leaves start to pile up. I used to think I needed a bigger deck to host better parties. I was wrong. I just needed a better layout. Have you ever found yourself trapped behind a grill, staring at your guests’ backs because the furniture was pointing the wrong way? It’s a lonely place to be. If you’re tired of feeling like a short-order cook in a storage closet, it’s time to rethink the layout. When you start making your deck feel like a living room, everything changes. You stop seeing it as a chore to go outside and start seeing it as your favorite room in the house.
Map Out the Cooking Zone Like a Pro Chef
Think of your deck as a high-volume restaurant line. If the chef has to run across the room to grab a plate, the entire operation grinds to a halt. The ‘Hot Zone’ is your engine room. It needs to be positioned near the house entrance but away from the primary traffic lanes. I learned this the hard way when I built my second deck; I put the grill right in the middle of the main walkway to the stairs. Every time I flipped a burger, someone had to duck or squeeze past. It was dangerous and annoying. Now, I always recommend tucking the cooking station into a corner or an offset ‘bump-out.’ When you use the right materials, like knowing why composite decks are the better choice for high traffic areas, you don’t have to worry about the heavy foot traffic wearing down the finish near your grill station. 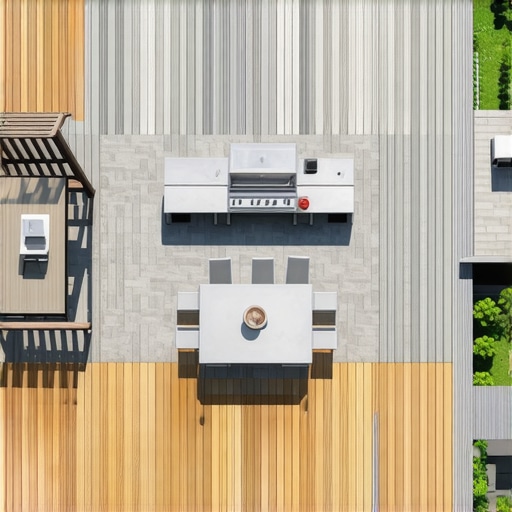
Provide a Landing Zone for Your Hot Platters
One of the most overlooked parts of the Hot Zone is what I call the ‘Platter Landing.’ You need at least 18 to 24 inches of flat surface on both sides of your grill. I once tried to save space by skipping this, thinking I could just use the dining table. I ended up trying to balance a tray of screaming-hot baby back ribs on a 4×4 railing post while trying to kick the screen door open. Two ribs hit the dirt, and my ego hit the floor. If you are tight on space, you can use the cocktail rail hack for easier outdoor entertaining to create a flat, usable surface right on top of your railing system. This allows you to set down tools, spices, or drinks without taking up precious floor space.
Solve the Traffic Jam with a Dedicated Social Buffer
Once the food is off the grill, people naturally migrate. This is where the ‘Social Zone’ comes in. This area needs to be the largest footprint on your deck because it has to accommodate chairs being pulled out and people walking around. A good rule of thumb is to allow 36 inches of clearance around any dining table. If you’re building with modern materials, you must follow the expansion gap rule that stops boards from buckling, especially in these high-traffic dining areas where furniture weight can stress the deck surface. I’ve seen beautiful layouts ruined because the homeowner didn’t account for the ‘chair slide’—the space needed to actually get up from the table without hitting a railing or a planter.
Define Your Sanctuary with Structural Shade
The final piece of the puzzle is the ‘Chill Zone.’ This is where you go when the eating is done and the sun starts to set. To make this area feel distinct from the kitchen, you need verticality. This is where pergola designs that turn your garden into a sanctuary come into play. A pergola acts as a visual ‘ceiling’ that anchors your lounge furniture. When I added a pergola to my current layout, I made sure to follow the sun path rule for placing your deck furniture. There is nothing worse than a ‘Chill Zone’ that is blindingly bright during the exact hours you want to use it. By angling your rafters correctly—using the 15-degree cut that keeps water off your pergola beams—you can create a space that feels private and cool. If your backyard is particularly small, you can always look into the simple way to extend a pergola for more shade without needing to tear down your existing structure.We need to talk about the biggest lie in the outdoor living industry: the phrase ‘maintenance-free.’ I’ve seen homeowners drop $30,000 on high-end boards only to have the frame rot out beneath them in less than a decade. The truth is, while your boards might be invincible, the skeleton holding them up is still vulnerable organic matter. This is one of the most critical composite decking secrets for a lasting deck that the big-box stores won’t tell you. Specifically, why pressure-treated wood still needs maintenance under composite is a nuance that separates the pros from the DIYers. If you don’t protect those joists, you’re essentially building a mansion on a foundation of sand. I always insist on the flashing tape move that doubles the life of your joists. This simple peel-and-stick barrier prevents water from sitting in the screw holes, which is where rot usually starts its slow, silent climb through your frame. 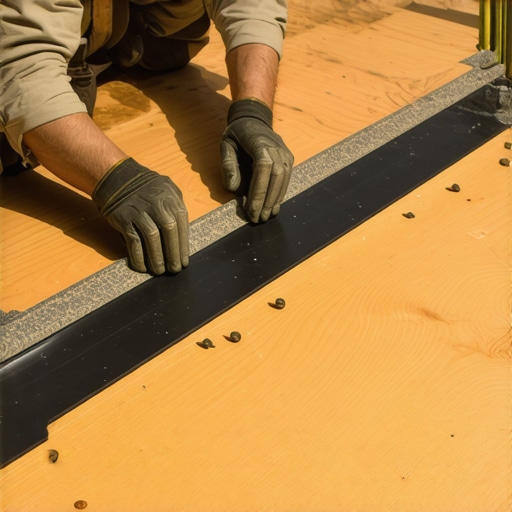
Why Hidden Fasteners Aren’t Always the Premium Choice
Everyone loves the ‘clean look’ of a fastener-free surface, but here is a contrarian view: I actually prefer face-screwing with color-matched plugs in high-traffic areas. Why? Because why hidden fasteners can be a maintenance nightmare becomes very clear the moment a single board in the middle of your deck gets damaged by a dropped grill or a heavy planter. With hidden clips, you often have to ‘unzip’ half the deck starting from the outside edge just to replace one plank. It’s an ‘oops’ factor that can turn a twenty-minute repair into a two-day project.
Why does my brand-new composite deck feel like a trampoline?
If you notice a slight bounce when you walk toward the dining area, it’s usually not the boards—it’s the framing span. Many builders follow the ‘minimum’ code requirements for joist spacing, but composite material is more flexible than natural wood. Understanding why your composite deck feels like a trampoline often comes down to joist centers. For a rock-solid feel, I always recommend 12-inch centers instead of the standard 16-inch. According to data from the North American Deck and Railing Association (NADRA), structural failures are rarely about the surface material; they are almost always linked to the ledger connection or inadequate support. This is why avoiding the ledger board error that causes house leaks is the most important technical hurdle you’ll face. If you get the flashing wrong at the house-to-deck transition, you aren’t just risking your deck; you’re risking the structural integrity of your kitchen wall. Have you ever fallen into this ‘maintenance-free’ trap or noticed a bounce in your step that shouldn’t be there? Let me know in the comments. By the way, if you’re still in the planning phase, I highly suggest you check out innovative deck design ideas for 2025 to ensure your layout is as modern as your materials.I’ve spent thousands of hours on my hands and knees inspecting deck boards, and I’ve realized that the most expensive tool you can own is the one you didn’t use during the planning phase. If you want a space that scales as your family grows, you have to stop guessing and start modeling. I’m a firm believer that you should never buy a single piece of lumber until you see it in a digital space. This is why you need a 3d model before buying a single deck board—it’s the only way to visualize if your ‘Chill Zone’ is going to be shadowed by your chimney or if your railing is going to block the very view you bought the house for.
Keep the Pressure Washer in the Garage
Most people think that cleaning a deck requires high-octane water pressure. They are wrong. In fact, one of the fastest ways to ruin your investment is to ignore the warning on why you should never use a pressure washer on composite. High-pressure streams can etch the surface of the boards, creating tiny grooves that trap more dirt and mold later. I personally use a soft-bristle brush and a mild detergent. And whatever you do, steer clear of the chemical aisle’s harshest stuff. Understanding why you should never use bleach on your composite deck is a game-changer; bleach breaks down the UV inhibitors in the plastic capping, leading to premature fading. 
How do I maintain my composite deck and pergola over time?
Maintenance isn’t about a big weekend project once a year; it’s about micro-habits. For your pergola, you need to watch the joints where the beams meet the posts. I always look for twisting—specifically, learning how to fix a pergola rafter that is starting to twist before it pulls the whole structure out of alignment. For the deck itself, winter is your biggest enemy. I’ve seen people use metal shovels and ruin their boards in one afternoon. Knowing the best way to handle snow removal on composite decks involves using a plastic shovel and working parallel to the boards, never across the gaps. According to the American Wood Protection Association (AWPA) Standard U1, wood used in deck framing must meet specific ‘Use Category’ ratings (like UC4A for ground contact) to ensure longevity. Even with these standards, I still use the simple spray that identifies hidden rot on old deck posts to catch issues before they become structural failures.
The Future of Decking is Smarter Than You Think
Looking ahead to 2025 and beyond, I predict we are going to see ‘Smart Decks’ becoming the norm. We’re already seeing integrated moisture sensors that can be embedded in the joists to alert your phone if the flashing fails. Until those are affordable, you have to be the sensor. If you notice a change in how the floor feels, you need to investigate the structural reason your deck feels bouncy and how to fix it immediately. Don’t wait for a board to pop. I want you to go outside right now and perform the 15-minute deck inspection every homeowner should do. It’s the single best thing you can do to ensure your composite decking secrets for a lasting deck actually pay off in the long run.
The Hardest Realities I Faced While Building My Third Deck
I’ve learned that a beautiful deck can still be a failure if it’s built on bad habits. Here are a few things I wish someone had told me before I picked up a hammer: Furniture isn’t static. People move, chairs slide, and your dining area needs more breathing room than you think. If you don’t plan for the ‘chair slide,’ you’ll constantly be scraping against your railing systems. Color matters for more than just aesthetics. While dark colors look modern, you need to know why black composite decking burns your feet before committing your entire lounge area to a charcoal hue. Planters are hidden killers. I used to love the look of built-in greenery, but why built-in deck planters are a rot-risk is something you only realize when the wood beneath them starts to crumble.
The Tools and Resources I Won’t Start a Project Without
Building a high-end outdoor space requires more than just a saw. I rely on three specific pillars for every build. First, 3D Modeling Software like SketchUp is non-negotiable. Seeing the shadows move across your space helps you apply the sun path rule accurately. Second, I always check the NADRA (North American Deck and Railing Association) safety guidelines; their structural checklists have saved me from major framing errors. Finally, don’t skimp on Butyl Joist Tape. After performing the deck joist tape test on my own projects, I’m a believer for life—it’s the cheapest insurance you can buy for your frame.
#IMAGE_PLACEHOLDER_E#
Stop Dreaming and Start Building Your Oasis
At the end of the day, your deck is about more than just square footage and fasteners. It’s about the Saturday afternoon naps, the smoky smell of a perfectly grilled steak, and the late-night conversations under a pergola. When you apply the composite decking secrets for a lasting deck we’ve discussed, you aren’t just building a platform; you’re creating a legacy of memories. Don’t let the technical details intimidate you. Take it one zone at a time, and soon you’ll maximize outdoor living in ways you never thought possible. Have you ever designed a space only to realize the traffic flow was completely backward? Let me know in the comments!