
I remember the first time I built a deck that sat barely six inches off the grass. It was a masterpiece—clean lines, gorgeous composite decking, and a sleek perimeter that blended perfectly with the lawn. I was so proud of those stunning deck design strategies until the first humid July hit. Every time I stepped out for morning coffee, I didn’t smell pine or fresh air; I smelled a stagnant swamp. Water was trapped, the air was heavy, and my brand-new frame was literally sweating. I had made the classic amateur mistake: I ignored the secret life of the ground beneath my feet.
Give Your Joists Room to Breathe
Building close to the earth feels like a great way to save on stairs and create a seamless transition, but without a plan, you are essentially creating a lid for a giant, wooden petri dish. If you do not manage the water that inevitably slips through the cracks, you are just counting down the days until your joists turn to mush. This is why the drainage move that saves your deck from mold is the single most important thing you will do before the first board is even delivered. I learned the hard way that even the best low-maintenance composite decking cannot save a frame that is constantly sitting in a steam room of its own making.
Is all this extra prep work actually worth the effort?
You might be thinking that a little bit of moisture won’t hurt modern pressure-treated wood. I used to tell myself the same thing to save a weekend of digging. But when you are dealing with how to build a low-profile deck on uneven ground, the lack of airflow is a silent, structural killer. According to the USDA Forest Products Laboratory, wood in high-moisture, low-ventilation environments can experience ‘incipient decay’—a stage where the wood loses its strength long before you see a single mushroom or soft spot. I once had to rip up a three-year-old frame because the joists had the structural integrity of wet cake. It was an expensive, back-breaking lesson that I never want to repeat. Have you ever noticed a weird musty smell coming from under your patio boards after a summer storm? If so, reach out to me through our contact page because we need to talk about your drainage slope before the rot takes hold. Understanding how to divert water and promote airflow is the difference between a deck that lasts thirty years and one that fails in five.
Stop Treating Your Backyard Like a Bathtub
To keep your deck from becoming a rot-trap, you have to start with the dirt. I used to think a few bags of gravel would solve everything, but I once watched a client’s backyard turn into a miniature lake because the ground was perfectly flat. Before you even think about posts, you need to perform the garden hose test for proper deck water runoff. Turn that hose on full blast and watch where the water sits. If it doesn’t move away from the house, you are building on borrowed time. I spent three days digging a trench on my last project just to satisfy the 2-degree slope secret for dry under deck storage, and even though we weren’t storing anything under that six-inch gap, it meant the wood stayed dry. 
Kill the Rot Before It Starts
Once your ground is sloped, you have to protect the wood that faces the sky. Moisture loves to sit in the tiny gap between your deck board and the joist. This is why the deck joist tape test is so revealing; if you don’t tape or seal those tops, the screws act like straws, sucking water down into the heart of the lumber. On a job last summer, I took it a step further and decided to paint your deck joists black under composite. It wasn’t just for the sleek, hidden look—that black exterior-grade paint adds a hydrophobic layer that helps water bead off rather than soaking in.
Square Your Frame with High School Math
I once built a 12×16 frame that was nearly three inches out of square because I trusted a cheap plastic speed square. By the time I got to the last row of boards, I had to rip a board into a long, ugly wedge to make it fit. It looked amateur and cost me a full day of rework. Now, I never start without the 3-4-5 triangle move for squaring up a new deck frame. It is the only way to ensure your composite decking lines up perfectly with your house. If your frame is a trapezoid, your deck will always look like it is trying to run away from the foundation.
Manage the Expansion Gap
Composite boards are not like wood; they don’t just sit there. They grow and shrink like they are breathing. If you butt them tight against your house, they will buckle and warp the moment the sun hits them. I always use the cardboard spacer trick for consistent board gaps to ensure there is breathing room between every plank. You also need to specifically learn how to stop composite deck boards from expanding into your siding, or you’ll find your vinyl siding popping off the wall by August. A little bit of foresight during the framing and spacing phase prevents a massive headache when the seasons change.Common wisdom suggests that once you upgrade to composite decking, your maintenance days are officially over. But here is the contrarian truth that most big-box stores won’t tell you: your deck is only as durable as the pressure-treated skeleton hiding underneath. I’ve seen homeowners spend fifteen thousand dollars on premium boards only to have the entire surface look like a roller coaster within three seasons. This happens because why your pressure-treated frame is pulling your composite apart is a real, structural phenomenon. As the green lumber in your frame dries and twists over time, it fights against the dimensionally stable composite. This internal war can shear off hidden fasteners or create unsightly gaps that no amount of decorative trim can hide.
Stop Building Drunk Railings That Wobble
Let’s talk about the ‘oops’ factor that haunts many DIY projects: the shaky railing. You know the feeling when you lean on a handrail and it gives a few inches? That isn’t just annoying; it is a structural failure waiting to happen. Most people simply lag bolt their posts to the rim joist, but that relies entirely on the wood grain not splitting under pressure. I always insist on using the blocking trick that stops railing post wobble. By installing solid internal blocking and tying the post into the structural joists, you create a rock-solid lever arm. Have you ever fallen into this trap of a wobbly railing? Let me know in the comments, because there is usually a way to stiffen it up without tearing the whole thing down. 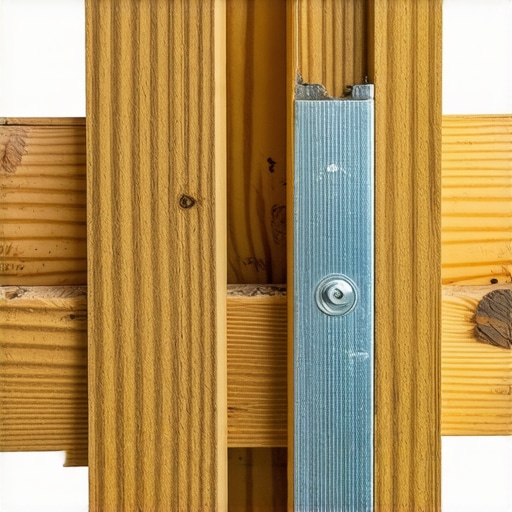
Can a heavy pergola actually lift off the ground during a storm?
It sounds counterintuitive because wood is heavy, but a pergola is essentially a giant kite. In high-wind scenarios, the flat rafters create massive amounts of lift. This is why most DIY pergolas fail the uplift test in storms; they are built to stay down by gravity alone, rather than being anchored against upward force. According to the North American Deck and Railing Association (NADRA), nearly half of the 40 million decks in the U.S. are past their safe life expectancy, often due to these overlooked connection points. I’ve transitioned to using the steel bracket move for high-wind pergolas to ensure the structure is physically locked to the footings.
The Secret to Longevity is Under the Boards
If you want a space that lasts thirty years, you have to look beyond the aesthetics. While we all want those composite decking secrets for a beautiful finish, the real pros focus on the hardware. Using the wrong fasteners is a classic advanced mistake. I’ve seen beautiful installs ruined because someone used a standard screw where the 3-inch screw mistake that ruins composite joists caused the wood to split and rot prematurely. If you are ever unsure about the structural integrity of your existing frame, don’t guess. Reach out via our contact page and let’s make sure your foundation is as solid as your vision.
The Gear That Separates Pro Decks from Shaky DIYs
I used to eyeball my joist heights and hope the crown of the wood would even out under the weight of the boards. It never did. Now, I never start a project without using the string line trick for leveling deck joists before decking. If you want that glass-smooth surface, you have to be obsessive about the plane of your frame. For vertical structures, I’ve ditched the old bubble level for the level and laser method for setting pergola heights alone. A rotary laser level might cost a few hundred bucks, but it pays for itself the first time you don’t have to climb a ladder six times to check a measurement. When it comes to the actual fastening, I rely on the jig i use for consistent deck screw depth. Nothing ruins the look of high-end composite decking trends faster than screws driven at different depths, creating a literal minefield of shadows and tripped-up toes.
Stop Power Washing Your Investment Away
The biggest mistake I see homeowners make—and I’ve been guilty of it too—is reaching for the pressure washer the moment the deck gets a little muddy. I’ve seen 3000 PSI streams literally shred the protective capping on expensive boards. This is why you should never use a power washer on composite boards; it creates micro-fissures that trap dirt and mold, making the deck harder to clean in the long run. Instead, I stick to the vinegar and water mix that cleans composite better than chemicals. It is gentle, cheap, and won’t kill your prize-winning hydrangeas. According to the American Wood Protection Association (AWPA) Use Category UC4A standards, wood longevity is heavily dependent on maintaining the integrity of the surface treatments and avoiding mechanical damage that allows moisture to penetrate the core.
How do I keep my composite looking new for decades?
Maintenance isn’t just about cleaning; it’s about surveillance. Every spring, I perform how to test your deck for structural fatigue by checking the ledger connections and the hardware for any signs of corrosion. Even the best composite decking secrets won’t save a deck if the hardware is failing from the inside out.
Smart Sensors are the Future of Outdoor Living
Looking ahead, I predict we are going to see a massive shift toward ‘smart decks.’ We are already seeing the integration of moisture sensors embedded within the joists that can alert your phone if a leak occurs under a second-story drainage system. As we move toward 2026, expect to see more innovative deck design ideas for 2025 that focus on these ‘invisible’ technologies. If you want to stay ahead of the curve, try the vinegar-based cleaning method this weekend—it’s the simplest way to preserve your boards without the risk of professional-grade damage. If you have questions about your specific frame’s health, reach out to me via our contact page and we can take a look at your setup together.
The Hardest Lesson I Learned About Structural Framing
After years spent working in the mud, my biggest lightbulb moment wasn’t about a specific power tool; it was the realization that you cannot out-decorate a failing foundation. I have seen homeowners get distracted by the latest composite decking trends while their frame was essentially a ticking time bomb of moisture and rot. Your deck is a living ecosystem, and if you don’t treat the skeleton with the same respect as the surface, the surface will eventually betray you. One of my most trusted composite decking secrets for longevity is ensuring the frame is over-engineered rather than just ‘good enough.’ It is the difference between a deck that creaks with every footstep and one that feels as solid as concrete.
Another hard truth: never skimp on the safety details that guests will never see. I used to think railings were primarily for looks until I watched a post fail under the simple weight of a leaning friend. That experience is why I always keep the complete guide to choosing railing systems for safety style as my baseline reference. It isn’t just about meeting local building codes; it’s about the peace of mind you feel when you know your structure is rock-solid.
The Toolkit That Saves My Back and My Sanity
If you are serious about completing a pro-level build, you need more than just a hammer and a prayer. Here are the specific resources and tools I never step onto a job site without:
- Moisture Protection Strategy: I swear by the shingle trick for protecting the top of your deck beam. It is a cost-effective, old-school move that creates a massive barrier against standing water where your beams are most vulnerable to decay.
- Precision Alignment Tools: Stop relying on your eyes alone. A rotary laser level and a high-quality chalk line are non-negotiable for keeping your spans straight and your heights consistent.
- Architectural Inspiration: Don’t just build a box. Look at pergola designs that turn your garden into a sanctuary to see how structural elements can double as artistic focal points for your property.
Your Future Oasis Awaits
Building your own outdoor space is one of the most rewarding home improvement journeys you can take. It is the setting for your future summer memories—the late-night dinners, the quiet mornings with a cup of coffee, and the deep pride that comes from knowing you built it to last for decades. Don’t let the technical hurdles or the framing math intimidate you. Every master builder started exactly where you are now: staring at a pile of lumber and a vision. If you ever hit a wall or just want a professional second opinion on your plans, don’t hesitate to reach out through our contact page. We are here to help you cross the finish line with confidence. Have you ever started a project only to realize the ground was way more uneven than it looked on the surface? Let me know your ‘oh no’ moment in the comments below!