
I’ll never forget the first time I stood back to admire my handiwork on a beautiful cedar deck, only to realize the entire railing looked like a drunken sailor leaning into the wind. The deck had a slight slope for drainage—something I learned is vital for [the 2-degree slope secret for dry under deck storage](https://deckforgebuilders.com/the-2-degree-slope-secret-for-dry-under-deck-storage)—but I hadn’t accounted for how that slope would fight my railing posts. I spent four hours trying to brute-force those posts into being plumb before I realized I was fighting physics. That’s when an old contractor buddy showed me the shim trick, and honestly, it felt like cheating. Today, we’re going to fix that lean once and for all, ensuring your [custom railing systems](https://deckforgebuilders.com/transform-your-outdoor-space-custom-railing-systems-for-safety-and-style) look professional and, more importantly, stay safe. [image]
Why My First Sloped Railing Looked Like a Rollercoaster
It was back in 2014, and I was building a wrap-around deck for a friend. I thought I knew everything about [how to select the perfect railing system for every deck](https://deckforgebuilders.com/how-to-select-the-perfect-railing-system-for-every-deck). I had my level, my impact driver, and a lot of confidence. But the moment I started mounting the posts on the sloped portion of the deck, everything went sideways—literally. I made the classic rookie mistake of over-tightening the downhill side of the mounting bracket, thinking I could just pull the post into a plumb position. I ended up with a [railing bracket that snapped in the cold](https://deckforgebuilders.com/why-your-railing-bracket-keeps-snapping-in-the-cold) and a post that still wasn’t straight. The problem is that decks aren’t actually flat; they are designed to shed water. When you put a square post base on a sloped surface, that post is going to tilt. You can’t just screw it down and hope for the best. Have you ever spent an entire afternoon staring at a post, wondering if your eyes were playing tricks on you, only to realize the bubble on your level was lying? According to the North American Deck and Railing Association (NADRA), railing failure is a leading cause of deck accidents, often because the connection between the post and the frame is compromised by installers trying to make it fit through sheer force. That’s where the shim comes in. By using a small, tapered piece of weather-resistant material under the low side of the post base, you create a level seat for the post to sit on. It’s the difference between a wobbly, dangerous rail and one that feels like a stone wall.
Will a piece of plastic really keep your railing from wobbling?
It’s a fair question to be skeptical. How can a tiny shim—sometimes only an eighth of an inch thick—provide the structural integrity needed for a safety feature? The trick isn’t just the shim itself; it’s using it in conjunction with [the hidden bracket trick for perfectly rigid railing posts](https://deckforgebuilders.com/the-hidden-bracket-trick-for-perfectly-rigid-railing-posts). When you shim correctly, you aren’t just filling a gap; you are ensuring that the tension from your bolts is distributed evenly across the base of the post rather than putting all the stress on one edge of the bracket. If you don’t get this right, you’ll find yourself reaching for [the simple tool for making sure your railing posts are plumb](https://deckforgebuilders.com/the-simple-tool-for-making-sure-your-railing-posts-are-plumb) every single time someone leans against the rail. Trust me, nobody wants a spongy feeling when they’re looking out over their backyard.I learned the hard way that you can’t just slap a level on the side of a post and call it a day. You need to treat the post base like the foundation of a house. Before you even think about shims, check the health of the wood underneath. If you’re working on an older structure, use the simple spray that identifies hidden rot on old deck posts to ensure the rim joist isn’t soft. If it’s mushy, no amount of shimming will save you.
Prep Your Surface for a Perfectly Plumb Post
I once spent an hour trying to level a post only to realize a stray piece of construction debris was lodged under the bracket. Sweep the area clean. Because of the 2-degree slope secret for dry under deck storage, your deck surface is naturally tilted. You aren’t fighting a mistake; you’re fighting intentional design. If you ignore this slope, your railing will look like it’s trying to escape the house.
Identify the Downhill Side of the Bracket
Set your post in place and use the simple tool for making sure your railing posts are plumb. You’ll see a gap between the post base and the deck on the downhill side. This is where your shims will live. In my early days, I tried to use cedar shims, but they eventually compressed and rotted under the weight. Now, I only use high-density plastic or horseshoe shims. They don’t react with the chemicals in pressure-treated wood, which is one of the composite decking secrets longevity tips for a lasting deck.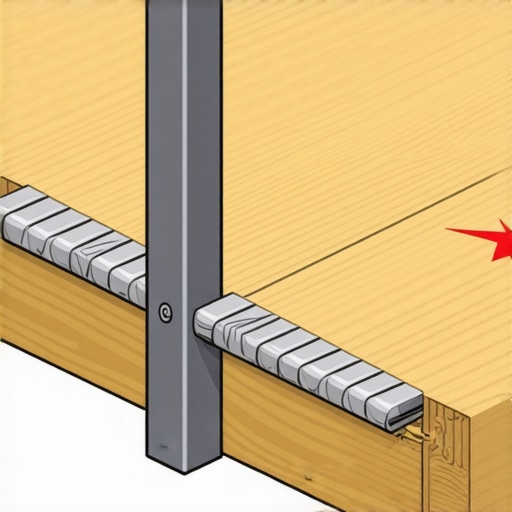
Tighten Your Bolts Like You’re Tuning a Guitar
Don’t just crank down one bolt at a time. This is where most DIYers fail. If you tighten the high side first, you’ll pin the post at an angle and won’t be able to slide your shims in. Start all four bolts by hand. Slowly tighten the downhill bolts while checking your level. It’s a rhythmic process. I remember a project in 2018 where I rushed this, snapped a bolt, and had to drill out the remains—a two-minute task turned into a two-hour nightmare. Go slow.
Reinforce the Frame to Eliminate Every Last Bit of Wobble
Even a perfectly plumb post can wobble if the deck frame is weak. This is especially true with innovative deck design ideas that elevate your homes curb appeal, where posts are often mounted on the outside of the rim joist.
The Magic of Solid Blocking
The secret to a rock-solid feel is the blocking trick that stops railing post wobble. You need to sandwich the post between the rim joist and a piece of solid blocking inside the frame. This transfers the leverage of the railing into the entire deck structure rather than just the single outer board. For even more stability, I like to use the zigzag pattern for stronger deck framing for my internal joist layout to prevent the frame from twisting.
Why Metal Brackets Beat Wood Every Time
If you want a forever deck, incorporate the hidden bracket trick for perfectly rigid railing posts. Metal tension ties that connect the post directly to the floor joists are the gold standard. They prevent the rim joist from rolling outward over time. This is the same logic behind the steel bracket move for high wind pergolas; mechanical fasteners are always superior to wood-on-wood friction.It’s a common trap to assume that once the posts are plumb and the boards are down, the job is done. But here’s where I get a bit controversial: everyone tells you that hidden fasteners are the only way to go for a premium look. I disagree. In my years on the job, I’ve seen why hidden fasteners can be a maintenance nightmare. If a single board in the middle of your layout warps or gets gouged, you’re looking at a massive headache to swap it out. I’ve transitioned back to using high-quality, color-matched face screws on many projects because they allow for much easier repairs down the line. It’s about being a realist, not just a stylist. One major ‘oops’ I see DIYers—and even some pros—make is ignoring the thermal expansion of these materials. If you don’t leave enough room at the ends, you’ll eventually see why your composite boards are crowning and how to fix it. I’ve seen decks literally push against house siding with enough force to crack the trim.
Does ‘Maintenance-Free’ Actually Exist in the Real World?
The short answer is no. Even the most expensive composite decking trends durable solutions for modern outdoor living require care. According to research cited by the International Association of Certified Home Inspectors (Interachi), the expansion coefficient of composite materials can be significantly higher than natural wood. This is why you need to be obsessed with your gap spacing. If you tighten everything down during a 50-degree morning, those boards will buckle when the 90-degree afternoon sun hits them. This thermal movement is also why your pressure-treated frame is pulling your composite apart; the two materials are constantly dancing at different rhythms.
Stop Treating Composite Like It’s Hardwood
The biggest mistake you can make is following the 16-inch-on-center rule for your joists without checking the manufacturer’s specific span ratings. For many high-end brands, 12-inch spacing is the only way to prevent that ‘walking on a sponge’ feeling. It’s the difference between a deck that feels solid and why your composite deck feels like a trampoline. I’ve had to go back and retro-fit blocking on countless decks where the homeowner was unhappy with the ‘bounce’ because they tried to save a few hundred dollars on framing lumber. Don’t be that person. Have you ever fallen into this trap of prioritizing aesthetics over future maintenance? Let me know in the comments below, because I’d love to hear your stories—and how you fixed them.
When I first started, I thought a standard drill and a box of screws were all I needed to be a pro. I was wrong. It wasn’t until I started using the jig I use for consistent deck screw depth that my projects stopped looking like a DIY experiment and started looking like a showroom. This tool prevents the screw heads from mushrooming the composite material, which is a total eye-sore. Another trick that sounds crazy but works is the soap slippage method for pulling composite boards tight. I use a tiny bit of dish soap on the side of a stubborn, bowed board to help it slide into place without scarring the finish. According to the Simpson Strong-Tie Deck Connection and Fastening Guide, ensuring these tight, precise connections isn’t just about looks—it’s about structural lateral load resistance. If you’re fighting a warped joist, skip the brute force and use the clamp and lever move for straightening bowed 2x10s. It saves your back and your sanity.
How do I keep my deck looking fresh without the chemicals?
The most common question I get is how to clean a deck after a brutal winter. Most people reach for the pressure washer, but why you should never use a power washer on composite boards is simple: it can permanently etch the surface and void your warranty. Instead, I always recommend the vinegar and water mix that cleans composite better than chemicals. It’s gentle, cheap, and won’t kill your landscaping. If you’re dealing with older wood, keep an eye on the rafters because why pergola rafter tails always rot first is usually due to end-grain water absorption. I’ve started using the 15-degree cut that keeps water off your pergola beams to mitigate this. Looking ahead, pergola trends crafting shade elegance in your outdoor space are moving toward motorized louvers and integrated smart sensors that detect rain. It’s an exciting time to be building. Before you start your next row of boards, I want you to try the cardboard spacer trick for consistent board gaps—it’s a low-tech way to ensure a high-end result.
The Hardest Lessons Learned on the Business End of a Level
Looking back at that first ‘drunken sailor’ railing, I realize my mistake wasn’t just technical; it was a lack of respect for the materials. Wood and composite aren’t static; they are living, breathing elements that respond to the environment. I used to think that over-tightening was a sign of strength, but after seeing why your railing bracket keeps snapping in the cold, I learned that flexibility and precision beat brute force every time. Another lightbulb moment was realizing that the deck surface is never truly flat because of the 2-degree slope secret for dry under deck storage. You have to work with gravity, not against it. Lastly, never underestimate the power of internal structural health; I always recommend performing how to test your deck for structural fatigue before adding a heavy new railing or pergola.
The Gear That Separates Pros from the Weekend Warriors
If you’re serious about a professional finish, you need more than just a standard drill. I never step onto a job site without the jig I use for consistent deck screw depth to ensure those composite boards don’t mushroom or tear. For anyone dealing with older structures, the 10-minute flashlight test for finding hidden ledger rot is the single most important safety routine you can adopt. I also highly recommend keeping a pack of high-density plastic horseshoe shims in your belt—they are the unsung heroes of a straight rail. For those looking for design inspiration, I often point people toward transform your home with stunning deck design strategies to help visualize the final architectural flow before the first board is even cut.
#IMAGE_PLACEHOLDER_E#
Build a Sanctuary That Stands the Test of Time
At the end of the day, we aren’t just building platforms; we’re building the backdrop for your family’s summer nights and quiet morning coffees. Whether you are aiming for pergola designs that turn your garden into a sanctuary or a high-performance maximize outdoor living with low maintenance composite decking, the effort you put into those small details—like shimming a post or choosing the right fastener—pays off for decades. Don’t be afraid of the slope or the thermal expansion; embrace the process of building it right the first time. Your railing systems are the most visible part of your project, so take that extra ten minutes to get them plumb. If you have questions about your specific layout, you can always contact us for more tailored advice. Have you ever fought a losing battle with a wobbly post base? Let me know your story in the comments below!